Flutter and Firebase, both Google Products make it seamless and powerful if used together. The best part about Firebase is you can use it for all mobile platforms, Android, iOS, and even Fuchsia. You can also use it for Web Development written in any language. So what is Firebase, you ask? Firebase is also an app development platform but is used for the back-end which usually includes a database, authentication, and much much more, and most of all, its free of cost for production and testing use.
Firebase Products
- Cloud Firestore
- Firebase ML
- Cloud Functions
- Authentication
- Hosting
- Cloud Storage
- Realtime Database
Various other features of Firebase also include:
- Google Analytics and Crashlytics
- Performance Monitoring
- Test Lab and A/B Testing
- App Distribution and Cloud Messaging
Firebase is evolving and bringing in brand new features all the time, so these are the current products as per September 2020. You can read about more Firebase Products at their website.
Getting started
To get started, create a Flutter Project. If you don't know how then get back to my previous post here.
Clear the entire main.dart file except for the main function and the import statements.
import 'package:flutter/material.dart';

void main() {
  runApp(MyApp());
}
Now navigate to your pubspec.yaml file. This is a configuration file for your Flutter App where you are going to import and add firebase packages to your Flutter App. You can also add any 3rd party packages that you need for your app as well in your pubspec.yaml file.
Go to Dart Packages. This is where you can get access to all 3rd party packages needed for Flutter, usually made by the Flutter team and as well as any individual who wants to contribute to the community for easy mobile development. Search for Cloud Firestore and open cloud_firestore package which would be the first link. Dart Packages are similar to Cocoapods if you have experience with iOS Swift Development. So what is Cloud Firestore?
Cloud Firestore
Cloud Firestore is a flexible, scalable NoSQL cloud database to store and sync data for client and server-side development. It is available in native Node.js, Java, Python, Unity, C++, and Go SDKs, in addition to REST and RPC APIs. Users can store data in documents that contain fields mapping to values. These documents are stored in collections, which are containers for your documents that you can use to organize your data and build queries.
So, by the end of this post, you'll be able to read, write, and update data on Firestore dynamically through your Flutter App.
Open your Cloud Firestore package on pub.dev and go to the installing tab.

Copy the below tag
cloud_firestore: ^0.14.0+2
and paste it in your dependencies section in your pubspec.yaml file and run flutter pub get to get the package. You'll already see that under dependencies, flutter SDK is being used as well, do not copy it directly below flutter, as pubspec.yaml is prone to indentation, ident it under dependencies or the program will think that cloud_firestore is a part of flutter which is not. It would somewhat look like this:
dependencies:
  flutter:
    sdk: flutter
  cloud_firestore: ^0.14.0+2
The number along with cloud_firestore is its version number and you can get the previous version of Firestore if you want, by navigating to versions on your Dart Packages website, under cloud_firestore. By adding ^ to your version number, it would use all versions above the mentioned package number only. In case, you don't want to use then you can leave as
cloud_firestore:
Now, let's set up Firebase, head on to https://firebase.google.com, and sign in to your Google Account and now click on Go To Console, near your user picture.

Click on add new project and you'll be redirected to a page where you can add your name, so let's call it MyFlutterApp. Now, you'll be asked if you want to enable Google Analytics, if it's enabled then disable it for now, as we don't need it now and we can enable later if we need it. And voila, your new project is made on Firebase.
Now your project should open by default, if it doesn't then go back to console.firebase.google.com and open it from there.
Now, let's begin by adding our app.

Android Support
- Registering the app
Click on the Android icon, which would redirect you to the following page

Your Android app package name can be found from your AndroidManifest.xml file at the following location [projectname]\android\app\src\main\AndroidManifest.xml
Here you'll find your package name on the top, you can change this as per your wish, in my case it is "com.example.myflutterapp"
<manifest xmlns:android="http://schemas.android.com/apk/res/android"
    package="com.example.myflutterapp">
Changing this package name would affect nothing, but you have to follow the basic package name convention which would be "com.[anypackagename].[appname]"
You can also change your app label, which is your app name running on your device in your AndroidManifest.xml under your android:label
Now copy your package name and add your app name as you wish, it is optional, and skip the SHA-1 certificate signing for now. Go ahead and register your app now.
- Downloading Config file
Now we have to download the Firebase configuration file into our Flutter project, this file contains our API Key and configuration for Flutter to start working on with Firebase.

So go ahead and download google-services.json and paste the downloaded file inside of the android/app directory within of your project.
- Firebase SDK configuration
You now need to update the Android Gradle file to include the Google Services plugin. Open android/build.gradle and change it to include the following:
buildscript {
  repositories {
    // Check that you have the following line (if not, add it):
    google()  // Google's Maven repository
  }
  dependencies {
    ...
    // Add this line
    classpath 'com.google.gms:google-services:4.3.2'
  }
}

allprojects {
  ...
  repositories {
    // Check that you have the following line (if not, add it):
    google()  // Google's Maven repository
    ...
  }
}
Now similarly, change the gradle file at android/app/build.gradle with the below code to include the following:
apply plugin: 'com.android.application'

dependencies {
  // add the Firebase SDK for Google Analytics
  implementation 'com.google.firebase:firebase-analytics:17.2.0'
  // add SDKs for any other desired Firebase products
  // https://firebase.google.com/docs/android/setup#available-libraries
}
...
// Add to the bottom of the file
apply plugin: 'com.google.gms.google-services'
And that's it, you are good to go.
iOS Support
- Registering the app
Go back to the dashboard and add an iOS app

Again, you'll need an iOS Bundle ID, which I recommend to keep the same as that of Android to maintain consistency in the project.
To verify if your iOS Bundle ID is same as that of Firebase, open your project in XCode and by launching ios/Runner/Runner.xcodeproj and changing the Bundle identifier under General.
Now click Register App to continue to the Config File.
- Downloading Config file
Now we have to download the Firebase configuration file into our Flutter project, this file contains our API Key and configuration for Flutter to start working on with Firebase.
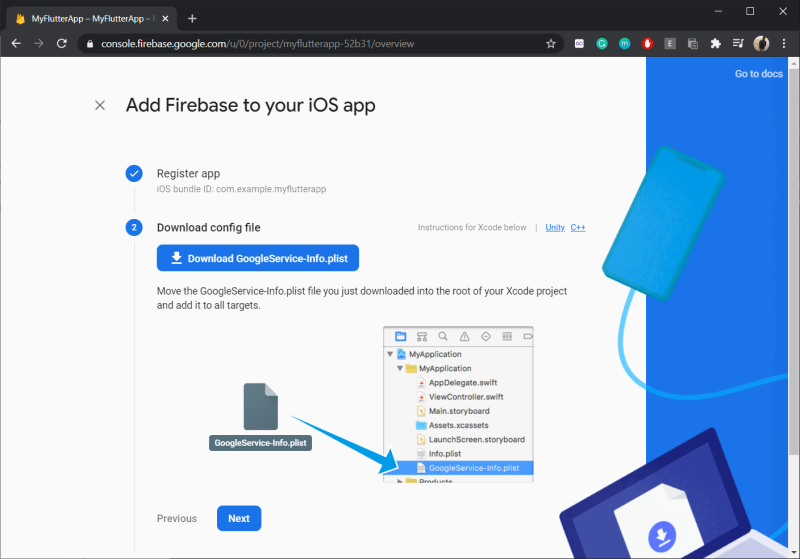
If you look, then the file format for iOS is not a JSON file like that of Android, it's a PLIST file, which again is a configuration file for iOS. Download GoogleService-Info.plist and paste this into the root of your Xcode project within Runner.
And that's it.
- Configuring Firebase SDK for iOS
You need to download Cocoapods for running iOS packages and in order to install Firebase pods as well. You can download Cocoapods by running the following command in terminal:
$ sudo gem install Cocoapods
Once you have Cocoapods installed, you can go ahead and run the following commands in your project directory.
pod init
Now open your Podfile and add
# add pods for desired Firebase products
# https://firebase.google.com/docs/ios/setup#available-pods
Save the Podfile and run
pod install
This would create a Runner.xcworkspace file for your app. Use this file for all future development on your application, as its configured with Podfile installation for Firebase.
That's it, you have configured Firebase for iOS devices now.
Note: If you don't follow the configuration step above using Cocoapods, then it's fine, Firebase would work perfectly on iOS but with the above step, it would be a little more seamless while running your iOS CI/CD.
Development
Now that you have your iOS and Android configuration for Firebase on Flutter, let's get our hands a little bit dirty on coding. Now that our app is connected, we can use any Firebase feature you want. Here, we shall be using Firestore for database management, you can even use Firebase Realtime Database and import its package from Dart Packages, as I have mentioned above but I personally prefer Cloud Firestore, because it's really handy and easy to use.
Okay so now head out and create a file and name it home.dart in your lib.
Import your flutter package and create a Stateful Widget. If you don't know how to do so, I'd highly recommend you to read my previous post about Getting started with Flutter.
Here's a tip, if you are using VSCode or any other IDE just type 'stfl' and you'll see your entire Stateful Widget made for you
Let's name this widget Home. This is how your code should look now
import 'package:flutter/material.dart';
class Home extends StatefulWidget {
  @override
  _HomeState createState() => _HomeState();
}

class _HomeState extends State<Home> {
  @override
  Widget build(BuildContext context) {
    return Container(

    );
  }
}
Head back to your main.dart file and replace your main function MyApp with Home, remember to import your home file as well in order for main.dart to access your Home widget
import 'package:flutter/material.dart';
import 'home.dart'
void main() {
  runApp(Home());
}
Now all your errors might have gone.
Get back to your home.dart and instead of returning Container, make it return MaterialApp and set its home as a Scaffold widget. Inside your Scaffold initialize an appBar and name it as Flutter and Firebase.
Now inside your Scaffold body, initialize a Column widget. Your widget will now look like this:
 Widget build(BuildContext context) {
    return MaterialApp(
          home: Scaffold(
            appBar: AppBar(
              title: Text('Flutter and Firebase'),
            ),
              body: Column(
        ),
      ),
    );
  }
Inside our column, we are going to have children, which would be our TextField, which is used to enter text value and these text values will be saved on our Cloud Firestore.
body: Column(
          children: [
            TextField(
              decoration: new InputDecoration(
                enabledBorder: new OutlineInputBorder(
                    borderSide: new BorderSide(color:Colors.black)),
                labelText: 'Enter Value A',
              ),
            ),
          ],
),
You can read about TextField widget and its properties from Flutter Cookbook so don't be scared when you see these properties and values for the first time here. The decoration here is used to provide design properties for the text field including its text style, border color, border-radius, and etc. enabledBorder is used to enable border for the text field and you can use properties to change its shape, size, and color as per your wish. labelText is your text value which the label holds so that the user knows what to enter into the Label.
Let's now add Padding to the TextField because at this moment, if you run your app, you won't be really happy with your result as your text field will be touching the ends of your display making it look a little shabby.
We can do this by wrapping our TextField with Padding property and then we will pad each side with 20.0 pixel. Now your TextField widget would look like this.
 Padding(
              padding: const EdgeInsets.all(20.0),
              child: TextField(
                decoration: new InputDecoration(
                  enabledBorder: new OutlineInputBorder(
                      borderSide: new BorderSide(color: Colors.black)),
                  labelText: 'Enter Value A',
                ),
              ),
            ),
If you run your app at this point, you'll be really excited with the result. It would look like this:

Now let's create another Textfield B. Here is a tip, just copy the previous text field and paste it below, so you'll have another text field but make sure to change its label to 'Enter Value B'. So your children widget would now look like:
  body: Column(
          children: [
            Padding(
              padding: const EdgeInsets.all(20.0),
              child: TextField(
                decoration: new InputDecoration(
                  enabledBorder: new OutlineInputBorder(
                      borderSide: new BorderSide(color: Colors.black)),
                  labelText: 'Enter Value A',
                ),
              ),
            ),
            Padding(
              padding: const EdgeInsets.all(20.0),
              child: TextField(
                decoration: new InputDecoration(
                  enabledBorder: new OutlineInputBorder(
                      borderSide: new BorderSide(color: Colors.black)),
                  labelText: 'Enter Value B',
                ),
              ),
            ),
          ],
        ),
And now you will have 2 working TextFields. Now let's also add a button so that whenever you trigger the button, the text field values get saved to Firebase.
We can use a RaisedButton for this purpose, which comes with a child widget which can be your text or an image widget, and most importantly, it has an onPressed value. onPressed decides what the button should do when it is pressed. There are many kinds of Buttons on Flutter and you can read about those here.
Let's call this Raised Button, Add because we shall be adding all our data to Firestore.
RaisedButton(
              child: Text("Add"),
              onPressed: null,
              ),
Now if you run your app, you'll see an Add Button, but it wouldn't be clickable for now because we have set the Button's onPressed value to null for now. We will later have it updated for Firebase to push the data into your Firebase Console.
Alright now, that we have almost everything setup let's begin Firebase initiation. For this, let's import the firestore package
import 'package:cloud_firestore/cloud_firestore.dart';
Let's begin by initializing Firebase by the command
final firestoreInstance = Firestore.instance;
Add this command before your stateful declared widget so that it can be accessed throughout the home.dart file.
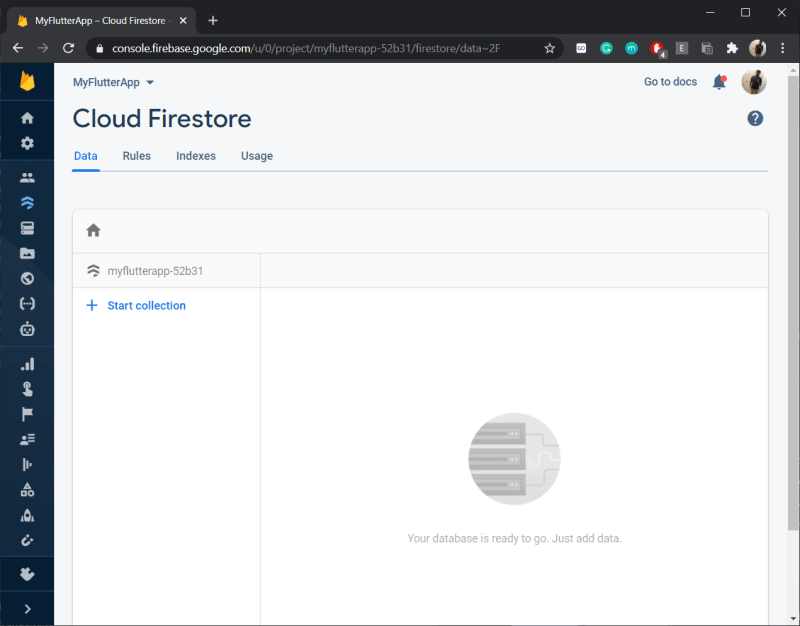
Now go to your Firebase Console and open your Firebase project and navigate to Cloud Firestore like this

Click on Create Database and choose your Database mode either Production or Test Mode. So what are these modes?
- Production Mode
In this, your data will remain private to yourself, which means once your app is out in the market, read/write access will be only provided as per your security rules
- Test Mode
Your data will be public by default and your client access to read and write will be denied in 30 days if you don't specify and verify security rules for access.
For now, let's test with production mode. Now click next and choose a Firestore location near your country, this would provide lesser latency for faster read/write. Now that you are done, you should see your Firestore data screen now
Now let's start by adding a collection. You can provide any unique ID for your collection, inside our collection we can have multiple documents where we shall be performing our data analysis. I have called my collection as user, where we shall be adding data as per we want. You can also manually add data in Firebase and retrieve it on your app and also do it dynamically from your Flutter App. You can generate and create your own Document ID if you want by adding it like we did for collection or generate a unique dynamic ID from our app.
Let's head back to our home.dart file and right below the Firestore declaration syntax, above the Stateful widget let's create a function called add.
void add() {
  firestoreInstance.collection("users).add(
  {
    "name" : "amey",
    "email" : "amey@example.com",
  }).then((value){
    print(value.documentID);
  });
}
Here, we are getting into our Firebase collection whose id was "user" and adding a document with a pre-generated documentID and entering the fields, name and email and we shall be printing out the value of our documentID.
Let's go ahead and replace our add button's onPressed value to trigger our function add()
RaisedButton(
              child: Text("Add"),
              onPressed: (){
                 add();
               },
              ),
Now run, your app and tap your Add Button will now be clickable, so go ahead and tap it. You'll find no change in the app but if you head to your firestore, you'll see the fields created as per we have declared in here. This is how it would look like, you'll however have a different documentID from mine

Wow, this is almost done, now we are still not changing our values dynamically, we will have to go keep going back and enter field values for every update and that's not viable. We want data from the text field to go to Firebase. So, let's fire this up.
Go ahead and create two text controllers. Text controllers are used to controlling your text field values as per the developer's need for user interaction. Create these right above your stateful widget.
final nameController = TextEditingController();
final emailController = TextEditingController();
Each text controller for each text field, let's call it, name and email controller respectively.
Now go into your text field widgets and initiate your created controllers. The TextField widget in Flutter comes with a controller property for us to add our controllers in. So this how we would be initializing it.
            Padding(
              padding: const EdgeInsets.all(20.0),
              child: TextField(
                controller: nameController,
                decoration: new InputDecoration(
                  enabledBorder: new OutlineInputBorder(
                      borderSide: new BorderSide(color: Colors.black)),
                  labelText: 'Enter Value A',
                ),
              ),
            ),
            Padding(
              padding: const EdgeInsets.all(20.0),
              child: TextField(
                controller: emailController,
                decoration: new InputDecoration(
                  enabledBorder: new OutlineInputBorder(
                      borderSide: new BorderSide(color: Colors.black)),
                  labelText: 'Enter Value B',
                ),
              ),
            ),
Now that we have our controllers set up, let's make some changes in our add() function to get the value of textfield passed into our Firestore.
Instead of manually passing my name as a parameter, I will be passing the text value to Firebase by getting the text value from the controller as, nameController.text and similarly from emailController.text.
Now our add() would look like this:
void add() {
  firestoreInstance.collection("users).add(
  {
    "name" : nameController.text,
    "email" : emailController.text,
  }).then((value){
    print(value.documentID);
  });
}
And now if you run your code, enter your desired name and email, it would right available on your Firestore.
Similarly, if you want to update, delete your data, you can use .updateData after your collection. Now for deletion, you can use FieldValue.delete() after your field name. Example, consider I make a deletion function to delete values, I'll have my name and email field modified as:
"name" : FieldValue.delete()
"email" : FieldValue.delete()
So, whenever this function is triggered, your current Firebase field value will be reset. You can also update the field with a null value if you have any issues with deletion using the .updateData
Now, let's talk about retrieving your data from Firestore. We will use querySnapshot. This contains the results of a query which is a simple retrieval of our data from Firestore.
firestoreInstance.collection("user").getDocuments().then((querySnapshot) {
    querySnapshot.documents.forEach((result) {
      print(result.data);
    });
  });
If you put the above in a function and then create another RaisedButton to trigger it, then you will see your document ID and fields printing on your console. Try doing this as a challenge.
This is pretty much all about Firebase and Flutter.


Latest comments (0)