Link to video: https://www.youtube.com/watch?v=i40hcJ73ljA
Understand the persistence issue with Containers, how Volumes and Bind mounts address them, how to manage them using the docker cli and some useful persistence topics
What the heck is a Docker Volume and why does it matter?
TL;DR - persistence.
If you wanna know what that means or how, that's what we will discuss in this blog.
Introduction
This blog is the fourth in a series of blogs and videos I call - Docker Made Easy.
I recommend going through the previous ones to help you get a more wholesome understanding of Docker.
Links to the previous blogs -
Alright. Here's a quick agenda for this blog:
- the problem we're dealing with
- the solution
- types of mounts, their differences, and reasoning behind the preferred option
-
dockercli usage examples - some useful persistence topics
Before we get into what volumes are, let's first try to understand what problem they address...
The problem
Containers by themselves are stateless or non-persistent - meaning, the data (state) they contain are lost when the container is re-created.
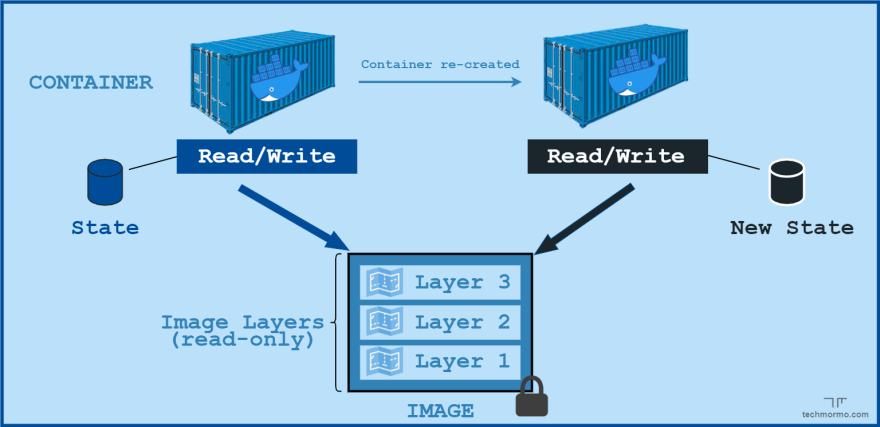
This is because containers only form a thin read/write layer on top of a specified Docker Image, which is removed when deleting the container. This is further discussed on the second Docker Made Easy blog - How Docker Images work.
This property makes containers super lightweight & portable and lets us scale them at will without having to worry much about their underlying storage.
But what if we are interested in keeping the container's data beyond its lifecycle, like in a stateful application? The classic examples are databases or key-value stores.
Suppose we need a MongoDB database for our application, so, we run a mongo container:
docker run -d mongo
Now, if the container was removed (intentionally or unintentionally), we'd lose all data from our MongoDB database.
That is probably not what we want. We likely need to store the data in our database persistently, even if the container is lost.
So, how do we persist the container's data?
The solution
Mounting.
Mounting is a process by which an operating system makes files and directories on a storage device available for its users to access via a filesystem.
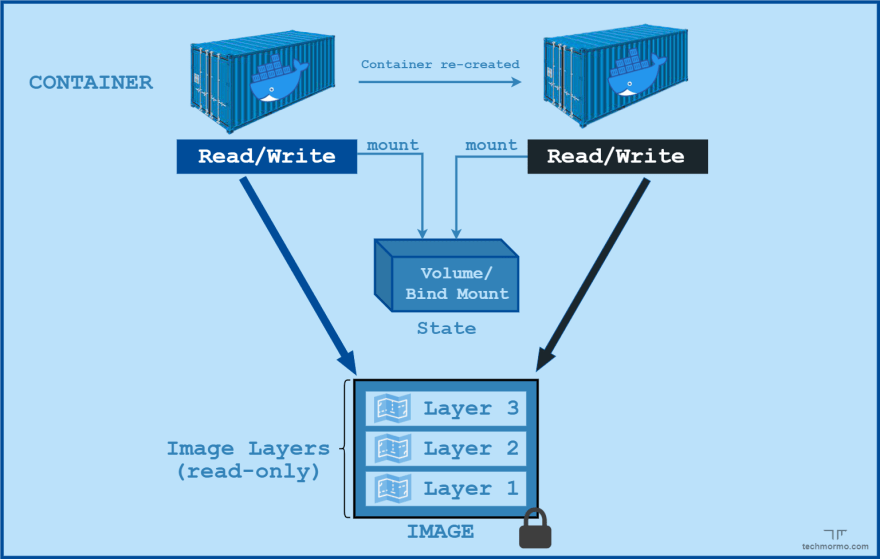
By mounting a file/folder from the container's filesystem to a file/folder on the host's filesystem, we can ensure that even if the container is removed, its data is persisted - because the host would still be available.
Now mounting might sound confusing if you're new to it. Thankfully, it's pretty straightforward in Docker.
Types of Mounting
There are two primary ways of mounting in Docker to achieve persistence:
- Bind mounts
- Volumes
No matter which type of mount you decide to use, the data looks the same from within the container i.e. it is exposed as either a directory or a single file within the container’s filesystem.
An easy way to visualize the difference between volumes and bind mounts is to think about where the data lives on the Docker host.
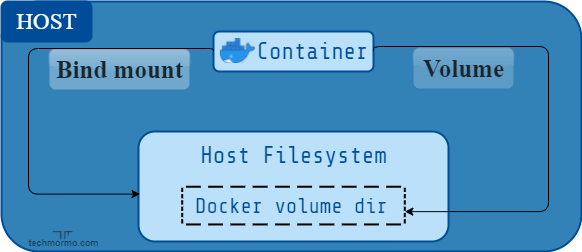
Bind mounts may be stored anywhere on the host filesystem, whereas Volumes are stored in a part of the host filesystem which is managed by Docker (
/var/lib/docker/volumes/on Linux).
Volumes can be of 2 types: anonymous and named.
-
Named volumes are characterized by a custom name that you provide on creation, which is usually human-readable e.g.
mongo_data,redis_data,my_custom_vol, etc. - Anonymous volumes are not given an explicit name when they are first mounted into a container, so Docker gives them a unique random name or ID.
Besides the name, both types of volumes behave exactly in the same ways. But named volumes are easier to deal with since you can refer to them using a human-readable name.
Docker claims that Volumes are the best way to persist container data. But why so?
Why Volumes are preferred over Bind mounts?
Even though bind mounts have been around since the early days of Docker, Volumes are the preferred form of persistence for most use cases today.
The following are the primary reasons for that -
- Portability - bind mounts require you to have a specific filesystem structure in the host, whereas volumes abstract it out because Docker manages it for you. This flexibility with volumes makes your containers much more portable since they are not strongly coupled to the host's filesystem structure.
- Security - since bind mounts can be mounted anywhere on the host, they allow the possibility of giving containers access to sensitive files like system files/directories. This is a big security concern because containers could impact non-Docker processes on the host by modifying those sensitive files. This can be avoided by using volumes, which are restricted to a certain part of the filesystem.
- Ease of management - Volumes are auto-created and managed by Docker whereas bind mounts need to be manually mapped to the host's filesystem. Additionally, you can manage Volumes with the
dockercli which makes it much more convenient (as we'll see very shortly). - I/O performance on Docker Desktop - On Docker Desktop (Mac & Windows), Volumes are stored in the Linux VM rather than the host, which means that the reads and writes have much lower latency and higher throughput.
- Accessibility - if you want to store your data on remote servers or cloud providers rather than locally, then volumes are the only choice.
Now that we know the WHY, let's look at the HOW...
How to manage volumes using the docker cli?
We can manage volumes through the docker cli directly (unlike bind mounts). The following commands show you how.
List all volumes -
docker volume ls
Create a volume named vol-name -
docker volume create vol-name
View detailed information about the volume, like creation date, mount-point, storage-driver etc. -
docker volume inspect vol-name
Remove the volume -
docker volume rm vol-name
Remove all unused local volumes (excluding the ones currently being using by containers) -
docker volume prune
Volumes are only removed when you explicitly remove them, therefore, prune can be very useful in reclaiming unused device storage.
Let's look at how we can solve the MongoDB persistence issue we had discussed earlier, using bind mounts and volumes.
The idea is simple, we just need to mount (using -v) the container's file/directory which stores the database state, to a volume or bind mount. For the mongo image, this is the /data/db directory, as specified in the Docker hub documentation.
To use bind mounts, we specify the path on your host (/path/on/your/host) to be mapped to the /data/db directory inside the container -
docker run -v /path/on/your/host:/data/db -d mongo
Using anonymous volumes, you don't need to specify anything other than the container's mount file/directory -
docker run -v /data/db -d mongo
Docker automatically creates a new volume with a random name the first time you run it.
And named volumes just require you to additionally specify the name of the volume, which in this case is mongo_data -
docker run -v mongo_data:/data/db -d mongo
If the named volume doesn't exist locally, it will be created automatically.
That's it!
Any of the 3 solutions above can enable persistence, although named volumes would be the most preferred as discussed previously.
Other useful persistence topics
Read-only and read-write mounts
Both volumes and bind mounts are read-write by default, meaning, containers can both read and modify the data that is mounted from the host.
Sometimes this might not be desired i.e. when we strictly need to give read access to the container(s) but not write.

A mount can be specified to be read-only by adding :ro at the end of the -v option in docker run command.
e.g. for a bind mount of /path/to/local/html -
docker run -v /path/to/local/html:/usr/share/nginx/html:ro -d nginx
e.g. for a volume named nginx-vol -
docker run -v nginx-vol:/usr/share/nginx/html:ro -d nginx
Sharing data among multiple Containers
Another persistence related issue is, being able to share files/directories among multiple containers.
This can be required for many use cases, for example when running multiple containers of the same service, or for example when producers & consumers in a distributed system need to share files.
Using bind mounts, containers can only share files within a single host/machine.
Whereas with Volumes, containers from many different hosts can share the underlying data e.g. via NFS, S3 or some other storage driver.
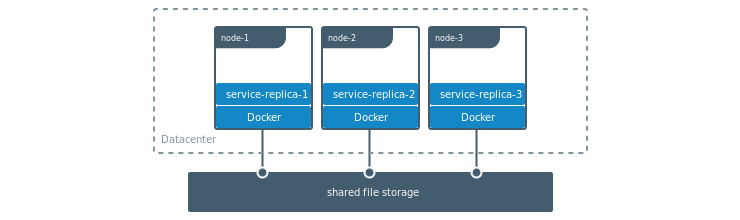
This is why Volumes are the preferred choice for sharing data among multiple Containers.
Conclusion
Today we learnt how Docker Containers can be made persistent, either by using bind mounts or volumes. We discussed the primary benefits of volumes, and learnt how we can manage them using the docker cli. We also briefly looked at some useful persistence topics.
docker-compose makes working with volumes easy as a pie. 🥧 But it's very important to understand the basics of volumes first, which was the goal of this blog.
If you're interested in learning about Docker Compose or Swarm, do let me know.
If you want to learn more about handling Docker storage, you can check out the official documentation: https://docs.docker.com/storage
I hope this helps you be a better Engineer or DevOps professional.
It certainly helps me, as I get to learn new things and fill gaps in my own knowledge.
Let me know if you have any confusion or suggestions.
Till then, be bold and keep learning!
But most importantly...
Tech care!


Top comments (0)