Introduction
This article will cover OAuth Provider Authentication basics using React and Altogic, a backend-as-a-service platform using its client library. You can checkout the Github repository and the demo application.
So, what is OAuth provider authentication?
The term OAuth stands for Open Authorization with 3rd party application such as social providers. Users can sign in to the application using their Google, Facebook, Twitter, Discord, Github accounts.
Provider redirects us to the specific route in the application with authorization token. It is critical to emphasize that the shared content is authorization token, not your password data.
How does the OAuth Provider Authentication work?
Users select the OAuth provider from the frontend application
After clicking the provider’s button, user is redirected related authorization page of the provider
Users type their credentials on the providers sign in page
The provider redirects user to the frontend application’s specific route called as Development-Callback URL
The frontend application fetches and handles the response comes from the provider
Creating App in Altogic
We can create an app with the Altogic Designer** really fast. To create an app via the Designer:
Log in to Altogic with your credentials.
Select New app.
In the App name field, enter a name for the app.
And click Create.

Here, you can customize your subdomain, but not necessarily to do, Altogic automatically creates one for you, which will be your envUrl. You don’t need to worry if you lost your envUrl; you can get it from the Environments view of Designer.
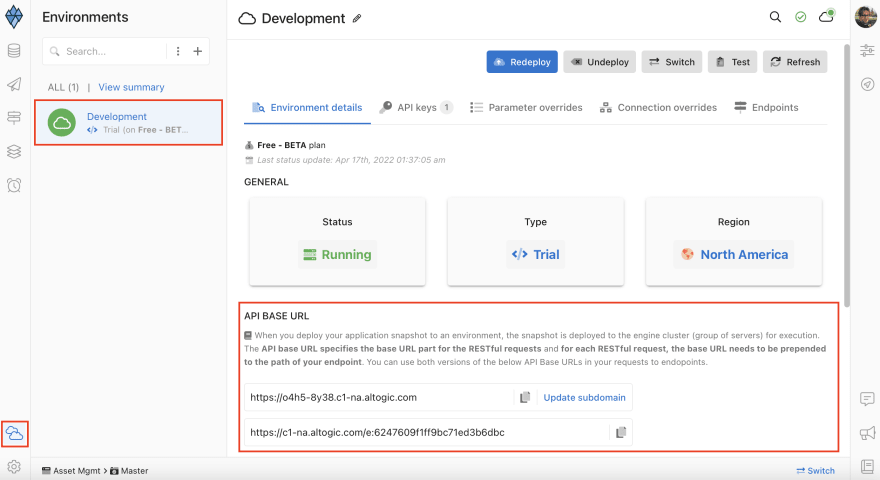
After creating our app, we need envUrl and clientKey to access our app via Altogic Client Library to create a web application.
In order to get the clientKey we need to enter the app which we have created before and;
Click on App Settings at the left-bottom of the designer.
And click on Client library keys section.

We can create new clientKey from that page, but thanks to Altogic for creating one clientKey automatically for us, so let’s copy the existing clientKey from the list.
How to Setup OAuth Provider Authentication with Altogic ?
Altogic currently supports 5 different OAuth providers:
We can configure any of these providers and combine them. In this tutorial, we will learn the entire key points to configure the OAuth providers with our app.
The Redirect URL is the link to which your front-end application is redirected after the user signs in with the provider. Firstly, we will configure our frontend application’s Redirect URL *with **Altogic.*
Click on App Settings at the left-bottom of the Designer.
And click on Authentication section.
Type your Redirect URL to the input field.

The remaining part is the configuration of the oAuth providers’ client with our app. We have to create an account with the providers we will use. As we indicate early, Altogic currently supports 5 different oAuth providers such as, Google, Twitter, Facebook, LinkedIn, and Github. We can view their configuration details at the bottom of this page. Before moving on to the self-configuration of each provider, there are 4 core concepts to explain:
Client ID: The ID of the application on the provider side
Client Secret: The secret client key of the application on the provider side
Development-Callback URL: The Redirect URL that we will pass to the application on the provider side
Client Sign In URL: The URL of the providers sign in page linked with our app. Since we have been using the Altogic Client Library, we won’t need this URL to redirect to the providers sign in page
We covered the fundamental concepts of the OAuth provider authentication. Let’s move on to the providers’ self configuration on their consoles.
Sign in to your Google Developer account
Click on Create Project
After creating the project select OAuth Consent Screen on the left sidebar
Select user type as External and click on Create button
Fill in the necessary blanks such as App Domain, Test Users , etc.

After setting up the OAuth Consent Screen, select **Credentials **on the left sidebar
Click on Create Credentials → OAuth Client ID
Select application type as Web Application
Paste your Development-Callback URL to the Authorized Redirect URIs
Your Client ID and Client Secret will be shown in the pop-up after creating the OAuth Client ID or in the right-top of the Credentials tab
Paste Client ID and Client Secret **to the related fields on **Altogic Designer

You can watch video tutorial of the Configuration of Google OAuth provider:
Sign in to your Facebook Developers account
Click on Create App on the right-top of the home page
Select Consumer
Set up Facebook Login to your app
Select App Review → Permission and Features on the left sidebar
Get advanced access for the public_profile
Select Facebook Login → Settings on the left sidebar
Paste your Development-Callback URL **to the **Valid OAuth Redirect URIs
Select Settings → Basic on the left sidebar
Copy&paste the App ID and App Secret **to the related fields on **Altogic Designer.

You can watch video tutorial of the Configuration of Facebook OAuth provider:
Sign in to your Twitter Developer Portal
Click on Create Project in the middle of the home page
Enter the necessary information related(App name, description, etc.)
After creating your project, click Edit button on Authentication Settings tab
Make sure 3-legged OAuth and Request email addresses from users is selected
Paste your Development-Callback URL to the Callback URLs field
Type your Website, Terms of Service, Privacy Policy URLs
Change tab to the Keys and Tokens **and **Regenerate Keys
Copy&paste the API Key and Key Secret to the related fields on Altogic Designer. (Consumer key and consumer secret)

You can watch video tutorial of the Configuration of Twitter OAuth provider:
Discord
Sign in to your Discord Developers account
Click on New Application on the right bottom of the home page
Give your application a name and click on Create
Select OAuth2 on the left sidebar
Click on Add Redirect button
Paste your Development-Callback URL in here
Copy&paste the Client ID and Client Secret to the related fields on Altogic Designer.

You can watch video tutorial of the Configuration of Discord OAuth provider:
Github
Sign in to your Github account.
Open your profile dropdown on the right-top of the page and click Settings
Click on Developer Settings at the bottom of the Settings page
Select OAuth Apps and click on Register a new application

Homepage URL: Our frontend application’s index URL
Authorization callback URL: Auth redirect URL that Altogic creates for us
After creating our OAuth app on Github, there will be Client ID and Client Secrets presented in the General tab. Copy&paste them to the related fields on Altogic Designer.

You can watch video tutorial of the Configuration of Github OAuth provider:
Frontend Development
Installation
Before installing the application, be sure you have already installed NodeJS in your development environment.
To install
💡 You can visit: https://nodejs.org/en/download/ to download.
To get started, open the terminal and create a new React project
// creates a react app with the name of 'altogic-oauth-provider-authentication-tutorial'
npx create-react-app altogic-oauth-provider-authentication-tutorial
The above command creates a React project in the altogic-oauth-provider-authentication-tutorialdirectory.
cd altogic-oauth-provider-authentication-tutorial
touch .env
Create a .env file in the root directory of your application, open the file in your editor and paste the following.
Replace YOUR-APPLICATION-ENV-URL and YOUR-APPLICATION-CLIENT-KEY with the envUrl and clientKey you copied before, then return to your terminal.
Install the Altogic client library to our project by using NPM or Yarn by running the following command:
// Installation of Altogic Client Library with NPM
npm i altogic
Next, create a file to handle the Altogic services and client.
Go back to your root directory and follow the commands below:
cd src
mkdir helpers
cd helpers
touch altogic.js
altogic.js will be created in the src/helpers directory. Open the file in your editor and paste the following.
The third parameter of createClient function signInRedirect handles the redirection to the Sign In page automatically when you have invalid session tokens or signed out. This is a beneficial feature for managing sessions in scenarios when you sign out from your mobile phone.
User Interface Components
We will use Tailwind CSS and Headless UI library for styling the project. Run the following commands in the root directory to install the library.
npm install -D tailwindcss postcss autoprefixer
npm install @headlessui/react
Below command will create tailwind.config.js file:
npx tailwindcss init -p
Open the tailwind.config.js in editor and copy/paste following script to configure template paths:
Open index.css file in src directory and add the following directives:
And we will use Font Awesome Icons in our project. You should install the Font Awesome Library to have well-looking components.
-
Add SVG Core:
npm i --save @fortawesome/fontawesome-svg-core
-
Add Icon Packages:
npm i --save @fortawesome/free-solid-svg-icons
npm i --save @fortawesome/free-regular-svg-icons
npm i --save @fortawesome/free-brands-svg-icons -
Add React Component
npm i --save @fortawesome/react-fontawesome@latest
We installed the necessary dependencies to our project for styling. Now, it is time to install react-router for routing our Single Page Application(SPA).
npm i react-router-dom
We completed the installation part of the project. We will use custom button components to style our application. Open your terminal on your root directory and type following commands one by one:
cd src
mkdir components
cd components
mkdir Buttons
cd Buttons
touch PrimaryButton.js SecondaryButton.js
Above commands will create PrimaryButton and SecondaryButton files under /src/components/Buttonsdirectory. Now, you can copy&paste the following scripts to the related files:
Implementation
Building Main Components
The next step is to create the core components that we’ll need for our application,
ProviderSelectorA component that can be used for redirection to the provider both sign in and sign upAuthRedirectA component that the user is redirected to after the provider’s authorizationAppThe main application component. It renders all the views with their properties.
Switch to the root directory of your react application and run following commands:
cd src
mkdir pages
cd pages
touch AuthRedirect.js ProviderSelector.js
This creates a pages directory with the components in the src directory. Your folder structure should look similar to the screenshot:

Since the user must be redirected to the related providers authorization page, we will develop the ProviderSelector component.
Altogic Client Library has just one simple method to handle both sign up and sign in cases to simplify the authentication process. A user instance is created in the database right after the first sign in/up action with the application. Therefore; I don’t have to design multiple use cases as a developer. Thus, we will handle sign in and sign up functionalities within just one component. We will be adding two different routes such as /signin and /signup, however same component will be rendered inside them with different texts.
We will design 5 buttons for each provider: Google, Facebook, Twitter, Github, Discord. When the user clicks the related button, it triggers the signin(provider) function defined inside the component. We will call Altogic Client Library altogic.auth.signInWithProvider(provider) method to redirect the user to the related authorization page.

As we early noticed in the article, users will be redirected to the frontend of the application with specific routing. We have to catch the return response of the redirection URL and take necessary actions on the application such as setting isAuth state in the context.
Now, we will develop a viewless AuthRedirect component to handle access_token from the provider and check whether the user is authenticated or somehow not.
BONUS: Extra Features/Components
To focus on the main purpose of the article, we won’t go over with the development of the below components in this article. However, you can reach the source code of the extra feature components from Github repository for full-featured app.
ProfileA component that the users can view, upload and remove their profile picturesSessionsA component that the users can view and sign out from their active sessions. Built with SessionTable and SessionItem sub-components.Footer,Header,ProfileDropdownNavigation bar and footer badgeNotFoundA component to catch the routes not presented in application routesNotificationA component that notifies the user about requests/responsesRequiresAuthA wrapper component that checks whether the user is authenticated before rendering a component; otherwise, it redirects the user to the signup/login page.RequiresNotAuthA wrapper component that checks whether the user is not authenticated before rendering a component; otherwise, it redirects the user back to the profile page(for example Sign In page).ModalContext, ModalProvider Provides context structure to communicate between components to show notifications to the user
You can see the list of related Altogic functions with above features:
Authentication Context
Here we came to the one of the core component and structure of app, AuthenticationContext created using useContext() hook. Context is used to generate shared data accessible across the component hierarchy without passing props to each component. For example, isAuth state stores the boolean value of is user authenticated or not. Almost every component must use the isAuth state to handle its internal functionalities. I could pass props to each component like parent to child. However it is not flexible and easy to use. I built an AuthenticationContext to handle and manage all the data and functionalities related with authentication.
I defined all my Altogic functions and related states in AuthenticationContext to distribute it to the child components.
Finally, we have completed the implementation of the core components of our application. It only remains the development of the App component left. You can reach the source code of the additional side components from the Github repository.
We defined the routes in the App component. Routes are protected with RequiresAuth and RequiresNotAuth restriction components.
Open the terminal in the root directory and paste the following command to run your application:
npm run start
Conclusion
In this tutorial, we walked through how to configure OAuth Provider Authentication in React app using Altogic and Tailwind CSS. We all covered detailed configuration of Google, Facebook, Twitter, Discord and Github providers in our Altogic app. If you build your backend application with coding in pure programming languages & frameworks; the configuration process will take your time and effort. However, with the significant help of the **Altogic, **we implement only 10 lines of code snippet inside the ProviderSelector, AuthRedirect components.
Check out the Github repository for the source code of the application for further details.


Top comments (0)