So you've decided to go CI/CD. You read all about the org changes, understand the ins and outs of the development pipeline, and feel confident you can get it done.
Congratulations!
After you set up your pipelines, document your dev practices, and start pushing to prod, there's still a major piece of the puzzle that needs addressing. The changelog.
How do you do it? Do you add a tech writer to your development team who can keep up with 5, 10, 20 pushes to production a day? You could, yes. But what if there was a way to automate it?
You already have an issue tracking system. We use Jira at my office. Whether you use Jira, GitHub, or Trello to track issues, they all have one thing in common - webhooks.
Each one of these systems fires events when certain actions take place in the system. And we're going to use them to automate our changelog.
The Architecture
There are three systems in play for a continuous changelog:
- The issue tracking system (in this walkthrough, Jira)
- The back end API to collect, store, and retrieve the changelog (built in AWS)
- The user interface

In our automation, the events flow like this:
- Dev team moves Jira issue to Done status. Jira publishes to a webhook containing details about the closed issue.
- AWS API Gateway proxies directly to DynamoDB to store the details.
- End user loads the changelog page. The page makes a request to load recent changes.
- AWS API Gateway proxies directly to DynamoDB to load the details from the database and return them in the response.
Seem simple? It is!
This is the kind of integration that pays off 1000x in the long run. It is a low cost to implement, high return on value integration.
AWS Configuration
In my GitHub repo, I provide the source to deploy the microservice from the architecture diagram above. It uses AWS API Gateway and DynamoDB as the two primary services for storing and retrieving data.
The back end only has two endpoints, one to create an item in the changelog, and another to load items from it.
- GET - /details
- POST - /details
Saving and loading are done in VTL, omitting the need for lambda functions entirely. This gives us the fastest response times possible.
Since we don't want malicious users discovering our API and posting bogus or inappropriate changes to our changelog, we need to add an API key. We can't add standard auth to verify our users since these requests are going to be coming through a webhook.
Jira provides the ability to include headers when publishing to a webhook, so we will take advantage of this and include an AWS API key. This key is included in the CloudFormation script in the repository.
If you follow the README in the GitHub repo, you will be up and running with minimal effort. It comes all pre-wired, so no setup is necessary besides deploying into your AWS account.
Jira Configuration
Now that we have our API up and running, it's time to configure Jira to feed the changelog data.
Add a Custom Field
We need to add a custom field to our Jira issues. From within Jira, navigate to Settings > Jira Administration > Issues.
Once you are viewing the issues admin page, navigate to Fields > Custom Fields > Add custom field.
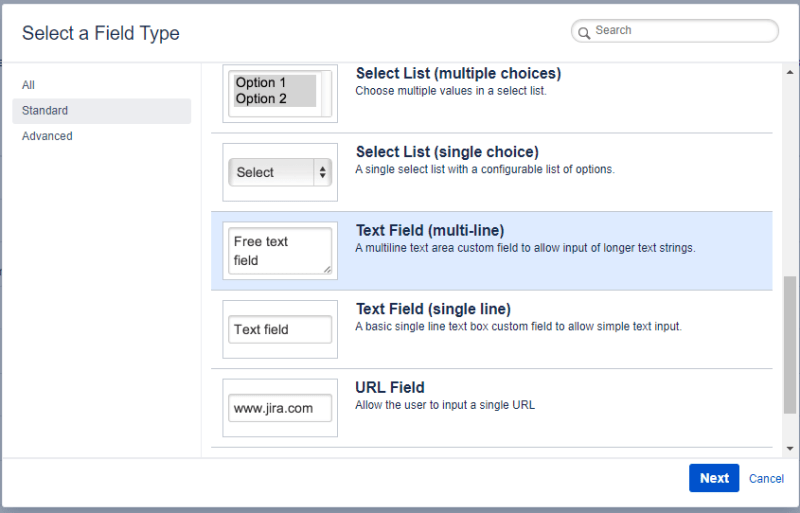
Changelog descriptions can get a little wordy, so select a Text Field (multi-line), give it the name Changelog and add a description that lets the users know the format they should type in their change details.
Next, choose your screens you want the changelog field visible on. If you want it in all your Jira projects, select them all!
Build the Webhook
With the custom field in place, it's time to build the automation trigger that posts to the webhook.
In your Jira project, go to Project Settings > Project Automation > Create Rule.

Select the Issue transitioned trigger type and optionally set the From status and To status on the next screen.
Note - The To status field should be set to whatever the final status is in your workflow. On my project, our final workflow status is Done.
Once you have configured the trigger, it's time to set up the action for Jira to take. Click on New Action to bring up the list of options.

Select the Send web request action to bring up the configuration screen.
Get Your API Details from AWS
Now we need to take a trip back into the AWS console. First, we need to get the url of the webhook we created.
- Navigate to the API Gateway console and select the Changelog API.
- Click on the Stages link on the left hand navigation, then the dev stage.
- There will be an Invoke URL on the top of the page. Grab that value and add it to the Webhook URL field in Jira. Be sure to add
/detailsat the end. - Next, click on the API Keys link on the left hand navigation, then the *cicd-ApiKey... value.
- Click on the Show link and copy the value displayed on the screen.
- Back in Jira, add a header of
x-api-keyand paste the api key in the value field. - Next, configure the webhook body to match the image below and hit Save.

Give your automation a meaningful name on the next screen and hit the Turn it on button to complete your integration!
View Your New Changelog
At this point, the integration and API are connected, and you can start closing issues! It will automatically add changelog details along with the issue type and date it was completed.
Once you have some issues moved over, let's take a peek at what it looks like. I have provided a skeleton Angular front end in the GitHub repo so you can view the changelog right away.

The changelog is grouped by day and has an icon next to the details based on the Jira type that was closed. For my project, a New Feature Jira type will display the NEW icon, while a Bug issue type displays a bug icon.
These are customizable to your project, so feel free to play around with icons and issue types.
Get Your Organization's Support
I could cut you loose right here, but what kind of responsible blogger would I be if I didn't talk about the organizational governance needed for this?
Following this route leaves a few questions you need to have answered by your organization:
- Who writes the changelog details? Tech writers? Developers?
- Does the changelog detail need to be reviewed before closing an issue?
- Can you trust developers to write the customer facing notes?
- What issue types do you want to include in the changelog?
- Should you display major features differently?
These are for you and your org to figure out. Sure it's easiest to let the developers add in the details and be done, but is it the safest? Do you want all changes to be logged for the public to see?
Try It!
This is a fast integration to set up and leads to some pretty fun results. I hope you give it a try and bring a continuous changelog to your project.
Do you do something like this? Do you do something totally different? Let me know your thoughts and opinions!

Like this content? Find the original article and plenty more on my blog!


Top comments (0)