![Cover image for Creating an API with AWS Lambda and RapidAPI [Tutorial]](https://res.cloudinary.com/practicaldev/image/fetch/s--UpwfB7wu--/c_imagga_scale,f_auto,fl_progressive,h_420,q_auto,w_1000/https://thepracticaldev.s3.amazonaws.com/i/6hg82mqpc6douboqofn5.png)
Lately, I’ve been really interested in serverless technology and the various use cases that would be ideal to use it for. I had a project come up that was going to be a perfect use case for it, so I decided to dive right in and learn all about AWS Lambda!
Unfortunately, as I was getting started with the project, I couldn’t find very many good, up to date, resources around exactly how to create an API using AWS Lambda and API Gateway. After learning the ins and outs of how to accomplish this, I decided to write my own blog post for others who are trying to learn too.
Creating the Lambda Function
To get started, first sign in to AWS console, navigate to the Lambda page, and create a new Lambda function. For the “role” of your Lambda function, I would recommend that you create a new role from a template and use the Basic Edge Lambda Permissions template. If your API needs to write to S3 or do any more complex operations, you may need to grant your Lambda function more permissions. To learn more about Lambda function permissions, here is an interesting doc from Amazon about it.

The most basic version of an API would be an API that simply allows you to call the API and return a 200 response with a body of “hello from AWS Lambda!” To achieve this functionality with a Lambda function, here’s the code you’ll input to do this:
exports.handler = (event, context, callback) => {
    var responseBody = {
        message: "hello from AWS Lambda!"
    };
    callback(null, {
        statusCode: 200,
        headers: { "x-custom-header" : "my custom header value" },
        body: JSON.stringify(responseBody)
    });
};
This is pretty straightforward code where you’re using the callback parameter result of successful function execution. That includes a status code of 200 along with headers and a body. All of this information will be sent as a response to the code that called your API in the first place.
Parsing Params and Headers in Lambda Function
With some API requests, your API may be sent parameters or headers to change the functionality of the API. If this is the case for the API you want to build, then you’ll need to access the headers and parameters through the event parameter. You can use the following code to access these variables:
let parameter = event['queryStringParameters']['name_of_parameter'];
let header = event['headers']['name_of_header'];

// OR

let paramter2 = event.queryStringParameters.name_of_parameter_one;
let header2 = event.headers.name_of_header_one;
Creating the API Gateway
Now that you have the code for the Lambda function, you’ll need to set up the API gateway which will be what initiates the Lambda code. Go to the AWS API Gateway page and create a new API.

Once you’ve created your API, you need to start defining the spec of the API.
Proxy API vs. Defined API
There are two different ways to set up your API and each one has it’s own benefits. The two types are “proxy resource” and “fully defined API”
Proxy API
When defining a new resource, you have the option to configure it as a proxy resource.
This means that your API gateway will route every single HTTP requests that include your base URL to your Lambda integration, then your Lambda integration will do the heavy lifting to process the different types of requests.
Let’s say your base URL is https://api.myapi.com/ and then you have a GET request to https://api.myapi.com/hello and POST request https://api.myapi.com/goodbye. Although these are both different HTTP methods to different resources, when using the proxy resource integration your lambda function will be executed for both of these requests.
The upside to this setup is that you are able to route multiples paths to the same Lambda integration. If you already have a codebase setup in this way it will be an easy way to get started with serverless technology without having to completely refactor your code.
There are quite a few downsides that you should know though. Some of these downsides include:
- The code for your Lambda function will be large as you’re having to handle all of the logic paths in the code.
- You’re paying to run the routing in the Lambda function instead of allowing the API gateway to do it for you.
- You’re not utilizing a lot of the features of the API gateway like API documentation.
Parsing different endpoints within the same Lambda function
If you do end up using the proxy integration feature, then you’ll need to do your own logic to handle each endpoint in a different manner. You will access the API request path information in a similar way to how you accessed the header and parameter information. The code to do this is:
let nameOfPath = event['path'];

// OR

let nameOfPath2 = event.path;
Should you go with this option, you will likely want to use if statements to handle each different path available and have a catch-all else statement to handle any non-defined API endpoints. This could look something like this:
exports.handler = (event, context, callback) => {
    if (event.path === '/hello') {
        callback(null, {
            statusCode: 200,
            body: JSON.stringify({message: 'hello'})
        });
    } else if (event.path === '/goodbye') {
        callback(null, {
            statusCode: 200,
            body: JSON.stringify({message: 'goodbye'})
        });
    } else {
        callback(null, {
            statusCode: 404
        });
    }
}
Fully Defined API
The other option is to define each of your API endpoints within the API Gateway. This will allow you to restrict the endpoints that are able to be called to only the endpoints you define. You can also have a different Lambda function for each of your endpoints.
I decided to add in a new resource called “/my-resource”
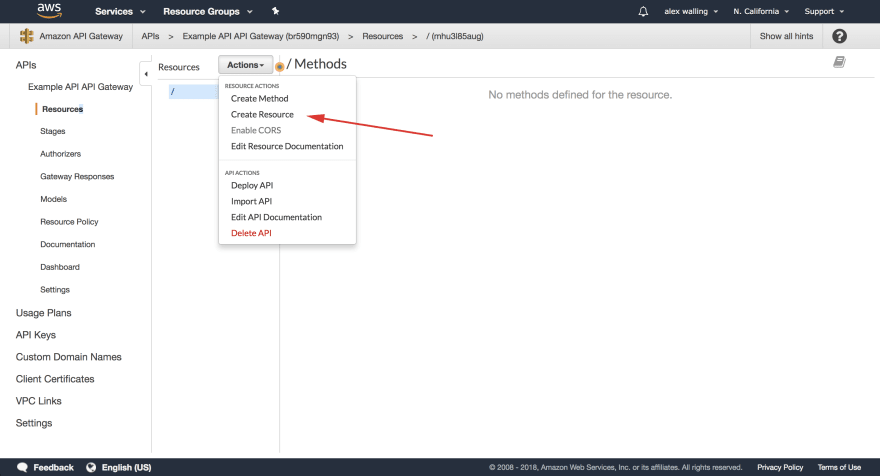
When defining the resource, you’ll just need to input the resource name and resource path. Since we’re not using the proxy resource, you can leave that unchecked.

After you’ve created your resource, you’ll want to create a method for that resource.

I’ve opted to use a GET request to my /my-resource endpoint.
When creating a new method, be sure that you use the Lambda Proxy integration. This allows the parameters and headers to be sent to your Lambda function. You’ll also want to select the Lambda function you want to activate when this endpoint is called.

Once you’ve defined all of your API endpoints, you need to deploy your API.

When Deploying, you’ll have to create a new stage to deploy your API. I’ve decided to name mine Staging because I am still in the development phase, but you can name your API stage whatever you like.

After deploying your API, you should now see an “Invoke URL” This is the URL that you will use to call your API. The format to call the API will be your Invoke URL followed by your resource name: https://qa397wgn73.execute-api.us-west-1.amazonaws.com/Staging/my-resource
Making your First Request
You can now make a GET request to the base URL of your API which will look like this:

Adding API Key Authentication with RapidAPI
One way to authenticate requests would be to do it through the API gateway and set up new API keys there. This is fairly straightforward to do, but if you ever want to allow other developers to consume this API, then it becomes difficult to generate new API keys and manage all of the different active API keys you have. You’ll also have to think about whether or not you want to charge for usage of the API, which then envolves handling payments and invoicing.
A great tool to do user management, API key generation, analytics, and billing for you is a tool called RapidAPI.
To start, you’ll need to be logged in to RapidAPI. Once you’ve created an account, you can head over to our documentation on Adding and Managing Your API. This will detail exactly how you’ll want to add your API to the RapidAPI marketplace. The basic steps are:
- Create & name your API
- Add the base URL for your API
- This is going to be the Invoke URL from your AWS API Gateway.
- Document all of the endpoints your API has available
- This is going to be all of the resources and methods you’ve defined for your API.
Now that your API has been documented for consumption through RapidAPI, you’re ready to set up authentication.
The beauty of RapidAPI is that we handle all user management and billing for you! That means as long as you set up a pricing plan and API access according to how you want to allow developers to access the API, then all you have to do is authenticate if a request is coming from RapidAPI in your code. Since we do all of the authentications before an API request is made to your systems, then you can allow any request coming from the RapidAPI systems to successfully call your API.
The easiest way to do this is to use our secret hidden header called “X-RapidAPI-Proxy-Secret” which is a unique secret key sent with every API request to your systems. The developers using your API will never see this key and the key is unique to every API. To find your X-RapidAPI-Proxy-Secret, go to your API settings page in the RapidAPI Provider Dashboard.
To use this key to authenticate requests as coming from RapidAPI, you’ll just want to do a quick check right when a request comes in to see if the X-RapidAPI-Proxy header is present and matches your unique key. Here’s the code to do that:
exports.handler = (event, context, callback) => {
    if(event['headers']['X-RapidAPI-Proxy-Secret'] != '*******************') {
        callback(null, {
            statusCode: 401,
            body: JSON.stringify({message: 'Unauthorized'})
        });
    } else {
        // You API logic goes here
        let name = event['queryStringParameters']['name'];

        var responseBody = {
            message: "hello " + name + "!"
        };
        callback(null, {
            statusCode: 200,
            body: JSON.stringify(responseBody)
        });
    }
}
On top of easily adding user authentication and API key management, you also get the benefit of automatically exposing your API to our large developer community that would be thrilled to use your awesome API! If you get your API up and running on the marketplace, we would love to hear all about it! Feel free to email us at community@rapidapi.com to let us know about any APIs you’ve added on RapidAPI or projects you’re working on that use an API through RapidAPI.


Top comments (1)
Some comments may only be visible to logged-in visitors. Sign in to view all comments.