
Pre-Requisites
- Basic Understanding of HTML/CSS/JS
- NodeJS Installed
Step 1 - Create your Blog using Agility CMS
Follow the steps I outline in this post to create your blog feed that we'll pull into your Angular application.
Step 2 - Install the Angular CLI
With the following command, we can install the Angular CLI which will allow us to create new Angular projects and assets. (Running this command requires nodeJS installed which you can install from nodeJS.org)
npm install -g @angular/cli
On Linux you may have to add sudo in front of the command to successfully run the command
Step 3 - Create a new Angular Project
To generate a new Angular project using the ng new command...
ng new myblog
- Select y for routing
- Select standard CSS (unless you prefer one of the other options)
Step 4 - Generate our assets
To have a consistent layout let's create a header and footer component to be at the top and bottom on every page.
ng generate component header
ng generate component footer
We will have three pages: Main Page | Projects | Blog, let's generate the components for them.
ng generate component main
ng generate component projects
ng generate component blog
Services allow us to deliver information and functionality across multiple components that may need to share information or functionality. Let's create some services.
ng generate service blogData
ny generate service projectData
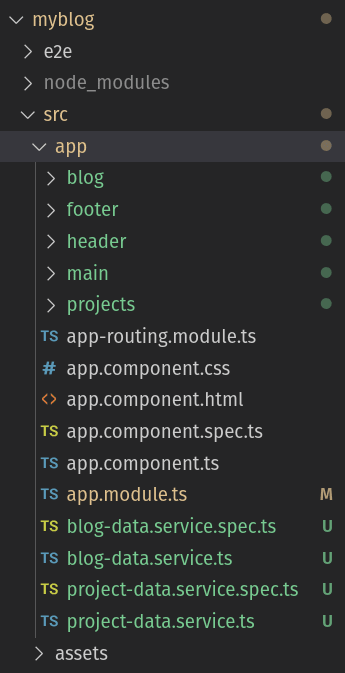
your file structure should look like this...
You can now use the command
ng serve
to see your app in the browser in dev mode
Step 5 - Understanding So Far
By running all the last commands we have created all the components and services we need for this application so far. When the files are generated Angular also registers everything with our App module. A module is like a connector of our assets allowing them to see each other.
Each application starts with one module, the App Module, although for the larger and more complex app you can have multiple modules to better organize code and improve performance (modules lazy load minimizing what the application needs to load at any particular time).
Note: We technically have the second module in the form of the routing module. We'll talk more about that later.
So this is how our app.module.ts should be looking so far:
import { BrowserModule } from '@angular/platform-browser';
import { NgModule } from '@angular/core';

import { AppRoutingModule } from './app-routing.module';
import { AppComponent } from './app.component';
import { HeaderComponent } from './header/header.component';
import { FooterComponent } from './footer/footer.component';
import { MainComponent } from './main/main.component';
import { ProjectsComponent } from './projects/projects.component';
import { BlogComponent } from './blog/blog.component';

@NgModule({
  declarations: [
    AppComponent,
    HeaderComponent,
    FooterComponent,
    MainComponent,
    ProjectsComponent,
    BlogComponent
  ],
  imports: [
    BrowserModule,
    AppRoutingModule
  ],
  providers: [],
  bootstrap: [AppComponent]
})
export class AppModule { }
The module has several arrays of things it is connecting:
declarations: All the components that are used within this module, if the component is declared in another module it can be brought in via imports.
imports: Modules that we'd like to use within this module. (we are importing our Routing Module and the build-in Angular Browser Module, there are other native Angular modules we may use later to give us some more tools)
exports: Module being exported to be used in other modules.
providers: Services that provide the functionality to the module
bootstrap: This is the component that appears when the Module is bootstrapped.
By default the App Module is bootstrapped to the index.html allowing the App-Root component to render, you can see this in the main.ts
Step 6 - Getting the basic layout
Let's set up the basic layout of our application. In app.component.html replace everything with...
<app-header></app-header>
<router-outlet></router-outlet>
<app-footer></app-footer>
So the header component will always be on top and the footer on the bottom so go into those components and create whatever navigation and footer you'd like. The router-outlet component will render whatever the router says should be rendered based on the router module, so let's visit that next.
Step 7 - Configure Our Routes
Your app-router.module.ts should look like so...
import { NgModule } from '@angular/core';
import { Routes, RouterModule } from '@angular/router';
import { BlogComponent } from './blog/blog.component';
import { MainComponent } from './main/main.component';
import { ProjectsComponent } from './projects/projects.component';

const routes: Routes = [
  { path: '', component: MainComponent },
  { path: 'blog', component: BlogComponent },
  { path: 'projects', component: ProjectsComponent },
];

@NgModule({
  imports: [RouterModule.forRoot(routes)],
  exports: [RouterModule],
})
export class AppRoutingModule {}
In order to create links to these pages, you need not use the usual tag but a special router-link tag. Keep this in mind when you build your header navigation.
<a routerLink="/">Main Page</a>
<a routerLink="/blog">Blog page</a>
<a routerLink="../projects">Project Page</a>
If you want just paste the above in your header component just to everything is working for now then come back later to fully build out your navigation.
Step 8 - Building out your project's services
Let's create our ProjectDataService that will provide our project data to any components that need it. Your project-data.service.ts file should look like so... (With your project data of course):
import { Injectable } from '@angular/core';

@Injectable({
  providedIn: 'root'
})
export class ProjectDataService {

  constructor() { }

  getProjects(){
    return [
      {
        name: "A Project",
        image: "An Image",
        gitURL: "gitURL",
        liveURL: "liveURL"
      },
      {
        name: "A Project",
        image: "An Image",
        gitURL: "gitURL",
        liveURL: "liveURL"
      },
      {
        name: "A Project",
        image: "An Image",
        gitURL: "gitURL",
        liveURL: "liveURL"
      },
    ]
  }

}
The injectable decorator does literately what it says and makes this provider injectable in our components so they can be provided the service. Let's inject this service into our project's component which is done by defining an argument to the constructor of the type of the service. We then use the services getProjects method to feed the data into a property of our component.
import { Component, OnInit } from '@angular/core';
import {ProjectDataService} from "../project-data.service"

@Component({
  selector: 'app-projects',
  templateUrl: './projects.component.html',
  styleUrls: ['./projects.component.css']
})
export class ProjectsComponent implements OnInit {

  projects

  constructor(projects:ProjectDataService) {
    this.projects = projects.getProjects()
  }

  ngOnInit(): void {
  }

}
We can now loop over the data to show our projects in our projects.component.html.
<div *ngFor="let project of projects">
<h1>{{project.name}}</h1>
<img [src]="project.image">
<p><a [href]="project.gitURL">Git</a></p>
<p><a [href]="project.liveURL">Live</a></p>
</div>
About the syntax above
- ngFor: This allows you to repeat an HTML tag and its children once for each item in an array.
- **
{{}}**: This allows you to inject a variable from the component as text. (in this case we are referring to the temporary variable "project" created from looping over the class property, "projects") - [Attribute]: This allows you to set the value of an element attribute to the value of a component's property.
Step 9 - Creating our BlogService
We will be pulling our blog posts from the URL you generated in step 1 from AgilityCMS but we need to set up the Angular HTTP module to make http requests. So in our app.module.ts let's import it!
import { BrowserModule } from '@angular/platform-browser';
import { NgModule } from '@angular/core';
import { HttpClientModule } from '@angular/common/http';

import { AppRoutingModule } from './app-routing.module';
import { AppComponent } from './app.component';
import { HeaderComponent } from './header/header.component';
import { FooterComponent } from './footer/footer.component';
import { MainComponent } from './main/main.component';
import { ProjectsComponent } from './projects/projects.component';
import { BlogComponent } from './blog/blog.component';

@NgModule({
  declarations: [
    AppComponent,
    HeaderComponent,
    FooterComponent,
    MainComponent,
    ProjectsComponent,
    BlogComponent
  ],
  imports: [
    BrowserModule,
    AppRoutingModule,
    HttpClientModule
  ],
  providers: [],
  bootstrap: [AppComponent]
})
export class AppModule { }
Then we can use in in blog-data.service.ts
import { Injectable } from '@angular/core';
import {HttpClient} from "@angular/common/http"

@Injectable({
  providedIn: 'root'
})
export class BlogDataService {
  //make sure to set the guid in the URL, test it works in browser
  guid:string = ""
  url:string = `https://api.aglty.io/${this.guid}/fetch/en-us/list/myblog`
  apikey:string = ""

  constructor(private http: HttpClient) { }

  getBlogs(){
    return this.http.get(this.url, {
      headers: {
        accept: "application/json",
        APIKey: this.apikey
      }
    })
  }
}
In the same way, we brought in the Http module via the constructor in our service, we will bring in the service to our Blogs component in the same way. We can then use the service to grab the data and add it to the property of our component.
Keep in mind the Http module doesn't return promises like Fetch or Axios but instead returns an RXJS Observable. Observables work very similarly with some other bells and whistles. To keep it simple instead of using a .then run a callback when a promise resolves, we subscribe an observable and pass a callback describing what to do with the data.
import { Component, OnInit } from '@angular/core';
import {BlogDataService} from "../blog-data.service"

@Component({
  selector: 'app-blog',
  templateUrl: './blog.component.html',
  styleUrls: ['./blog.component.css']
})
export class BlogComponent implements OnInit {

  blogs:Array<any>

  constructor(data: BlogDataService) {
    // subscribe to the request data from our service
    data.getBlogs().subscribe((blogs:any) => {
      //Map the data to a more useable array
      this.blogs = blogs.items.map(blog => blog.fields)
      console.log(blogs)
    })
  }

  ngOnInit(): void {
  }

}
Notice the use of any type, ideally you avoid this and create the proper interfaces and types to get the full value of Typescript, but since my focus in this tutorial is the Angular workflow I'm using any type to bypass and simplify the lesson.
Now we can make use of the blogs in our blog components HTML! If you haven't installed the Angular dev tools chrome extension, do so! It will allow you to see the data available to any component at any time which can be super useful.
<div *ngFor="let blog of blogs">
    <h1>{{blog.title}}</h1>
    <p>{{blog.body}}</p>
    <h2>{{blog.date | date}}</h2>
</div>
Notice the usage of the pipe character for the date. Angular has several different pipes built in that allow you to do a very typical conversion like a date into a more readable date.
At this point you've set everything up, now it is just a matter of styling your portfolio application to your liking!


Top comments (1)
Thanks for your post, do you have any blog or link suggestion so that i can learn more about observable rxJs? Thanks so much