
This post assumes you are familiar with the basics of React, and saving your work to GitHub.
What is automation and why should you care?
Automation is just a way to have the computer run tasks for you so you don't have to do it manually.
When you build software, you do it in small chunks, adding a bit here, and a bit there, making sure everything works. But every time you change something, there's a chance that you might break something that was working before.
You could manually check everything still works every time you make a change. But as your project gets bigger, that takes more and more time. And you're more likely to miss something.
So why not get the computer to do those checks for you. That way you can spend your time on something more productive. Getting this all up and running is part of the process called Continuous Integration
A super simple app
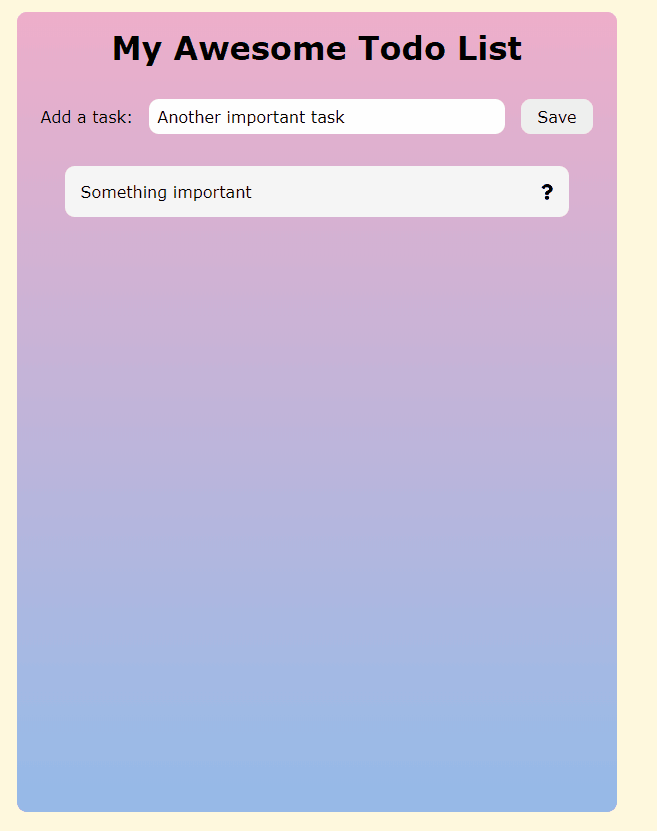
For this post, I've built a simple app in React. It's not even a full todo-list, but it's the start of one.
The app allows you to add tasks to a list.
I've pushed this app up to my GitHub account. You can find it here
 AlexKMarshall
/
TravisAutomationExample
AlexKMarshall
/
TravisAutomationExample
A simple todo app to demonstrate integration with Travis CI
Set up the automation
So now the project is up on GitHub, lets add some automation checks.
To set up with Travis, the first thing you'll have to do is go to Travis CI and sign up there to link it to your GitHub account.
Once you've done that, you're almost set. You need to add one file to your project, at the top level. Create a file called .travis.yml with the following content.
language: node_js
node_js:
  - "stable"
script:
  - yarn build
If you created your project with NPM instead of Yarn, replace yarn build with npm run build.
This is pretty much the simplest script there is. We're telling Travis that our project is using node_js and that we want it to use the stable version. And then we ask it to run the build script. That will run the React build process, and if we've made any mistakes that stop it from working, Travis will tell us.
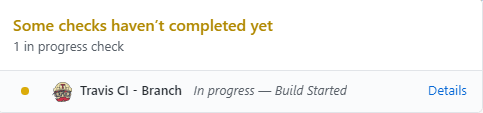
So, commit this file and push the change up to GitHub. Now, at the top of the GitHub page, you'll see your latest commit number, with an orange indicator next to it. If you hover over this, you'll see it tells you that some checks have not completed yet. And that the Travis build is in progress.
If you give this a couple of minutes, you'll see the icon change to a green tick. And if you click on it, you'll see that the build has passed.

Add a little process to your process
So this setup was super basic - lets make this check a bit more thorough.
I've created a test that will check that when we type in a task and click save, it gets added to our todo-list. And the input box gets cleared.
I won't go into detail here about how to write these tests, but if you've not written any before, check out React Testing Library.
We want Travis to run this test every time we push a commit to GitHub. So lets add a line to .travis.yml to do that.
language: node_js
node_js:
  - "stable"
script:
  - yarn build
  - yarn test
Again, if you're using NPM, that line would be npm test instead.
Lets commit and push this change up to GitHub. Again, we get the green tick. Lets click on it, and click on the link to see the details of the passing build. Travis shows us a log of everything that it ran. If we scroll down to the bottom, we'll see it shows details of our tests.
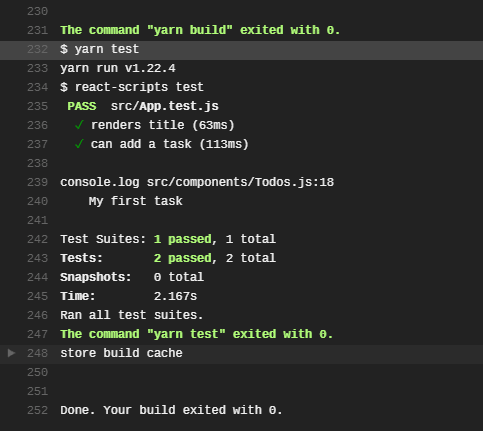
They've got green ticks next to them, and everything passes, great!
Grab a branch for safety
Now that we have these green ticks, and we know everything works, wouldn't it be great if we could make sure it stays that way?
A great way to do this is to always make our changes on a separate git branch. That way we can do our work separately from the main branch, and only merge our new changes in once we're sure everything works well. To create a new branch we run git checkout -b my-new-branch in the terminal. Now if we make any mistakes, they won't impact the main code.
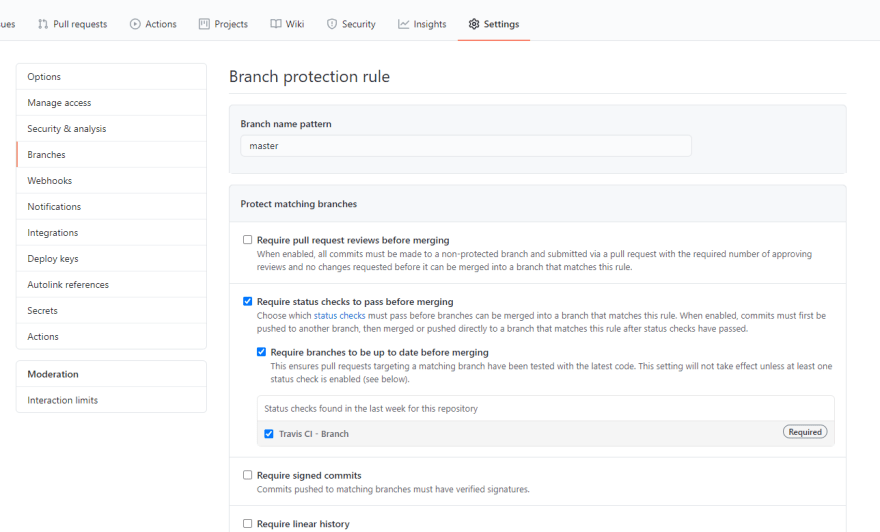
We can go one step further, and stop any merging from our branch to main, unless the Travis build has passed.
In your GitHub repo, go to settings and select Branches. There you can type the name of your main branch, and select Require status checks to pass before merging and your Travis build check. Make sure to also check the Include administrators option if you want to protect yourself from yourself.
Lets try and break things
So what happens when something breaks? I've changed my code to remove the line that adds a new todo to the list. This should mean that my tests will fail. As this is a new branch, when push we need to make the new branch on GitHub too, so run git push --set-upstream origin my-new-branch in the terminal.
When we go to GitHub we see it suggest to make a pull request.

We'll press the green button to create the pull request. We'll see that we can't merge this pull request until the checks finish. And if we wait, we'll see a red cross on the Travis build.
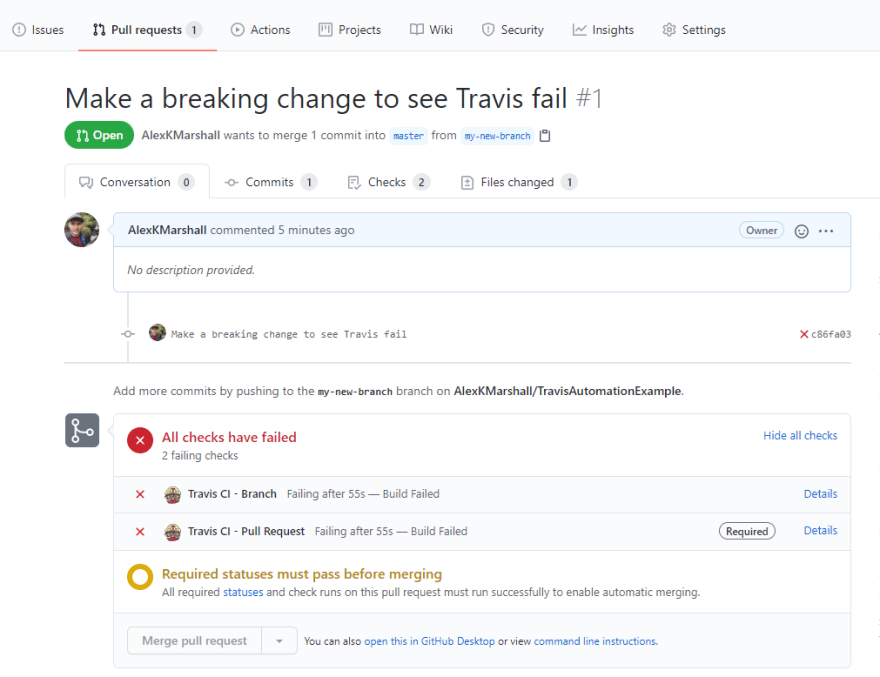
If we click through into the details on Travis, we can see what's wrong.

This time we don't get the green ticks. We can see the test can add a task has failed, just as we expected.
Travis caught our mistake, and we get a chance to fix it, instead of breaking our main code-base.
We can go back to our code, fix what was wrong, and push to GitHub again. This time the build passes, we get the green ticks, and we can merge our pull request safely.
Where to go from here
This was just the basics, from here you can automate pretty much anything you can think of.
- Running full end-to-end tests
- Testing on different browsers or different versions of node
- Automating deployment to a service like Netlify if everything passes
- much more
I hope this post helps you to see the benefits of Continuous Integration, and how it can be simple to set up.
If you have any other suggestions for cool ways to use automation, I'd love to hear them in the comments.
Happy Coding!


Top comments (0)