
Welcome to our simple guide for those of you looking for 99.9% uptime and an almost free deployment solution for your static websites, without having to maintain and configure your own server. In this article, we will do it with Cloudflare as a CDN service and AWS S3 as file storage.
Cloudflare has 150+ data centers all over the world and their Basic plan (free) is more than enough for most websites. Though its features are basic, you will still get 99.9% uptime, free SSL certificate, DDoS protection, Brotli compression, auto JS/CSS minification, hiding of your destination server IP, and proper cache settings.
We decided to write this article because most other guides on the internet overwhelm people with superfluous settings that do not make any sense and seem copy/pasted from other sites.
Starting Requirements
- AWS account
- Cloudflare account with your existing NS already migrated to it
Migration to Cloudflare is a very simple process, because they have a nice UI/UX. They will scan your DNS records and suggest that you add existing ones.
Pros and Cons
✅ Highly performance CDN for free;
✅ 99.9% uptime;
✅ Free SSL certificate;
✅ Simple configuration and usage;
❌ Not possible to use S3 with Cloudflare if you find that your current site name is in use as a bucket name (explanation below);
❌ Only first level subdomain compatibility for https websites on a free plan.
1. Create S3 Bucket
You need navigate to S3 through your AWS console and click “Create bucket”.
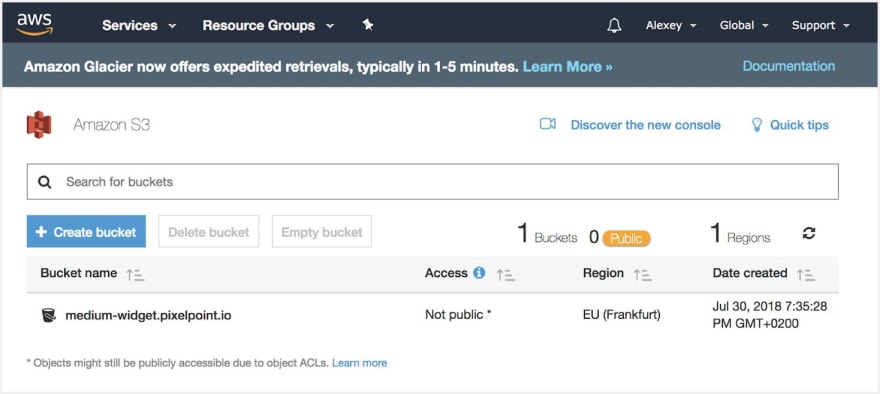
On the next screen, pick your bucket name and define the region. The bucket name should be the same as your website name. It’s an AWS requirement and without it you will not be able to access your website through Cloudflare. The region does not matter, because the site is cached by Cloudflare anyway.

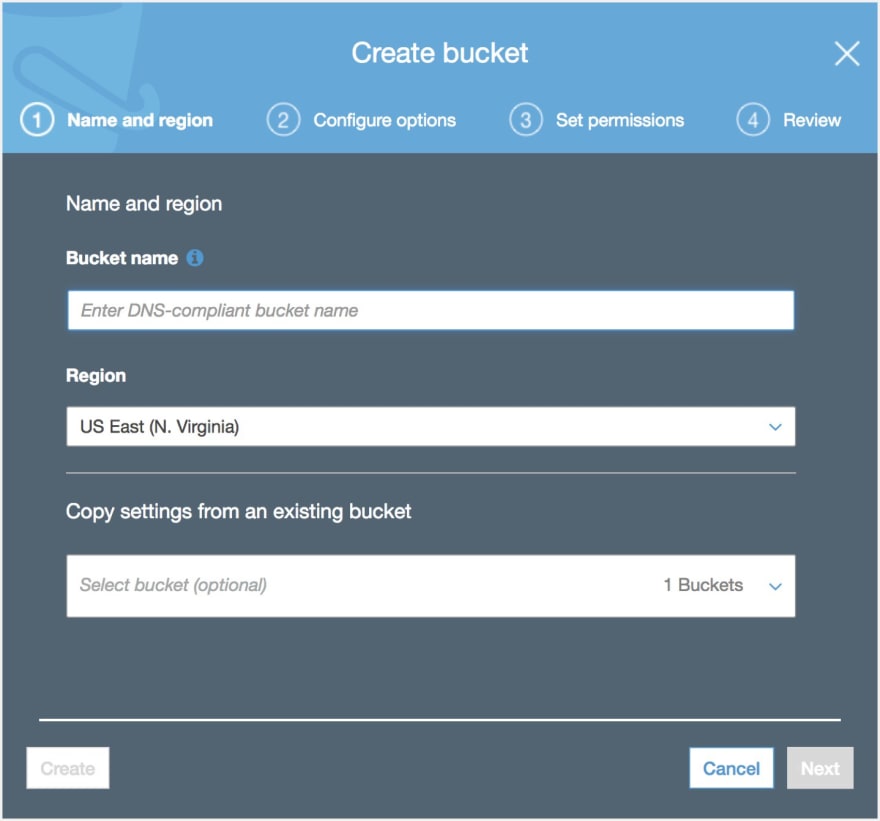
After that screen, click “Next” until you create your bucket. You don’t need to change anything in these settings. Note: If you receive a “Bucket name already exists” message in this step, please see the “Troubleshooting” section at the end of the article for details.
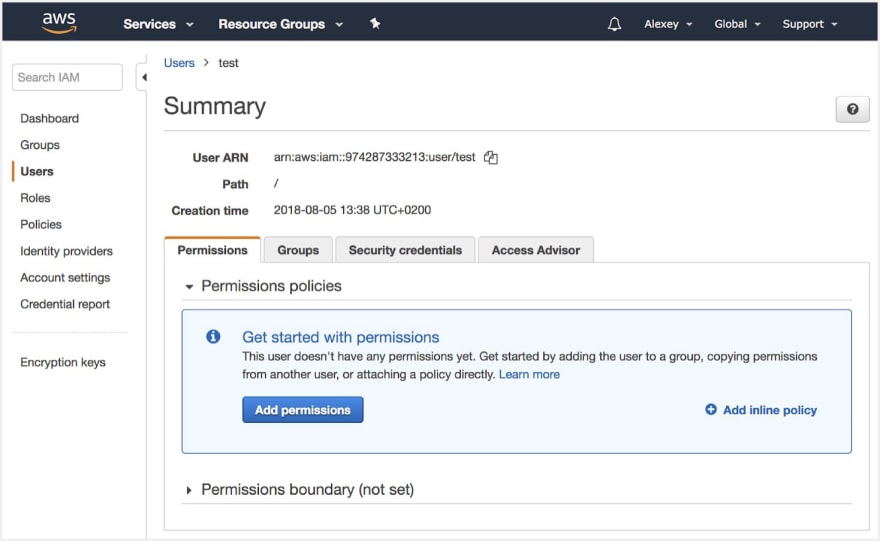
2. Create IAM user.
First, we need to the install AWS command line tool by following this link. Once it’s ready, go to the IAM tab in AWS, then Users, and Add user. Make sure you check Programmatic access, because we don’t need extra permissions for this user despite publishing website content.


By default, your user is created without extra permissions. Simply click “Next” until you reach the “Success” page with user credentials

Download you .csv and store it securely. These details are required for AWS CLI.
3. Set the right permissions for your user
After you created your user, click on it, then on the permissions tab click “Add inline policy.”
You should see the policies generator page, where you’ll see the following settings:
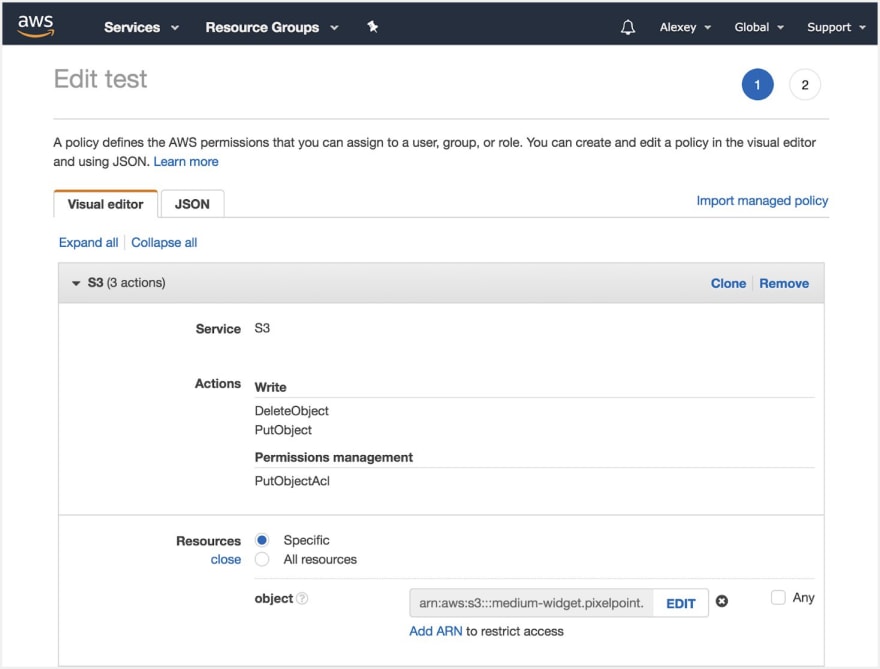
Actions — Write section with PutObject and DeleteObject; Permissions section with PutObjectAcl
Resources – your ARN bucket name, which looks like this arn:aws:s3:::medium-widget.pixelpoint.io/*
In JSON view, it should look like this

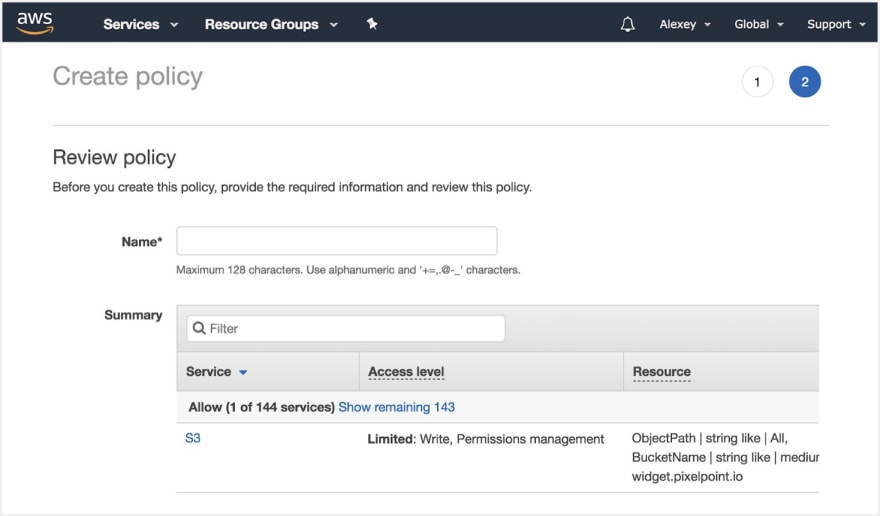
Review the policy and enter the name. We are now done with configuring permissions and we can now set up aws-cli to push your website.
4. Deploy with AWS CLI
Go to the terminal and run aws configure. You will be asked to fill in credentials from the .csv file you downloaded during the IAM user creation process. Enter you Access Key ID and Secret Access Key. The other fields are optional and you can simply hit “Enter”.

After that, you’re ready to deploy your website with AWS CLI. Go to your website folder; it should contain index.html and other files. Then execute:
aws s3 cp {folder name} s3://{bucket name} --recursive --acl public-read
Real example:
aws s3 cp dist/ s3://test.pixelpoint.io --recursive --exclude ‘.DS_Store’ --acl public-read
In the command, we copy the folder to the remote bucket on S3.
--recursive copies all nested folders;
with — exclude you can define lists of files that it is not necessary to copy, such as some temporary, IDE, or OS related files;
--acl public-read is necessary to make your website accessible.
We use copy instead of sync folder, because sync does not work as expected and some files will not be copied to the bucket even after modification.
5. Publishing website
To finally publish your website, go to your S3 bucket list, click to the bucket, then choose the Properties tab. Enable static website hosting and enter index.html as your index file. Copy the url of the website and click “Save.”

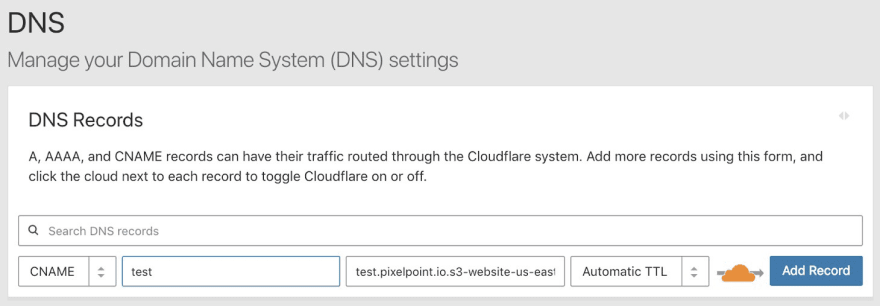
The final step is to go to your Cloudflare DNS settings and add a new CNAME record. As we noted above, your bucket name should be the same with your CNAME. In the domain name field in Cloudflare, you should put a link to your website on S3 without “http” and “/”, like this: test.pixelpoint.io.s3-website-us-east-1.amazonaws.com. In a name field, you should put your website name without domain. For example, for “test.pixelpoint.io”, we would only put “test” as a name.
That’s it. Now your website should be accessible via your chosen domain name.
Troubleshooting
- Make sure you that you have “Flexible” settings enabled in Cloudflare’s SSL section, otherwise you could face an issue with SSL certificate.
- To redirect from www to non www domains, be sure you do it as a first level subdomain(Cloudflare limitations). You can do this through the Page Rules section on Cloudflare or by creating a new bucket with a Redirect rule at S3.
- If you receive the error “Bucket name already exists” during the bucket creation process, this solution will not work for you, as you will not be able use Cloudflare in this case.


Latest comments (8)
Curious if I could get this to work with Backblaze B2
Is there any benefit in this set up over just using GitHub Pages?
You can get a custom domain to work with GitHub Pages, you get SSL, you get your static pages hosted for free, but on top of that with GitHub Pages you can use Travis-CI/Jekyll to build your static pages easily. Since it's a static website it's not like the source is private or anything like that.
I tried Github pages before moved to a described solution.
Reasons:
About the last point, of course, it could be specific my issue because I don't know how to cook Github pages well, but I did not want to spend a whole day trying to figure out how to do it right. I wanted to have a solution out of the box.
All of those reasons are mitigated with using Netlify + the setup's a breeze and you get mostly the same benefits like you do with AWS/Cloudflare, except you also get total control of server's redirect rules (meaning you can redir everything to your index page for a SPA or properly serve 404s/401, etc. for specific routes) and you also get form submission, authentication and other various goodies that can't otherwise be fitted onto a static page.
Any reason/pros this setup tops that?
Well, you can always just set up a separate repository for the results with Travis-CI, and throw away the history on it.
Seems like a minor problem - changing the configuration on your build tool seems like a minimal hassle. Also, separate repository with build artifact deployment to GH Pages is not a lot of work, and you can use a separate branch and deploy just your build artifacts there and e.g. always throw away the history on that branch.
This is sort of true, unless you're happy with using subdirectories + scripting. E.g. "if in staging branch, deploy to staging subdirectory". That + local envs + potentially using ngrok / PageKite or similar should cover most uses rather well.
No clue what that's about. You could of course try to ask GitHub or Stack Overflow or some such.
I've got repos where I push and changes appear within seconds, and repos where changes go to Travis-CI queue and then the artifacts get pushed to GH pages and those changes appear within minutes. Can't remember witnessing downtime.
Sounds like there were quite a few steps that probably took a while to set up your alternative.
As an example of what I've set up there's this for the sources github.com/Lieturd/lieturd-website which deploys build artifacts to github.com/Lieturd/lieturd.github.io (without history) that then gets hosted at lieturd.com/ .. all with the 100% free GitHub Pages + Travis-CI.
If you happen to like writing pure HTML or prefer using Jekyll, then the setup can be even simpler and skip the Travis-CI step, like I did on this earlier work: github.com/lietu/lietunet
How much has that set up cost you each month?
Cloudflare is free. S3 just few cents. All assets served by Cloudflare so you don't pay for traffic from S3.
Wow. That's amazing. I'll have to give that a go then.
Thank you for sharing!