Photo by Florian Berger
Introduction
Today 2FA is everywhere. It has made stealing accounts a bit harder than just obtaining a correct password. And while by no means it makes your online assets hackproof, it requires more sophisticated and multi-leveled attacks. As with anything in this world, the more complex something is — the more likely it is to fail.
I am pretty sure that everyone who is reading this has used OTP-based 2FA in their lifetime. Today, I am inviting you to look under the hood of this simple yet such widespread technique that is guarding countless accounts today.
But before we dive in — here's the demo of what we will be building today.
The basics
When talking about OTPs first thing that should be mentioned is that there are two types of them. HOTP and TOTP. Namely, HMAC-based One Time Password and Time-based OTP. TOTP is not something completely different but an enhancement over HOTP, so let's first talk about the basic form.
HOTP algorithm is described by RFC4226. It's a small, 35 pages long spec, that contains everything from formal description to implementation example and test cases. Let's look at some of it's core concepts.
First of all, what does HMAC-based mean? HMAC stands for Hash-based Message Authentication Code.
MAC is a way of proving that a message came from the expected sender and not someone else. MAC algorithm produces a MAC tag using a secret key that is only known to the sender and the receiver. So when you receive a message, you can recalculate MAC tag yourself and if it matches to the one that was sent along — then you can be sure the message came from the expected sender and not one of those balaclava-wearing hackers, duh. As a bonus this also verifies data integrity, as in whether the data was damaged along the way. You cannot really tell one event from another but it's safe to consider the data corrupted in both cases.
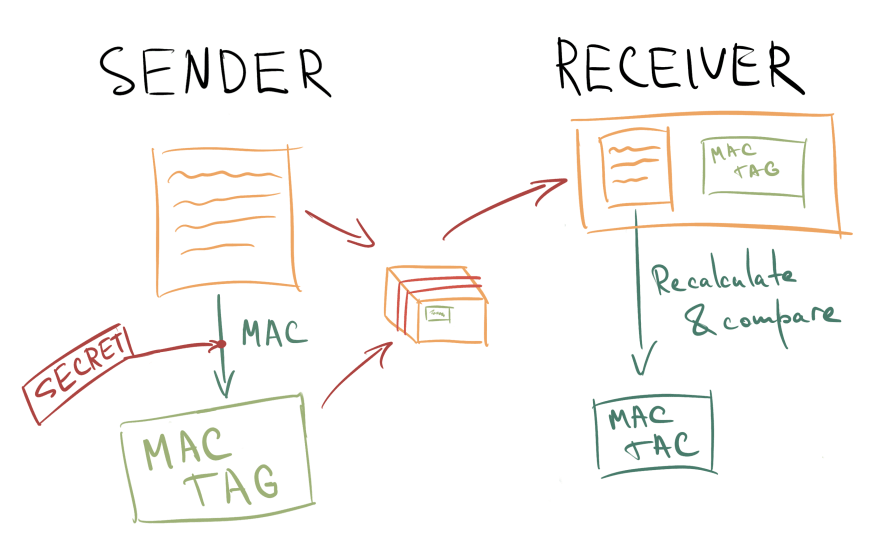
I have included some graphics similar to this one in this article. It might be silly but hopefully will help illustrate some things and make this wall of text less dull. Maybe they are too silly though...
Now, what is a hash? A hash is a product of running a message through a Hash Function. Hash functions take your data and make other fixed-length data out of it. For example, there is a well-known MD5 hash function. It was widely used to verify that the data you downloaded is not damaged. Basically, you feed it some data and get a string that looks like CCB4DB2088210… at the output.
MAC itself is not a specific algorithm, but rather a term that refers to one. HMAC, in turn, IS a specific implementation. Or, to be more precise — HMAC-X, where X is one of the crypthographic hash functions. Now, HMAC takes two parameters — a secret key and your message, mixes them together in a special way, applies a hash function of your choice twice and produces a MAC tag.
This article is not about cryptography though and you are probably wondering — how the hell is all of this related to one-time passwords? Don't worry — we are almost there.
According to the specification, HOTP is calculated based on 2 values:
- K — a secret key shared between client and server
- C — a counter or a moving factor
Secret key is a value that must be over 128 bits long, preferrably 160. It is generated when you initially setup your 2FA.
Counter is an 8-byte value that is synchronized between the server and client. It will be constantly updated as you generate passwords. In HOTP, client counter is incremented each time a new password is generated and server counter — each time a password is validated. Since we can generate passwords without actually using them, server allows counter values to be a bit ahead of what the current one is but only within a certain window. If you played with your OTP token too much and it was an HOTP algorithm — you'll have to resync your token with server.
Alright. As you have probably noticed, there are two input arguments here, just like in the HMAC itself. RFC4226 defines HOTP like this:
HOTP(K,C) = Truncate(HMAC-SHA-1(K,C))
So, K is predictably used as our secred key and Counter is used as the message. After HMAC generates the MAC — a mysterious Truncate function is used to extract a familiar numeric one-time password you see in your authenticator app.
Let's start generating and learn the rest along the way as we code!
Implementation plan
We will need the following steps to get our hands on those OTPs.

- Generate HMAC-SHA1 value from our K and C parameters. This will be a 20-byte string
- Extract 4 bytes from that string in a specific way
- Convert those bytes into a number, divide that number by 10^n, where n = number of digits in the OTP and take the remainder. Usually n=6.
Doesn't seem too complicated, right? We'll start with generating the HMAC.
Generating HMAC-SHA1
This is probably the most straightforward part of our plan. We are not going to roll our own crypto, of course. Never roll your own crypto. We are going to use Web Crypto API. Now, one thing to mention here is that by specification it is only exposed in a Secure Context. What this means is that you will be unable to tinker with it unless your scripts are running on an HTTPS website. And I doubt your localhost dev server is configured this way. Mine certainly isn't! You can read more history on why it became this way (as well as countless disappointed devs voices) here.
Luckily, in Firefox you CAN use Webcrypto in any context and don't have to reinvent the wheel or import any third-party libraries to do that. So, for the purpose of this article we are going to use FF.
Crypto API itself resides under window.crypto.subtle. If you are wondering what is so subtle about it — let me cite the spec here:
It is named
SubtleCryptoto reflect the fact that many of these algorithms have subtle usage requirements in order to provide the required algorithmic security guarantees
Let's quickly run through the Crypto API methods we will be using and set everything up. NB: all the methods mentioned here are async and return promises.
First of all, we would need the importKey method, since we are bringing our own key instead of generating one in browser. It takes 5 arguments:
importKey(
    format
    keyData,
    algorithm,
    extractable,
    usages
);
In our case:
-
formatwill be'raw', meaning that we will supply the key as raw bytes in anArrayBuffer. -
keyDatais the ArrayBuffer mentioned above. We'll talk about generating it in a bit -
algorithmwill beHMAC-SHA1as per OTP spec. This has to be an HmacImportParams object -
extractablecan be false, since we don't plan to export the key - And finally, of all possible
usageswe will only need'sign'
Our secret key will be a long random string. In reality it could be a sequence of bytes that are not necessarily printable but for the sake of convenience in this article let's just go with a string. To convert it to an ArrayBuffer we will use TextEncoder. With it this process takes just two lines of code:
const encoder = new TextEncoder('utf-8');
const secretBytes = encoder.encode(secret);
Now, let's compile everything together:
  const Crypto = window.crypto.subtle;
  const encoder = new TextEncoder('utf-8');
  const secretBytes = encoder.encode(secret);

  const key = await Crypto.importKey(
    'raw',
    secretBytes,
    { name: 'HMAC', hash: { name: 'SHA-1' } },
    false,
    ['sign']
  );
Great! We have our crypto instance on standby. Now let's deal with the counter and finally sign the message.
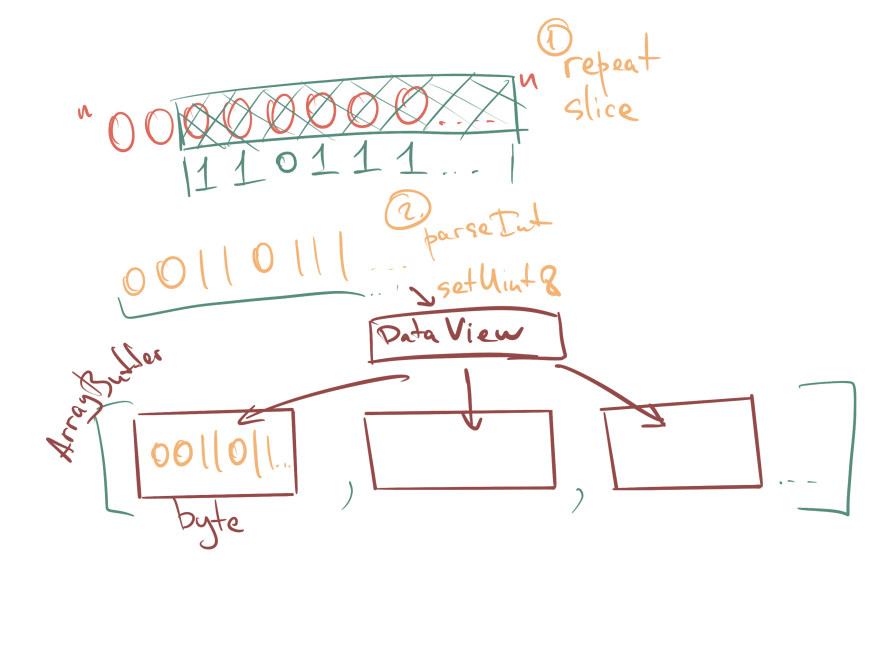
Our counter, according to the spec, should be 8 bytes and will also come in an ArrayBuffer form. To convert it into this form we will first use a trick that is usually used to pad numbers with leading zeroes in JS and then put each individual byte into the ArrayBuffer using a DataView. Please note that according to spec all binary data is treated as big endian (most significant bit first).
function padCounter(counter) {
  const buffer = new ArrayBuffer(8);
  const bView = new DataView(buffer);

  const byteString = '0'.repeat(64); // 8 bytes
  const bCounter = (byteString + counter.toString(2)).slice(-64);

  for (let byte = 0; byte < 64; byte += 8) {
    const byteValue = parseInt(bCounter.slice(byte, byte + 8), 2);
    bView.setUint8(byte / 8, byteValue);
  }

  return buffer;
}
With that in place — we are ready to sign! To do that we will just need to use sign function of SubtleCrypto.
const counterArray = padCounter(counter);
const HS = await Crypto.sign('HMAC', key, counterArray);
Bam! First stage complete. We have our HS value calculated. While this is a cryptic variable name, this is how this value is called in spec, so I decided to leave it be. It will be easier to map steps from spec to our code this way. What's next?
Step 2: Generate a 4-byte string (Dynamic Truncation)
Let Sbits = DT(HS) // DT, defined below,
// returns a 31-bit string
DT stands for Dynamic Truncation. Here's how it works:
function DT(HS) {
  // First we take the last byte of our generated HS and extract last 4 bits out of it.
  // This will be our _offset_, a number between 0 and 15.
  const offset = HS[19] & 0b1111;

  // Next we take 4 bytes out of the HS, starting at the offset
  const P = ((HS[offset] & 0x7f) << 24) | (HS[offset + 1] << 16) | (HS[offset + 2] << 8) | HS[offset + 3]

  // Finally, convert it into a binary string representation
  const pString = P.toString(2);

  return pString;
}

Note how we apply bitwise AND to the first byte of HS. 0x7f in binary is 0b01111111 , so we are just dropping the first bit here. In JS it just implements truncation to the spec-defined 31-bit, but in other platforms it would also ensure that the first bit, which is also the sign bit, is masked off to avoid confusion between signed/unsigned numbers.
Alright, we are almost there! Now we only need to convert what we got from DT to an integer and off we go to stage 3.
function truncate(uKey) {
  const Sbits = DT(uKey);
  const Snum = parseInt(Sbits, 2);

  return Snum;
}
Stage 3 is really small. All we need to do now is to divide our resulting number by 10 ** (number of digits in OTP) and take the remainder of that division. This way we basically cut last N digits from the resulting number. The spec mentions that you must extract at least 6 digits and possibly 7 or 8. Theoretically since it's a 31-bit integer you can extract up to 9 digits, but in reality I've never seen anything over 6. Have you?
Code for the final function that encompasses all functions we created above will then look like this:
async function generateHOTP(secret, counter) {
  const key = await generateKey(secret, counter);
  const uKey = new Uint8Array(key);

  const Snum = truncate(uKey);
  // Make sure we keep leading zeroes
  const padded = ('000000' + (Snum % (10 ** 6))).slice(-6);

  return padded;
}
Hooray! Now, how do we verify that what we just coded is, in fact, correct?
Testing
To test our implementation we will use examples provided in the RFC. Appendix D provides reference values for the secret string"12345678901234567890" and counter values from 0 to 9. It also provides us with calculated HMACs and intermediate truncated values. Very useful for debugging all the steps of this algorithm. Here's the sample of that table with only counter and HOTP values:
   Count    HOTP
   0        755224
   1        287082
   2        359152
   3        969429
   ...
If you have not yet checked the demo page, now is the time. Go ahead and try some of the RFC values over there. Make sure to come back though as we are about to move on to TOTPs!
TOTP
Finally, we've made it to the more modern form of 2FA — TOTP. When you open your favorite authenticator app and see a small clock ticking backwards, counting seconds until your code expires — that's TOTP. So what's the difference?
Time-based means that instead of a static counter, current time is used as a moving factor. Or, to be precise, current time step. To calculate this time step we take current unix epoch time (number of milliseconds since 00:00:00 UTC on 1 January 1970) and divide it by a time window (usually 30 seconds). Server usually allows for a bit of time drift to account for imperfections in time sync — about 1 step forwards and backwards depending on the configuration.
As you can see, this is clearly more secure than plain HOTP. In time-based case every 30 seconds a valid OTP changes even if it was not used. In the original algorithm valid password is defined by whatever counter value is currently stored on the server + whatever window there is for ahead of counter passwords. If you don't authenticate, that OTP stays valid for indefinite amount of time. More on TOTPs can be found in RFC6238.
Due to time-based scheme being an extension over original algorithm, no changes to the original implementation are required. We will use requestAnimationFrame and check on every tick if we are still inside the time window. If we are not — we will calculate a new time step (counter) and regenerate HOTP with it. Omitting all the administrative code it will look roughly like this:
let stepWindow = 30 * 1000; // 30 seconds in ms
let lastTimeStep = 0;

const updateTOTPCounter = () => {
  const timeSinceStep = Date.now() - lastTimeStep * stepWindow;
  const timeLeft = Math.ceil(stepWindow - timeSinceStep);

  if (timeLeft > 0) {
    return requestAnimationFrame(updateTOTPCounter);
  }

  timeStep = getTOTPCounter();
  lastTimeStep = timeStep;
    <...update counter and regenerate...>
  requestAnimationFrame(updateTOTPCounter);
}
Finishing touch — QR support
Usually when we setup 2FA we do so by scanning a setup QR code that contains all the required data: secret, selected OTP algorithm, account name, issuer name, number of digits.
In my previous article I talked about how we can scan QR codes right from the screen using getDisplayMedia API. I ended up creating a small npm library that we can now use to easily add QR code reading support into our demo. The library in question is called stream-display and it will be accompanied by an amazing jsQR package.
URL encoded in the QR code for 2FA should be in the following format:
otpauth://TYPE/LABEL?PARAMETERS
So, for example:
otpauth://totp/label?secret=oyu55d4q5kllrwhy4euqh3ouw7hebnhm5qsflfcqggczoafxu75lsagt&algorithm=SHA1&digits=6&period=30
I will omit the setup code for the stream/recognition itself since it can be easily found in both libs' documentation. Instead, here's how we can parse this URL:
const setupFromQR = data => {
  const url = new URL(data);

  // drop the "//" and get TYPE and LABEL
  const [scheme, label] = url.pathname.slice(2).split('/');
  const params = new URLSearchParams(url.search);

  const secret = params.get('secret');
  let counter;

  if (scheme === 'hotp') {
    counter = params.get('counter');
  } else {
    stepWindow = parseInt(params.get('period'), 10) * 1000;
    counter = getTOTPCounter();
  }
}
In a real world scenario the secret will be a base-32 (!) encoded string, because some shared secret bytes can be non-printable. But here we once again omit that for demo purposes. Unfortunately, I cannot find any information on why exactly it was decided to be base-32, or this specific format. There seems to be no actual RFC for the otpauth and the format itself seems to be invented by Google. You can read a bit more about it here.
If you want to generate your own 2FA QR codes for testing purposes you can use an amazing FreeOTP tool. I sure used it a lot while making this.
Conclusion
And with this — we shall be done! Once again, you can check out the demo to see it in action or to see the full code driving the entire process.
I think we covered some important tech we use on a daily basis and hope that you have learned something new today. I spent much more time writing this article that I imagined it would take. But it is also very enjoyable to turn a paper spec into something working and something so familiar. We have more interesting things to talk about in the future, so stay tuned.
Until next time!


Top comments (9)
Hi. I just tested you demo if it generates the same tokens as (for example) WinAuth. WinAuth generates tokes every 30 seconds as well, but they are different from the ones generated in your demo. The tokens generated by your demo cannot be used to log into Amazon as well.
WinAuth generates time based tokens based on RCF 6238 as well and works fine for Amazon. What is the difference between your demo and WinAuth (or other Google Authenticator clones)? Can it be modified to generate the same tokens?
Hello there! Thank you for testing the demo and very sorry for such a huge delay in my response. Somehow dev.to never sends me emails about new comments :(
After some debugging and digging, I remembered the whole base32 deal. When creating this demo, for reasons I don't remember, I did not implement conversion of the input string from base32 and instead left it to be treated as plain UTF-8.
While this works for the test cases provided in RFC4226, it does not work with real world applications, which use base32.
I grabbed a base32 to ArrayBuffer conversion function from another library, put it into the demo and did a quick test against and AWS account comparing the codes to google authenticator. This way, it works!
Thanks for reporting this. I will think about how to incorporate this into article and the demo and push an update.
hi, the TOTP example is not complete because you are calling a method called getTOTPCounter() however you have not defined this method anywhere in your example. Please can you share the full example? Thank you
Hi! You can find the full example on Github in the article demo repo. The function you are looking for is defined here: github.com/khovansky-al/web-otp-de...
This article is freaking awesome! However, I see no QR code in the demo - only an icon/button and if i click it, it wants me to share my screen :-o
Thanks!
Yes, the demo only scans QR codes, not generates them. I have linked the FreeOTP tool in the article that you can use to generate the QR code. You can then use this demo to let the screen sharing API access the page with QR code and that will in turn scan the QR code and give you a OTP. Hope this helps!
Awesome! Tks for this great article.
Glad you liked it!