One area of a Kubernetes that is critical to production deployments is security. Ensuring the control of who has access to your Information System and what users have access to is the objective of an Identity and Access management system. It is one of the fundamental processes in Security Management and it should be thoroughly taken care of.
This blog will take a practical look at authentication and authorization of users external to Kubernetes with Role-Based Access Control (RBAC).
Pre-requisites:
- High-level understanding of Kubernetes concepts. Sample reference article.
- You have a Kubernetes cluster running.
- You have the kubectl command-line (kubectl CLI) installed.
- OpenSSL installed
Why we need RBAC?
RBAC policies are crucial for the management of a k8s cluster, as with RBAC we can specify which types of actions are allowed depending on the user and the role in the organization. Examples include:
- Secure your cluster by granting privileged operations (Example- accessing secrets) only to admin users.
- User authentication in your cluster.
- Limit resource creation (Example- pods, deployments) to specific namespaces.
- Isolate resources access within your organization (for example, between departments).
To manage RBAC in Kubernetes, we need the following elements:
Roles and ClusterRoles: Both consist of rules. The difference between a Role and a ClusterRole in the scope: in a Role, the rules are applicable to a single namespace, whereas a ClusterRole is cluster-wide.Both Roles and ClusterRoles are mapped as API Resources inside our cluster.
RoleBindings and ClusterRoleBindings: Bind subjects to roles (i.e. the operations a given user can perform). As for Roles and ClusterRoles, the difference is the scope: a RoleBinding effective inside a namespace, whereas a ClusterRoleBinding is cluster-wide.
Subjects: The set of users and processes that want to access the Kubernetes API.
Resources: The set of Kubernetes API Objects available in the cluster. ( Pods, Deployments, Services, etc. )
Verbs: The set of operations that can be executed to the resources above (examples: get, watch, create, delete, etc.)
Users: These are meant for humans or processes living outside the cluster. In Kubernetes, there is no API call to add/create the users(for example you
can not say kubectl create user)service accounts: These are namespaced and associated with the pods via secret. These are managed by Kubernetes. By default service account have no access permissions.
With these elements in mind, We want to connect subjects, API resources, and operations. In other words, we want to specify, for a given user, which operations can be executed over a set of resources.
How to use RBAC?
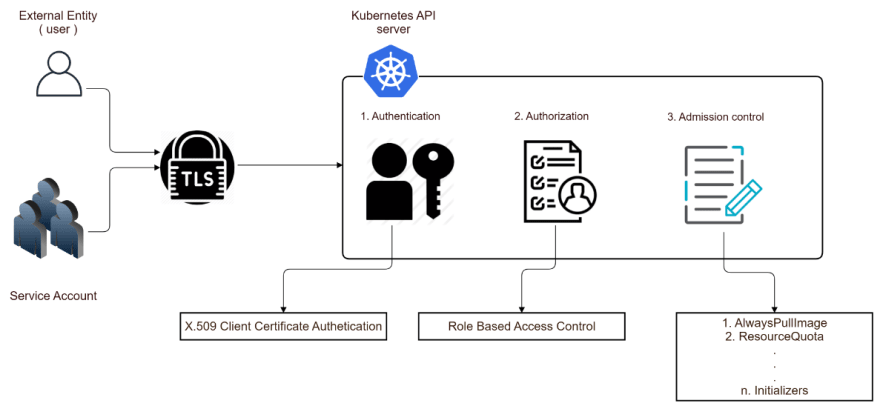
There are multiple Authentication strategies followed by Kubernetes. We will be using X.509 Client Certificate for authentication purpose.
When we use X.509 Client Certificate Authentication strategy Kubernetes it will first create the certificate authority and it is a cluster-wide authority that is issuing certificates.
- First step k8s will create a certificate authority and it will generate a certificate and that is going be a crucial component of authentication.
- Once you have a CA Cert then you can basically create a certificate external to k8s and send it to k8s saying here is a new user that is going to be associated with the new certificate please sign it and approve it.
- Then Kubernetes will take that and will add it to its own internal store and then it will authorize and approve.
- Then Kubernetes generates a signed certificate and gives it back, which is going to be used by the user/admin who is going to access the k8s cluster.
- The user will use a combination of the CA cert as certificate along with the pre-approved certificate associated with the user.
We will create an external user called Bob and the group engineering that he belongs to with the roles which grant him namespace level write access and a cluster-level read access.
Authentication
Steps: (Before we start please make sure all of the above pre-requisites are satisfied)
Create a namespace engineering
$ kubectl create namespace engineering
namespace/engineering created
Run a below command to get namespace
$ kubectl get ns
Create Private Key Using OpenSSL
After creating a namespace we will create a private key using OpenSSL. Before that create a new directory called cred and cd into that directory. To do that run below command
$ mkdir cred && cd cred
$ openssl genrsa -out Bob.key 2048
Extract certificate signing request from the private key created
Now we have created a private key with name Bob.key we will extract the CSR (certificate signing request) from this private key for that run below command.
$ openssl req -new -key Bob.key -out Bob.csr

You are about to be asked to enter information that will be incorporated
into your certificate request.
What you are about to enter is what is called a Distinguished Name or a DN.
There are quite a few fields but you can leave some blank
For some fields, there will be a default value,
If you enter '.', the field will be left blank.
-----
Country Name (2 letter code) [AU]:.
State or Province Name (full name) [Some-State]:.
Locality Name (eg, city) []:.
Organization Name (eg, company) [Internet Widgits Pty Ltd]:engineering
Organizational Unit Name (eg, section) []:.
Common Name (e.g. server FQDN or YOUR name) []:Bob
Email Address []:.

Please enter the following 'extra' attributes
to be sent with your certificate request
A challenge password []:.
An optional company name []:.
while creating a CSR you will be asked to enter certificate subject values. (Enter a value for Common Name and Organization Name. For all other fields enter the value as ' . ' and it will be treated as blank value)
The common name we are using here is Bob and the organization name engineering and this very critical to Kubernetes because when we are actually extracting the CSR file from the key we are mentioning that the name of the user is Bob and the group that he belongs to is engineering.
This is the only common identifier between the outside user and Kubernetes because when Kubernetes wants to find out more about Bob it actually looks at the common name in the certificate and then figures out the exact identity.
Convert the CSR file to base64
Now we have two files one is the private key that we have generated and the CSR file that we got out of it
This CSR file is basically the certificate request. We have to send this to Kubernetes and ask Kubernetes to register it and then as a cluster administrator will approve that request.
Before that, we have to convert the CSR file to base64 as base64 string is how Kubernetes will understand. For that run below command.
$ cat Bob.csr | base64 | tr -d '\n'
Copy the output of the above command.
Create CertificateSigningRequest
Now create a certificateSigningRequest.yaml and paste the copied output string of above command next to request: under spec:
CertificateSigningRequest
kind: CertificateSigningRequest
apiVersion: certificates.k8s.io/v1beta1
metadata:
  name: Bob
spec:
  groups:
  - system:authenticated
  request: <paste base64 string from above step>
  usages:
  - digital signature
  - key encipherment
  - server auh
Send certificate signing request to Kubernetes
$ kubectl create -f certificateSigningRequest.yaml
Get the status of a CSR created
$ kubectl get csr
NAME      AGE   REQUESTOR            CONDITION
Bob   7s    docker-for-desktop   Pending
As we can see the condition is pending because the Kubernetes administrator has to approve the signing request. To do that run the below command
Approve CertificateSigningRequest
#kubectl certificate approve <name of the certificateSigningRequest >

$ kubectl certificate approve Bob
certificatesigningrequest.certificates.k8s.io/Bob approved
Get the status of a CSR
$ kubectl get csr
NAME      AGE     REQUESTOR            CONDITION
Bob   3m21s   docker-for-desktop   Approved,Issued
Now we have sent the CSR and Kubernetes admin approved it. Kubernetes will turn the CSR request into a base64 encoded token and store it internally. Now we need to retrieve that token, decode the token and create a CRT file from that token which will be the final certificate which we are going to use when Bob gets authenticated.
Create a CRT file from a token
$ kubectl get csr Bob -o jsonpath='{.status.certificate}' | base64 --decode > Bob.crt
Now that we have two files a) Bob.key b) Bob.crt combination of both these files will help Bob to play with the Kubernetes cluster.
Configure The details in a config file (kubeconfig file)
We have to set the credentials in the kubeconfig file to get the Kube cluster access for that run a below command
$ kubectl config set-credentials Bob --client-certificate=Bob.crt --client-key=Bob.key
User "Bob" set.
Test if Bob can access the resources
So now to find out our Bob is ready to manage and access the resources in namespace engineering
$ kubectl auth can-i list pods -n engineering
if you run the above command you will get the output as yes because you are running a command as cluster-admin so to check is the Bob is able to list the pods inside lab4 namespace run below command
$ kubectl auth can-i list pods -n engineering --as Bob
The output of the above command will be no. This is because the Bob has been just authenticated by Kubernetes but it is not authorized to perform any action.
Authorization
Once an API request is authenticated, the next step is to determine whether the operation is allowed or not. This is done in the second stage of the access control pipeline.
Create a pod in namespace engineering
$ kubectl run nginx --image=nginx -n engineering
Test if Bob can access pod inside engineering namespace
To See if Bob can access the pod inside engineering namespace run a below command.
$ kubectl get pods -n engineering --as Bob
Error from server (Forbidden): pods is forbidden: User "Bob" cannot list resource "pods" in API group "" in the namespace "engineering"
As we can see the Bob is not able to access the pods as he is not authorized to even list the pods inside engineering namespace for that we have to create a role which will give them access to resources mentioned in the rule and bind that role to a user i.e. Bob.
Create a role for engineering namespace
So how does the role lookalike? Create a role.yaml file and paste the below content in the file and run a command to create a role
kind: Role
apiVersion: rbac.authorization.k8s.io/v1
metadata:
  namespace: engineering
  name: reader
rules:
- apiGroups: [""]
  resources: ["pods","services","nodes"]
  verbs: ["get","watch","list"]
$ kubectl create -f role.yaml
Get role
$ kubectl get roles -n engineering
We just have created a role that is not associated with any user and it grants access to resources pods, services, and nodes to watch and list operations inside engineering namespace.
Create role-binding
Now we have to associate this created role to a user we have created. To do so create a rolebinding.yaml paste the below text and run a command to create role-binding.
RoleBinding associates an existing role with Bob.
kind: RoleBinding
apiVersion: rbac.authorization.k8s.io/v1
metadata:
  name: read-access
  namespace: engineering # namespace where we have created the role and user
subjects:
- kind: User
  name: Bob # user name we have created
  apiGroup: rbac.authorization.k8s.io
roleRef:
  kind: Role
  name: reader #name of the role we have created
  apiGroup: rbac.authorization.k8s.io
$ kubectl create -f rolebinding.yaml
Get rolebindings
$ kubectl get rolebindings -n engineering
Test if Bob can list pod inside engineering namespace
Now try to run the below command and see if Bob have access to get the pods inside engineering namespaces
$ kubectl get pods -n engineering --as Bob
NAME   READY   STATUS    RESTARTS   AGE
engineering   1/1     Running   0          6s
As we can see now Bob has access to get the pods from the namespace. Now If a Bob wants to know the nodes in the cluster what he does is he will run the command as $ kubectl get nodes --as Bob but he Bob will not be able to access the nodes as nodes are the cluster level resource and the object role is limited to namespace only. Current permission which is very restrictive prohibits Bob from accessing anything at cluster-level. The Bob still pretty much aligned to namespace engineering and he can list any resource that is specific to the namespace.
$ kubectl get nodes --as Bob
Error from server (Forbidden): nodes is forbidden: User "Bob" cannot list resource "nodes" in API group "" at the cluster scope
Create cluster-level premissions
Now we want to give Bob slightly better access permissions i.e. cluster-level permissions for that we have to create a new role called ClusterRole which will give access to cluster-level resources. To do so create a file
clusterRole.yaml and paste the below content in the file and run the command to create a cluster role.
Get ClusterRole
kind: ClusterRole
apiVersion: rbac.authorization.k8s.io/v1
metadata:
  # namespace is removed as cluster level role is not namespaced
  name: cluster-node-reader
rules:
- apiGroups: [""]
  resources: ["nodes"]
  verbs: ["get","watch","list"]
$ kubectl create -f clusterRole.yaml
Create role-binding
Now to bind this role to a user create clusterbinding.yaml and paste the below content in the file and run the command to create a cluster binding.
kind: ClusterRoleBinding
apiVersion: rbac.authorization.k8s.io/v1
metadata:
  name: cluster-binding
subjects:
- kind: User
  name: Bob
  apiGroup: rbac.authorization.k8s.io
roleRef:
  kind: ClusterRole
  name: cluster-node-reader
  apiGroup: rbac.authorization.k8s.io
$ kubectl create -f clusterbinding.yaml
Test if Bob can cluster-level resource
To see is Bob can now access the cluster level resource run a below command
$ kubectl get nodes --as Bob
NAME STATUS ROLES AGE VERSION
docker-desktop Ready master 90d v1.14.6


Top comments (0)