
Setup Obniz Board as a counter & store data in Kintone Web Database all in 10 minutes!
Introduction
What is Obniz Board?
Obniz Board is an IoT Microprocessor that is easily programable with JavaScript!
The code can be stored on the cloud & you have full device control with just one JavaScript library, making it an ideal IoT device for a hackathon.
2-min video on Obniz Board's functionality:
https://youtu.be/Y_PXOgRP_AU
What is Kintone?
Kintone is acloud platform that creates Web Databases ridiculously quickly!
Databases are created with intuitive drag-and-drop GUI and since your data lives in the cloud, no need to worry about servers to maintain. Control everything on your browser or use REST API.
Outline
- Introduction
- Outline
- Get an Obniz Board
-
Connect Obniz Board to WiFi
- Step 1: Plug-in the Obniz Board to power via Micro USB cable
- Step 2: Connect to the Obniz Board's network from your PC
- Step 3: Open http://192.168.0.1
- Step 4: Select the target WiFi network's SSID from the pull-down menu
- Step 5: Enter the password in alphanumeric characters.
- Step 6: Press "Connect" button to complete the process.
- Success + obnizID
- Configure the Script.js
- Get a FREE Kintone Developer License
- Create the Database
- Verify
- Conclusion
Get an Obniz Board
Obniz Board is on Amazon for $49 (At the time of publishing).
This tutorial assumes you are using the original Obniz Board, but you can use their newer Obniz Board 1Y as well.
Connect Obniz Board to WiFi
Now that you are a proud owner of Obniz Board, time to plug it in & connect it to WiFi.
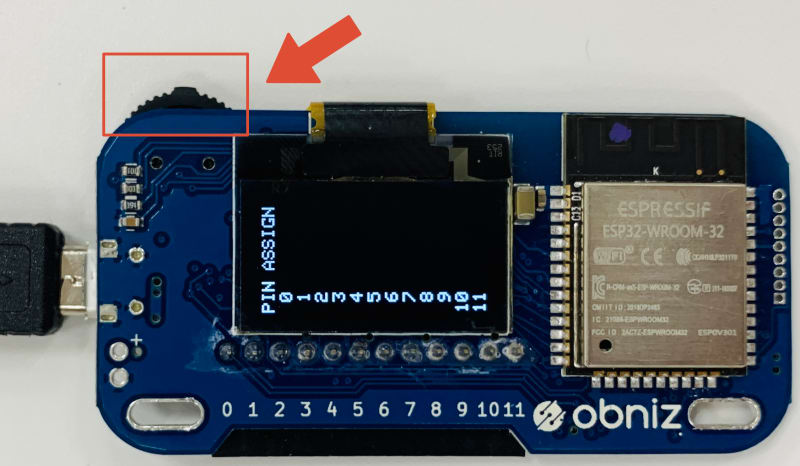
Overview of the parts

We will be using the Dial Switch as the input mechanism.
Step 1: Plug-in the Obniz Board to power via Micro USB cable
Turn on the Obniz Board by plugging in a Micro USB that is connected to a charger, battery, or PC.
Step 2: Connect to the Obniz Board's network from your PC
Obniz Board can act as a WiFi access point for configuring it from a browser.
The network name will be obniz-XXXXXXXXXX
Step 3: Open http://192.168.0.1
Step 4: Select the target WiFi network's SSID from the pull-down menu
Step 5: Enter the password in alphanumeric characters.
Step 6: Press "Connect" button to complete the process.
| Login Page | Success Page |
|---|---|
 |
 |
Success + obnizID
Once you have your Obniz Board successfully connected to the internet, a QR Code and the 8-digit obnizID will be displayed.
For details on the process, refer to Obniz Document on Setting from Browser.
If an error is displayed or Obniz Board is not starting up, refer to Obniz Troubleshooting Guide
Configure the Script.js
The code needed for this Obniz Board x Kintone integration is below.
Save the code as Script.js and replace the Xs in Line 5 with your obnizID.
⚠️ If you do not update the script with your obnizID, you will get a prompt each time you view the Kintone Database App.
(() => {
  'use strict';

  // Instantiate Obniz with Obniz ID & set callback function
  const obniz = new Obniz('XXXX-XXXX');
  kintone.events.on('app.record.index.show', event => {
    obniz.onconnect = async () => {
      let count = 0;

      // Gets the input from the built-in black switch
      // Switch's 4 states: "none", "push", "left", "right"
      obniz.switch.onchange = function (state) {
        obniz.display.clear();
        if (state === 'right') {
          count++;
        } else if (state === 'left') {
          count--;
        } else if (state === 'push') {
          // Kintone REST API Request
          // kintone.api(pathOrUrl, method, params, opt_callback, opt_errback)

          const pathOrUrl = kintone.api.url('/k/v1/record', true);

          const method = 'POST';

          const body = {
            'app': kintone.app.getId(),
            'record': {
              'Number': {
                'value': count
              }
            }
          };

          kintone.api(pathOrUrl, method, body,
            function (resp) {
              // Successful API Call
              console.log(resp);
            },
            function (error) {
              // Error
              console.log(error);
            });
          obniz.display.print('Saved to Kintone');
        }

        // Display the current count on Obniz
        obniz.display.print(count);
      };
    };
  });
})();
Code's Author
The above code is in large part by written by @RyBB.
RyBB is a Technical Evangelist at Cybozu where he promotes fun hacks using the Kintone Platform. Check out his Japanese articles at Qitta @RyBB.
Get a FREE Kintone Developer License
Sign up for the FREE Kintone Developer License by filling out this web form: kintone.dev/new
When selecting your subdomain, please...
- ⚡ Only use lowercase, numbers, & hyphens
- ⚠ Do not use uppercase or special characters
The Subdomain will be used to access your Kintone Database.
- Your Kintone login link will be
YOUR_SUBDOMAIN.kintone.com - Example:
example.kintone.com
By default, the login name is your email.
Create the Database
Databases in Kintone are called "Apps".
This video will go over how to make a Kintone Database for this project.
The steps it takes are also written below.
- Log in to your Kintone Subdomain
- The URL to your Kintone is
YOUR_SUBDOMAIN.kintone.com - Ex/
demosubdomain is accessed at demo.kintone.com}
- The URL to your Kintone is
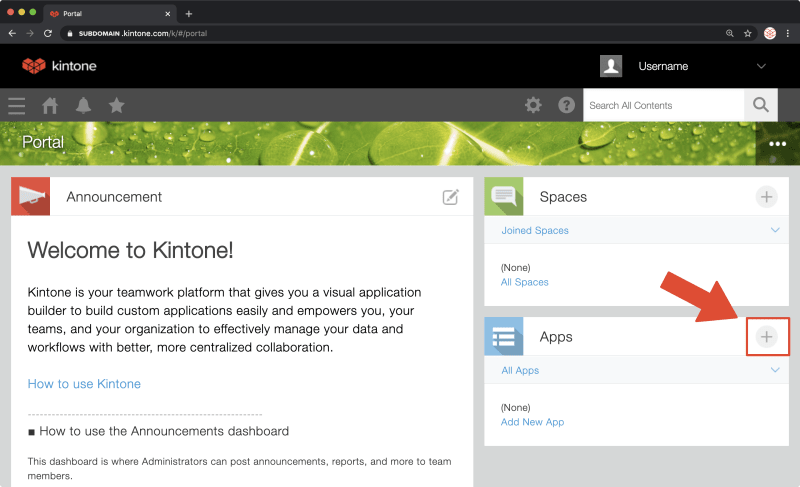
- Find the "Apps" section on the left side of the Portal page
- Click on the [ + ] button on the left side
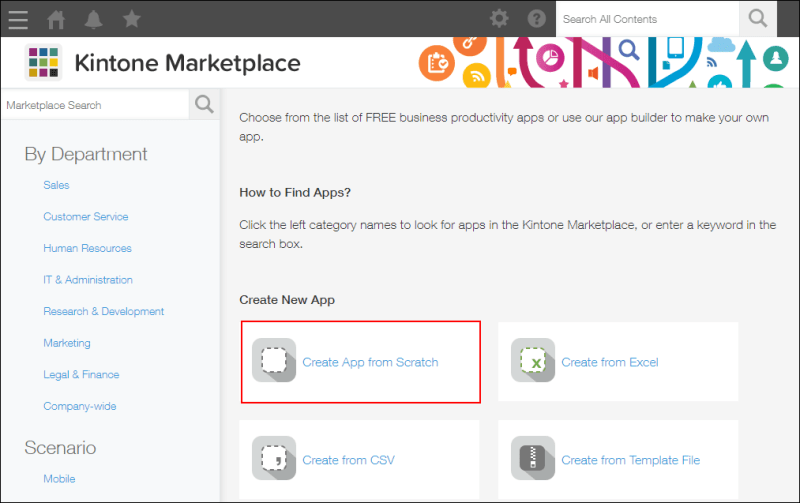
- Select the "Create App from Scratch" button from the Kintone Marketplace page
- Name the Database by clicking on & replacing
New AppwithObniz Counter - Drag-&-Drop a Number field, click on the left gear ⚙️ icon & name it
Count - Drag-&-Drop the Created datetime field
- Click the green Save Form button
- Click the App Settings tab, then click on the JavaScript and CSS Customization section
- Under the Upload JavaScript for PC section, click on the Add Link button & past-in
https://unpkg.com/obniz@2.0.3/obniz.js- This is the CDN URL to the Obniz's JavaScript library
- Still under the Upload JavaScript for PC section, click on the Add File and upload the
Script.jsfile from the Configure the Script.js section - Click the blue Save button at the top
- Finally, click on the blue Activate App button

Your Kintone Database is now ready!
You can access it from the Portal Page under the Apps section.
Verify
Time to test your new counter!
- Open your browser to Kintone Database App's Record List View.
- ⚠️ Enter your obnizID a prompt requesting it appears. To prevent this prompt from appearing in the future, configure the
Script.jswith your obnizID.
- ⚠️ Enter your obnizID a prompt requesting it appears. To prevent this prompt from appearing in the future, configure the
- Verify if Obniz Board is connected by seeing it display a
PIN ASSIGNscreen like below. - Now move the Dial Switch (Black Wheel Nob, Top Left) to the Right and click Click it
- A new record in the
Obniz CounterDatabase App should appear with1as the count.
| Record List Page | Record Details Page |
|---|---|
 |
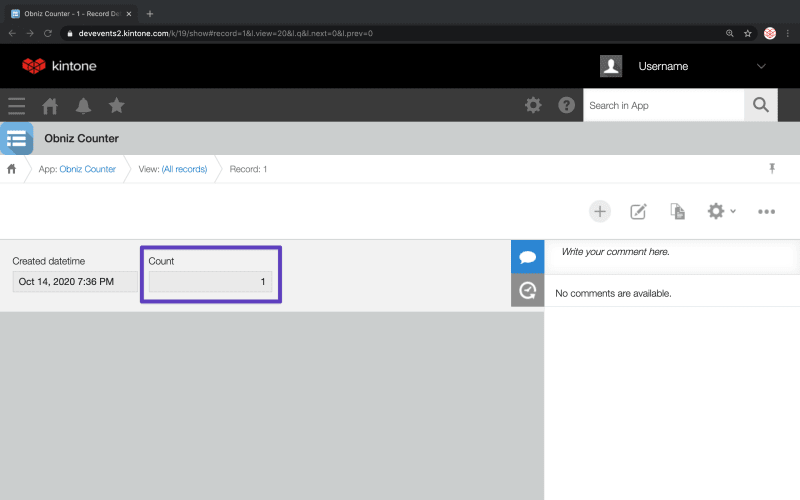 |
📺️ Demo Video
Conclusion
This tutorial went through how you get started with Obniz Board and connect it to a Kintone Database!
If you have any questions or problems with Kintone, post a comment & I will help you out!
If you have any questions or problems with Obniz Board, tweet at them at @obniz_io or make a post in their forum.
References for Obniz Board
- Obniz Board Specs
- Interesting Projects Using Obniz
- 2-min Video on Obniz Board's Functionality
- Obniz Board Quick Start


Top comments (0)