

This post contributed to the AG Grid blog by Arek Nawo
Electron is a cross-platform framework for building native desktop applications with web technologies. It’s built on top of Node.js and the Chromium browser, allowing you to use all of the latest features and improvements from the browser and JavaScript language.
Electron enables you to create the best user experience while taking care of all the complex parts of making a native app. With Electron, you can reuse both your knowledge and codebase across the web and all desktop platforms. If you already know how to develop frontend web apps and Node.js backends, you’ll feel right at home with Electron as it basically combines those two into a single app.
In this article, you’ll learn how to integrate AG Grid—an advanced and performant JavaScript grid library—into your Electron app. You’ll create a simple to-do app with native functionality to save and restore its state from a JSON file.
You can follow along with this GitHub repo.
How Does Electron Work?
A basic Electron app consists of two processes. The main process acts as an entry point for the app, with access to Node.js APIs and modules (including native ones). It also controls the app’s lifecycle and manages its windows using Electron-provided APIs.
So while the main process is like your web app’s backend, the renderer process is more like its frontend. It’s responsible for rendering the app’s UI and runs in every opened window. Thus, it should follow web standards (such as HTML5, CSS3, and ECMAScript) and use browser Web APIs. No Node-specific code is allowed.
To communicate between processes (e.g., to handle data transfer or invoke native functionality from the UI), you can use preload scripts and inter-process communication (IPC). Preload scripts run in the renderer process before the main script and have access to the Node.js API. You can use them with the Electron’s contextBridge module to safely expose privileged APIs to the renderer process. Most notably, you can expose helpers leveraging the ipcRenderer module to communicate with the main process.
Using AG Grid with Electron
A good way to get started with Electron is with Electron Forge—“a complete tool for creating, publishing, and installing modern Electron applications.” Electron Forge has everything you need to work on your Electron app, including a Webpack-powered template.
Setting Up the Project
To initiate a new project with Electron Forge, ensure you have git and Node.js v12.13.0 or newer installed. Then, run the following commands to create the project, install additional dependencies, and start the development server:
npx create-electron-app@latest project --template=webpack
cd project
npm install ag-grid-community
npm run start
Managing the App’s Window
By default, the template includes files for main and renderer processes. Inside the src/main.js file, you’ll see the starting point of your app. Take a closer look at the createWindow() function and event listeners below:
const { app, BrowserWindow } = require("electron");
// ...

const createWindow = () => {
  const mainWindow = new BrowserWindow();

  mainWindow.loadURL(MAIN_WINDOW_WEBPACK_ENTRY);
  mainWindow.webContents.openDevTools();
};

app.on("ready", createWindow);
app.on("window-all-closed", () => {
  if (process.platform !== "darwin") {
    app.quit();
  }
});
app.on("activate", () => {
  if (BrowserWindow.getAllWindows().length === 0) {
    createWindow();
  }
});
The app module controls your app’s event lifecycle. When the app is ready, it creates a new window by calling createWindow(), which in turn creates a new instance of BrowserWindow. Using the loadURL() method, the window loads the content served by Webpack’s development server. It also opens dev tools for easier debugging using the webContents.openDevTools() method.
The other event listeners handle macOS-specific edge cases, like keeping the app open without any windows (window-all-closed) or opening a new window when activated from the dock (activate).
Adding Preload Script
To allow native API access from the renderer process, you’ll have to expose some functions in the preload script. Although the template doesn’t include it by default, adding it yourself is easy.
Create a new src/preload.js file and edit the config.forge.plugins field in package.json to inform Electron Forge about the preload script:
{
  /* ... */
  "config": {
    "forge": {
      "packagerConfig": {},
      /* ... */
      "plugins": [
        [
          "@electron-forge/plugin-webpack",
          {
            "mainConfig": "./webpack.main.config.js",
            "renderer": {
              "config": "./webpack.renderer.config.js",
              "entryPoints": [
                {
                  "html": "./src/index.html",
                  "js": "./src/renderer.js",
                  "preload": {
                    "js": "./src/preload.js"
                  },
                  "name": "main_window"
                }
              ]
            }
          }
        ]
      ]
    }
  }
  /* ... */
}
To initialize the script, specify it when creating a BrowserWindow in the src/main.js file using the Webpack-provided global variable:
// ...
const createWindow = () => {
  const mainWindow = new BrowserWindow({
    webPreferences: {
      preload: MAIN_WINDOW_PRELOAD_WEBPACK_ENTRY,
    },
  });

  // ...
};
// ...
Building the Renderer Process UI
With essential window management ready, you can start working on the renderer process. You’ll use AG Grid to create a simple to-do list with the ability to add, remove, and mark items as complete.
Developing a renderer process is very similar to creating a frontend web application. You can use all the frontend frameworks and APIs available in the browser environment. In this tutorial, you’ll use plain HTML, JS, and CSS to keep things simple.
Start by creating your UI’s structure in the src/index.html file:
<!DOCTYPE html>
<html>
  <head>
    <meta charset="UTF-8" />
    <title>AG Grid + Electron</title>
  </head>
  <body>
    <div class="container">
      <h1>Electron TO-DO</h1>
      <div class="btn-container">
        <button id="save-btn" class="btn">Save</button>
        <button id="restore-btn" class="btn">Restore</button>
        <button id="add-btn" class="btn add-btn">Add</button>
      </div>
      <div class="divider"></div>
      <div id="grid" class="ag-theme-alpine"></div>
    </div>
  </body>
</html>
Then, add the necessary styling in src/index.css :
html,
body {
  height: 100%;
  margin: 0;
}
#grid {
  width: 100%;
  flex: 1;
}
.container {
  margin: auto;
  display: flex;
  justify-content: center;
  align-items: center;
  flex-direction: column;
  height: calc(100% - 2rem);
  padding: 1rem;
  width: 30rem;
}
.btn-container {
  display: grid;
  grid-template-columns: repeat(auto-fit, minmax(100px, 1fr));
  gap: 0.5rem;
  width: 100%;
}
.divider {
  margin: 0.5rem 0;
  background: #e6e6e6;
  height: 0.125rem;
}
.checkbox {
  height: 100%;
  margin: 0;
  width: 1.25rem;
}
.btn {
  flex: 1;
  padding: 0.5rem;
  background: #6b7280;
  border: none;
  color: #fff;
  font-size: 1rem;
}
.btn:hover {
  background: #9ca3af;
  cursor: pointer;
}
.add-btn {
  padding: 0.5rem;
  background: #f97316;
  border: none;
}
.add-btn:hover {
  background: #fb923c;
  cursor: pointer;
}
.remove-btn {
  display: inline-flex;
  max-height: 1.25rem;
  max-width: 1.25rem;
  font-size: 1.25rem;
  justify-content: center;
  align-items: center;
  background-color: #ef4444;
}
.remove-btn:hover {
  background-color: #f87171;
}
With this setup, you can now move to the src/renderer.js file to initialize the grid:
import "ag-grid-community/dist/styles/ag-grid.css";
import "ag-grid-community/dist/styles/ag-theme-alpine.css";
import "./index.css";
import { Grid } from "ag-grid-community";

let rowData = [];

const columnDefs = [
  // ...
];
const gridOptions = {
  columnDefs,
  rowData,
};
const saveBtn = document.getElementById("save-btn");
const restoreBtn = document.getElementById("restore-btn");
const addBtn = document.getElementById("add-btn");
const addTodo = () => {
  // ...
};
const removeTodo = (rowIndex) => {
  // ...
};
const saveToFile = () => {
  // ...
};
const restoreFromFile = async () => {
  // ...
};
const setupGrid = () => {
  const gridDiv = document.getElementById("grid");

  new Grid(gridDiv, gridOptions);
  addBtn.addEventListener("click", addTodo);
  saveBtn.addEventListener("click", saveToFile);
  restoreBtn.addEventListener("click", restoreFromFile);
};

document.addEventListener("DOMContentLoaded", setupGrid);
All setup, including creating a Grid instance and adding event handlers, happens after the DOM is loaded. The grid is created using the provided configuration, defining its columns and input data:
// ...
let rowData = [];

const columnDefs = [
  { field: "task", editable: true, flex: 1 },
  {
    field: "completed",
    width: 120,
    cellRenderer(params) {
      const input = document.createElement("input");

      input.type = "checkbox";
      input.checked = params.value;
      input.classList.add("checkbox");
      input.addEventListener("change", (event) => {
        params.setValue(input.checked);
      });

      return input;
    },
  },
  {
    field: "remove",
    width: 100,
    cellRenderer(params) {
      const button = document.createElement("button");

      button.textContent = "✕";
      button.classList.add("btn", "remove-btn");
      button.addEventListener("click", () => removeTodo(params.rowIndex));

      return button;
    },
  },
];
// ...
The columns are defined by certain parameters such as field name, width, or custom cellRenderer in case you want to display the data differently. editable enables built-in editing support, allowing the user to change the task’s name. At the same time, flex is an alternative to width, indicating that the column should fill the remaining space.
For “completed” and “remove” columns, custom cell renderers render a checkbox and button to, respectively, change the status of the task or remove it from the list entirely. The actual change to the grid’s data is done with params.setValue() and a separate removeTodo() function.
Both addTodo() and removeTodo() operate using the gridOptions.api object. After being provided to the grid, gridOptions gets the api property to allow control of the grid:
// ...
const addTodo = () => {
  rowData = [...rowData, { task: "New Task", completed: false }];
  gridOptions.api.setRowData(rowData);
};
const removeTodo = (rowIndex) => {
  rowData = rowData.filter((value, index) => {
    return index !== rowIndex;
  });
  gridOptions.api.setRowData(rowData);
};
// ...
Values from rowData items are also bound to the grid, meaning that if the user changes the completion status or the task’s name, the new value is reflected in one of the rowData items.
With all these changes, the app’s UI is now fully functional and looks like this:
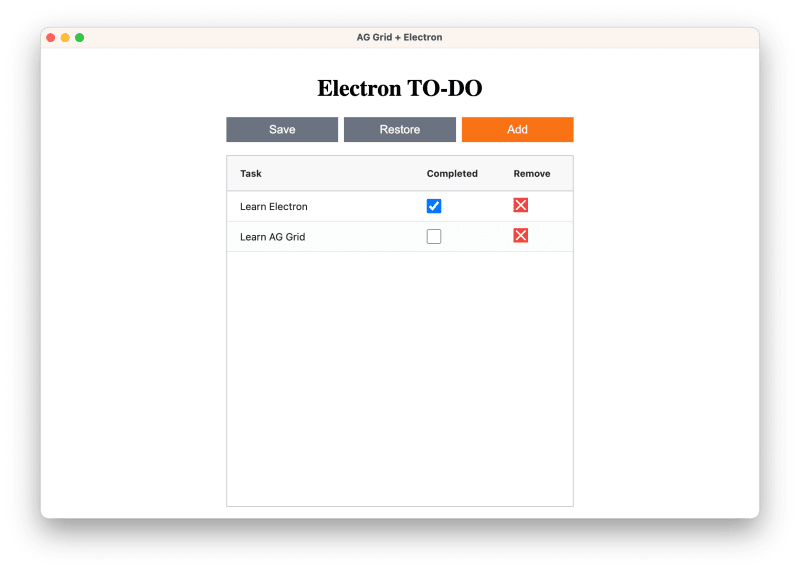
All that’s left is to implement save and restore functionality. For that, you’ll have to return to the main process.
Adding Native Functionality
Inside the src/main.js file, create a new function, handleCommunication(), for handling IPC implementation:
const { app, BrowserWindow, ipcMain, dialog } = require("electron");
// ...

const handleCommunication = () => {
  ipcMain.removeHandler("save-to-file");
  ipcMain.removeHandler("restore-from-file");
  ipcMain.handle("save-to-file", async (event, data) => {
    try {
      const { canceled, filePath } = await dialog.showSaveDialog({
        defaultPath: "todo.json",
      });

      if (!canceled) {
        await fs.writeFile(filePath, data, "utf8");

        return { success: true };
      }
      return {
        canceled,
      };
    } catch (error) {
      return { error };
    }
  });
  ipcMain.handle("restore-from-file", async () => {
    try {
      const { canceled, filePaths } = await dialog.showOpenDialog({
        properties: ["openFile"],
        filters: [
          {
            name: "json",
            extensions: ["json"],
          },
        ],
      });

      if (!canceled) {
        const [filePath] = filePaths;
        const data = await fs.readFile(filePath, "utf8");

        return { success: true, data };
      } else {
        return { canceled };
      }
    } catch (error) {
      return { error };
    }
  });
};
// ...
First, using ipcMain.removeHandler(), ensure that no existing handlers are attached to the used channels in case the window was reactivated (macOS-specific). The ipcMain.handle() method allows you to handle specific events and respond with data by simply returning a value from the handler.
For this app, the channels used are ”save-to-file” and ”restore-from-file”. Their handlers use the dialog module to bring up the system’s native open or save dialogues. The resulting paths are then provided to Node.js’s built-in fs module to read from or write to the provided file.
handleCommunication() should be called from the createWindow() function:
// ...
const createWindow = () => {
  const mainWindow = new BrowserWindow({
    webPreferences: {
      preload: MAIN_WINDOW_PRELOAD_WEBPACK_ENTRY,
    },
  });

  mainWindow.loadURL(MAIN_WINDOW_WEBPACK_ENTRY);
  mainWindow.webContents.openDevTools();
  handleCommunication();
};
// ...
To be able to send an IPC message from the renderer process, you’ll have to use the preload script and the contextBridge module:
// src/preload.js
const { contextBridge, ipcRenderer } = require("electron");

contextBridge.exposeInMainWorld("electronAPI", {
  saveToFile(data) {
    return ipcRenderer.invoke("save-to-file", data);
  },
  restoreFromFile() {
    return ipcRenderer.invoke("restore-from-file");
  },
});
contextBridge.exposeInMainWorld() safely exposes the provided API to the renderer process. Keep in mind that, in preload script, you’ve got access to privileged APIs, which, for security reasons, should be freely available from the frontend of your Electron app.
The exposed methods use the ipcRenderer module to send messages to the ipcMain listener on the other process. In the case of the ”save-to-file” channel, additional data in the form of a JSON string to save is provided.
With the bridge ready, you can return to the renderer process and finish the integration by adding proper handlers for the last two buttons:
// ...
const saveToFile = () => {
  window.electronAPI.saveToFile(JSON.stringify(rowData));
};
const restoreFromFile = async () => {
  const result = await window.electronAPI.restoreFromFile();

  if (result.success) {
    rowData = JSON.parse(result.data);
    gridOptions.api.setRowData(rowData);
  }
};
// ...
Each handler uses methods from the electronAPI object available on the window. In saveToFile(), the rowData is stringified and sent to the main process for writing it to the file. In the case of the restore operation, it first awaits the file’s stringified content to then parse and assign it to the grid.
Now your app can use the native file dialog to restore and save its state:

The final app outputs a JSON file like the following:
[{"task":"Learn Electron","completed":true},{"task":"Learn AG Grid","completed":false}]
Conclusion
Now you know how to use AG Grid in an Electron app. You’ve learned about Electron processes—what they are and how they work. Finally, you established IPC to communicate between them to implement native functionality into your app.
As you’ve seen, thanks to Electron, you can quickly transform your web app into an installable native desktop app with all the functionality that comes alongside it.
AG Grid is a high-performance JavaScript table library that’s easy to set up. It integrates well with your favorite frameworks, like React, and works great with other parts of the JavaScript ecosystem, such as Electron. Check out the official documentation to learn more.


Latest comments (0)