
Now that we are familiar with Terraform's blocks let's try using them. I will attempt to implement this infrastructure from AWS official user guide
Code be found on Github
Note: it is assumed that you have completed Installation & Usage tasks from this series
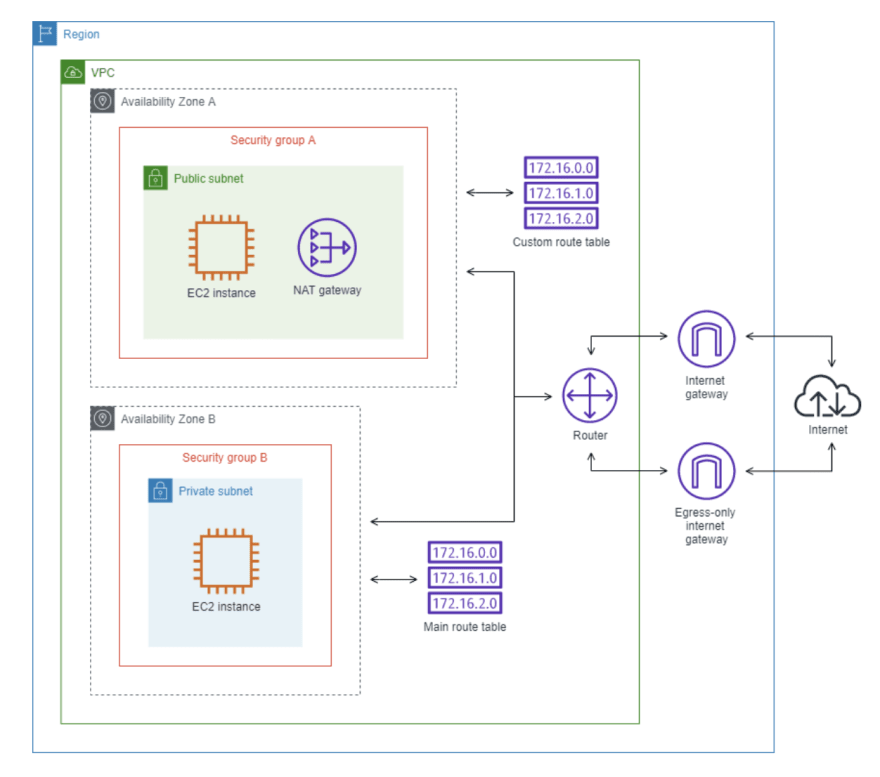
My goal is to build a configuration that will:
- Create a vpc (size /16 CIDR block 10.0.0.0/16).
- Create 1 public subnet (for EC2 instance) in Availability Zone 1 (size /24 CIDR block 10.0.0.0/24). This subnet is associated with a route table that has a route to to an Internet Gateway.
- Create 1 private subnet (for RDS) in Availability Zone 2 (size /24 CIDR block 10.0.1.0/24).
- Create separate security groups for each subnet.
- Create 3 EC2 (web servers) instances in public subnet in AZ 1 within subnet range. Each instances should have an Elastic IPv4 associated with it. Each instance must be accessible from the internet.
- Install Docker on web servers & clone code from github repo.
- Create a NAT Gateway in public subnet in AZ 1 with its own Elastic IPv4 address.
- Create an Elastic IP for NAT Gateway.
- Create 3 EC2 (db) instances in a private subnet in AZ 2 (within subnet range). Instances should be able to send requests to the internet using NAT Gateway.
- Create route tables for each subnet.
- Create an Internet Gateway that connects VPC to the internet and other AWS services.
- Create main route table associated with private subnet. This table should contain an entry that ebables instances in the subnet to communicate with other instances in the VPC over IPv4, and an entry that enables instances in the subnet to communicate with the internet through the NAT Gateway over IPv4.
- (Optional) Create subdomains for public subnet instances
- (Optional) Output urls, public IPs, and other relevant information in a human readable format
Part 1: Initial setup
Let's get to work. First we need to create a directory for our project, change into it, and create 3 files: main.tf, variables.tf, and outputs.tf. I create those files with touch command, but you can use whatever way you prefer:
$ mkdir terraform-practice
$ cd terraform-practice
$ touch main.tf variables.tf outputs.tf
Part 2: Terraform Settings
First thing we will define would be the terraform block that will pin the versions of aws provider and terraform that we will use. This block will go into its own file called terraform.tf.
Open terraform.tf and put this code in it:
# terraform.tf

terraform {
  # Provider-specific settings
  required_providers {
    aws = {
      version = ">= 2.7.0"
      source  = "hashicorp/aws"
    }
  }
  # Terraform version
  required_version = ">= 0.14.9"
}
Now we can initialize Terraform with:
$ terraform init
# Output
Terraform has been successfully initialized!
Part 3: Region, VPC, and Subnets
To make it a better practice project we will make use of the variable block by putting some of the resource-specific settings in there. We will keep adding more variables as the project goes on. Open varaibles.tf file and put this code there:
# variables.tf

variable "aws_region" {
  type    = string
  default = "ca-central-1"
}

variable "vpc_name" {
  type    = string
  default = "TerraformCertPrep_vpc"
}

variable "vpc_cidr" {
  type    = string
  default = "10.0.0.0/16"
}

variable "public_subnet" {
  default = {
    "public_subnet_1" = 1
  }
}

variable "public_subnet_cidr" {
  type    = string
  default = "10.0.0.0/24"
}

variable "private_subnet_cidr" {
  type    = string
  default = "10.0.1.0/24"
}

variable "private_subnet" {
  default = {
    "private_subnet_1" = 1
  }
}
We can finally start working on our resources. This code will belong in the main.tf file. Next we will start work on vpc, official docs here. We will use our newly defined variables:
# main.tf
provider "aws" {
# This is how we access variables
region = var.aws_region
}
data "aws_availability_zones" "available" {}
data "aws_region" "current" {}
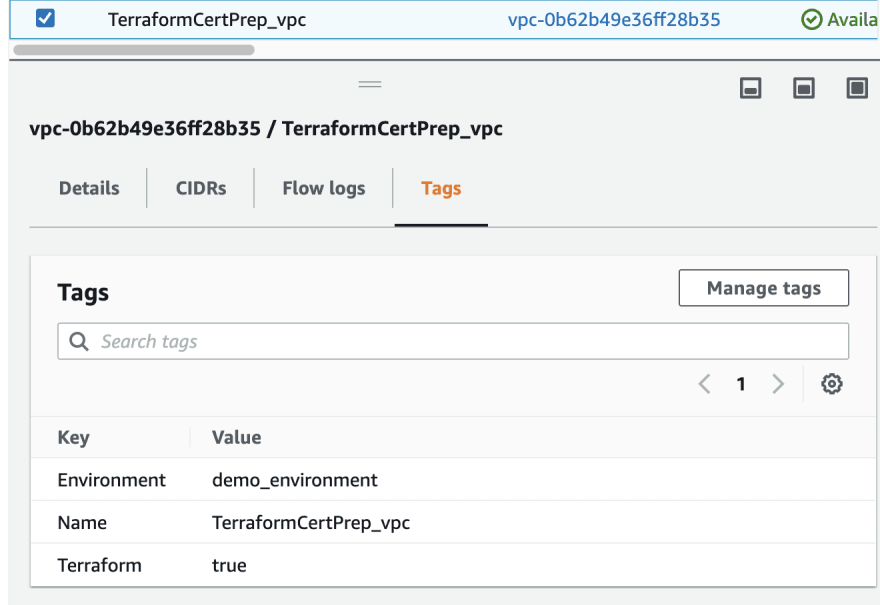
resource "aws_vpc" "vpc" {
cidr_block = var.vpc_cidr
tags = {
Name = var.vpc_name
Environment = "demo_environment"
Terraform = "true"
}
}
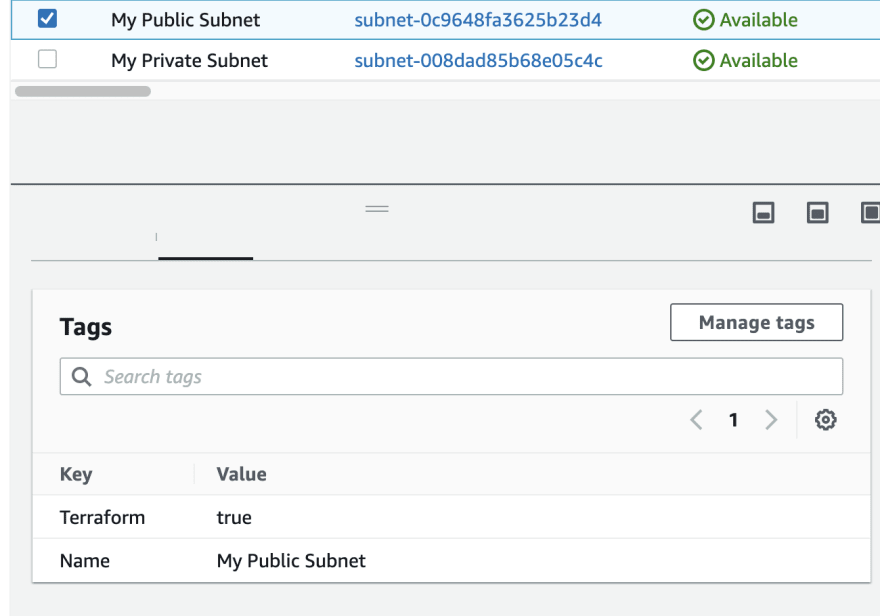
resource "aws_subnet" "public_subnet" {
vpc_id = aws_vpc.vpc.id
cidr_block = var.public_subnet_cidr
availability_zone = data.aws_availability_zones.available.names[0]
map_public_ip_on_launch = true
tags = {
Name = "My Public Subnet"
Terraform = "true"
}
}
resource "aws_subnet" "private_subnet" {
vpc_id = aws_vpc.vpc.id
cidr_block = var.private_subnet_cidr
availability_zone = data.aws_availability_zones.available.names[1]
tags = {
Name = "My Private Subnet"
Terraform = "true"
}
}
We can run format and validate command to check our code:
$ terraform fmt
$ terraform validate
Then we run:
$ terraform plan
# Output
Plan: 3 to add, 0 to change, 0 to destroy.
You should see a detailed report with 3 resources that will be created: 1 vpc and 2 subnets.
Now we can create those resources with apply command (you will need to type yes when prompted to approve):
$ terraform apply
# Output
Apply complete! Resources: 3 added, 0 changed, 0 destroyed.
Let's check AWS console to verify the results.
VPC was created:
And so were our subnets:
This part of the code seems to be working fine. Since I have no need for these resources at the moment, I will destroy them:
$ terraform destroy
We have completed the first 3 tasks of our goal. In the next article I will try to deploy route tables, NAT Gateway, and an Internet Gateway.
See you soon!


Latest comments (0)