
Hello coder,
This article presents a simple Flask web app released as an open-source product by the publisher that might help students and beginners to code their first product with a commercial value.
In my case, I've learned a lot by updating open-source projects written in different patterns and technologies starting from old school C/C++ to Python and modern frameworks like React and Vue.
A few words about the app
The web app is a simple web application coded in the Flask, the popular and lightweight Python web framework. The application comes with a basic set of features, listed below:
- A beautiful UI kit: Dashboard Atlantis provided by Themekita agency
- The web framework, as mentioned above, is Flask
- Database: SQLite
- Session-based authentication that allows registration and login
- To manage the database, the popular SQLAlchemy is already integrated
- License: MIT - this means that anyone might use the app for commercial and hobby projects.
In a rush? just grab the code from Github, follow the comprehensive instructions listed in the README file and start coding: Flask Dashboard Atlantis Dark
What is Flask
Flask is a micro web framework written in Python. It is classified as a microframework because it does not require particular tools or libraries. It has no database abstraction layer, form validation, or any other components where pre-existing third-party libraries provide common functions. The framework has a small footprint and lets the programmer build complex web apps with great freedom. For more information, feel free to read more on the official Flask website
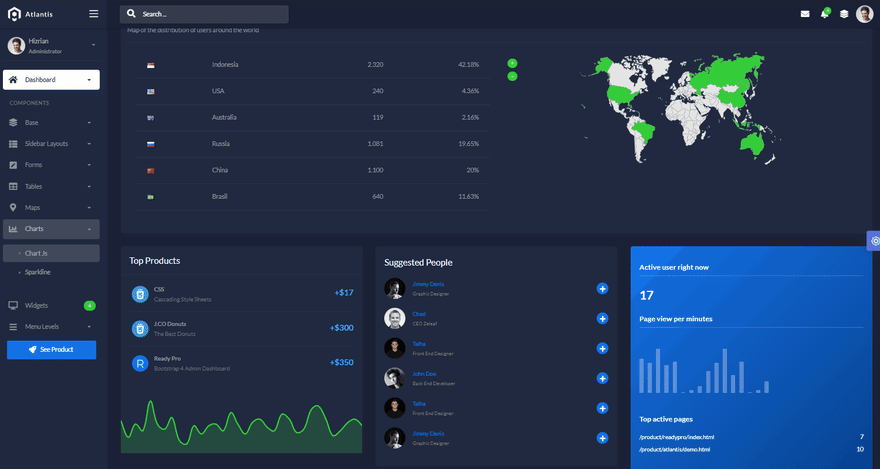
Atlantis Flask Dashboard
The application has a simple, modular structure:
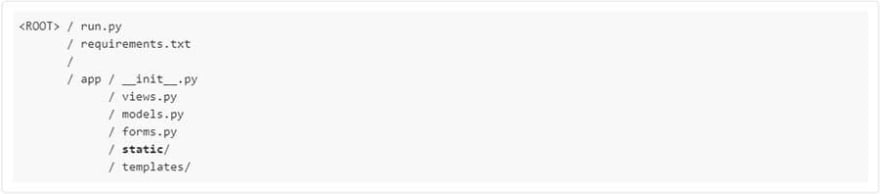
In this simple structure, the key files are:
-
run.py- app launcher -
requirements.txt- the file with the project required modules -
app / __init__.py- the constructor for our app -
app / views.py- handles app routing and serve the requests -
app / models.py- defines the tables used by the app as Python classes -
app / forms.py- defines the forms used in login and users registration -
app / configuration.py- concentrate all config variables in one place
Build the app
In order to build this admin dashboard, we need to have a minimum environment already set up in the workstation. First, we need to add Python, the programming language used to code the app and behind the Flask framework.
Install Python
Python can be downloaded from the official website. Choose the installer for your operating system, download, and click a few times.
By typing python --version in a terminal window, you should see something like this:
$ python --version
Python 3.7.2
Install Flask
We have two options here. Install Flask using a virtual environment or globally. I will choose the simple option:
$ pip install Flask
$ pip freeze | grep Flask
First command install Flask, the second will print the version.
If we reach this point without errors, the next step is to build the app by type all commands listed in the README file, published on Github:
$ # Clone the sources
$ git clone https://github.com/app-generator/flask-dashboard-atlantis-dark.git
$ cd flask-dashboard-atlantis-dark
$
$ # Virtualenv modules installation (Unix based systems)
$ virtualenv --no-site-packages env
$ source env/bin/activate
$
$ # Virtualenv modules installation (Windows based systems)
$ # virtualenv --no-site-packages env
$ # .\env\Scripts\activate
$
$ # Install requirements
$ pip3 install -r requirements.txt
$
$ # Set the FLASK_APP environment variable
$ (Unix/Mac) export FLASK_APP=run.py
$ (Windows) set FLASK_APP=run.py
$ (Powershell) $env:FLASK_APP = ".\run.py"
$
$ # Set up the DEBUG environment
$ # (Unix/Mac) export FLASK_ENV=development
$ # (Windows) set FLASK_ENV=development
$ # (Powershell) $env:FLASK_ENV = "development"
$
$ # Run the application
$ # --host=0.0.0.0 - expose the app on all network interfaces (default 127.0.0.1)
$ # --port=5000    - specify the app port (default 5000)
$ flask run --host=0.0.0.0 --port=5000
$
$ # Access the app in browser: http://127.0.0.1:5000/
For newcomers, Virtualenv is a concept used by the Python programmers to isolate the dependencies and avoid conflicts with other applications - more information available in this article.
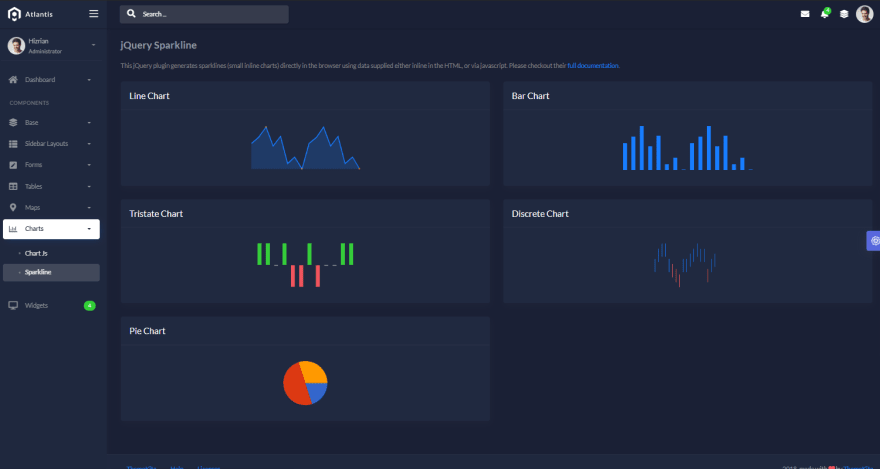
If all goes well, our Flask dashboard should run in the browser, and we should see some beautiful screens with various widgets and UI elements:


Where to go from here
Using this simple and functional web app, a beginner might learn web programming by updating the code and add new simple features:
- Customize the pages meta information (title, description)
- Add new app routes
- Code simple javascript functions
- Add new forms, tables
- Upgrade the app to support other database engines: MySql, PostgreSQL
Thank you for reading this article and don't hesitate to AMA in the comments.


Oldest comments (0)