Introduction
It is almost impossible to avoid the intriguing world of deployments if you’re running applications on a Kubernetes cluster.
A Kubernetes deployment is what enables you to roll out, roll back and scale various versions of your applications. In other words, a Kubernetes deployment is a resource object used for releasing declarative app updates. You specify your desired app state through a deployment, and the deployment controller takes action to change the current state to the desired state.
For example, you can specify how many duplicates of a Pod you want running and the deployment makes this happen.
Acting as a means for Pod performance management, a Kuberenetes (or K8s) deployment can speed up application launches and updates with no downtime. Software development teams and managers often use deployments for auto-rolling updates to prevent downtime and the challenges that manual updates are notorious for.
The rest of this article will delve into Kubernetes deployments in detail so that you can learn how to use them smoothly. We’ll also show you a more efficient way to manage your Kubernetes clusters (and multi-cluster deployments) so that you can use your time and resources more efficiently.
What is a Kubernetes Deployment?
A Kubernetes deployment is the vehicle that you use to provide declarative updates to a containerized application. Updates are sent to the Pods and ReplicaSets using manifestation files, i.e., YAML. On receiving an input, the current state of the application is set to “declared” by the controller.
To understand the above definition better, let us individually ‘unpack’ the three terms used above: Pod, ReplicaSet, and Deployment.
Pods
Within a K8s cluster, we cannot run containers directly. So, the Docker image needs a layer of abstraction over containers, and this is where the Pod comes in. In other words, Pods are used to encapsulate your containers so that you can perform deployments efficiently.ReplicaSet
If your application requires more than one Pod, grouping is performed by ReplicaSet. This component of Kubernetes enables you to create various instances for each Pod, which helps when you have to scale applications.Deployment
Alright. So, you’ve got a Pod when you need to deploy an app and a ReplicaSet when you need to deploy it. Why do we need a Kubernetes Deployment then?
Valid question. Let’s explain.
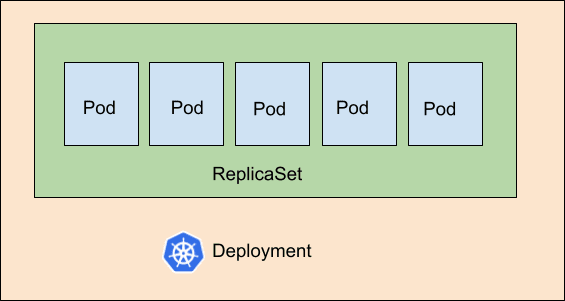
Deployment adds flexibility to your Kubernetes cluster and eventually, to your application. Whether you’re rolling an update or rollbacking one, using the deployment helps you handle Pod instances better. So, keeping a Pod(s) inside the ReplicaSet inside the Deployment makes for a highly effective hierarchy layer in Kubernetes.
Here’s an image to help you understand this concept better:
Why use Kubernetes Deployment?
In the DevOps universe, efficiency is key. And manually updating Pods within containerized apps is not a smart use of developer resources. Imagine upgrading services, stopping old versions, waiting for new launches, verifying versions’ validity, rolling changes, rolling back the changes when a failure occurs by your hands. Not a pretty sight.
Added to this is your potential to rack up errors, reduce productivity, build up idle time for your resources, and other issues too numerous to mention.
Deployments solve this problem by enabling you to use repeatable pre-designed patterns (or workflows) to automate processes.
You can use a K8s deployment or cluster object to specify your desired outcome(s), as the system then emphasizes maintaining your deployment’s “desired” state. This is a better approach for managing Pod status, availability, pausing, rolling, rollbacks, versioning, and management on the server-side.
By using deployment in Kubernetes, you’re better positioned to leverage the following benefits:
- Faster instance updates resulting from individual updates generated by the rolling concept.
- Better control over unsavory situations. This means that in the event of an error, rollbacks to previous working versions can be performed seamlessly.
- The ability to 'force' stop updates for your Pods or ReplicaSets.
- Smoother application scaling for Pods with multiple instances.
How to Create a Kubernetes Deployment
Now that we’ve answered the question: “what is a Kubernetes deployment?” - let’s move on to how a deployment functions. Here, you will learn how to create and use deployments efficiently.
Creating a Kubernetes Deployment
The first step to creating a Kubernetes deployment is creating a YAML file for this deployment. The structure of this object's information is similar to ReplicaSet, but its type should be "Deployment".
Here’s an example deployment object named "deployment-explainer" :
File Name: deployment-explainer.yaml
apiVersion: apps/v1

kind: Deployment

metadata:

name: deployment-explainer # It is the name of your deployment

spec:

replicas: 5 # Total number of copies

Selector: # For 5 replicas, your cluster must have 5 pods with the same label running

matchLabels:

app: webserver

version: v101

template: #

metadata:

labels:

app: webserver

Version: v101

spec:

containers:

 name: explainer

image: explainer/latest # Path of the image goes here

ports:

 containerPort: 80
Once you have created the YAML file, it's time to execute. Use the following command for this:
kubectl apply -f deployment-explainer.yaml --record
Here are a few more useful commands to help you manage your Kubernetes deployment smoothly:
- To check if your deployment was created:
kubectl get deployments
- To see a detailed description of this deployment:
kubectl describe deployment deployment-explainer
- As a deployment will create a ReplicaSet, use this to perform a check:
kubectl get replicaset
- After creating the replica set, a deployment should create pods. To verify pods created and their status:
kubectl get pods
P.S In the example case used above, you should have 5 replicas of the Pod.
- Use the following command to delete a deployment:
kubectl delete -f deployment-explainer.yaml
- Get running services using the below command:
kubectl get services
- You may set the image or update the YAML file to perform a rolling update.
kubectl set image deployment deployment-explainer explainer=explainer:2.0
OR
kubectl edit deployment deployment-explainer
- The rollout status can be checked using:
kubectl rollout status deployment deployment-explainer explainer=explainer:2.0
Application Management Strategies using Kubernetes Deployment
Some features might demand thorough and detailed testing while some UX/UI changes might just need quick updates. Depending on what your development goals are, you can employ various K8s deployment strategies. Two popular strategies are -
- Rolling Update Strategy
This is the default Kubernetes deployment strategy that enables you to replace pods in a controlled way.
The rolling update strategy does not just stage the application launch. It also optimizes the Pods count by maintaining the minimum number of Pods in the deployment. However, for short time periods, this strategy could create 2 versions of the same Pod run for your application - creating problems for the service consumers.
The strategy ensures that at least 25% of pods are in the desired state and not more than 25% of total pods are made unavailable. This implies that the rolling update won’t cause any downtime if your application is architectured for good fault tolerance.
- Recreate Strategy
With this strategy, all previous Pods are deleted, and new ones are created. New containers are executed after complete termination of the old ones. While this might cause downtime, it also means that you won't have to deal with incorrect handling of service consumers' requests.
When old containers are stopped and new versions are being configured, there are no active containers for your applications. So, requests by service consumers won’t be processed during this time.
Using workflows for deployment in Convox
First, here’s how this is done in K8s.
Kubernetes lets you release containerized applications to various cloud-based hosts. For example, you can add AKS, Google GKE, and Amazon EKS clusters - all to your pipeline, making multi-cloud development and deployments easier.
To achieve this in K8s, you will usually need to create an environment, set up resources, and create K8s jobs. Then, you will need to create the YAML file for parallel deployment across multiple clouds using Kubernetes namespaces.
Running these commands and preparing a lengthy YAML isn’t all. You still have to take care of various background and prerequisite activities. Managing new deployments (especially when dealing with a multi-cloud situation) can be complex and time-consuming with these necessary tasks.
But we don’t recommend this method, as there’s a better way.
Convox acts as a Kubernetes deployment controller, doing the heavy-lifting for your team by helping you access and manage K8s directly in a few clicks.
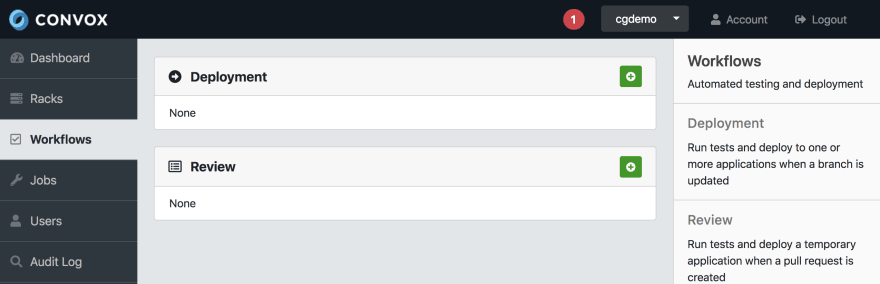
You can do this by using Deployment Workflows.
A Deployment Workflow lets you easily handle the staging and production tasks related to your regular applications. Whenever you add code to a particular repository or branch on Github/Gitlab, it triggers an update to your application deployed in Convox. If required, you can trigger workflows manually instead of on merges.
Creating Deployment Workflows is easy with Convox.
How to create a Kubernetes deployment with Convox as a deployment controller
With Convox, handling Kubernetes deployments and managing your Kubernetes cluster is a smooth operation. Convox empowers developers and their team managers to deploy applications easily by automating the complex, lengthy parts of the deployment process.
Convox provides an API proxy that is accessible from your Convox racks. With Convox’s easy-to-use interface, problems with the management of Kubernetes credentials have become a thing of the past.
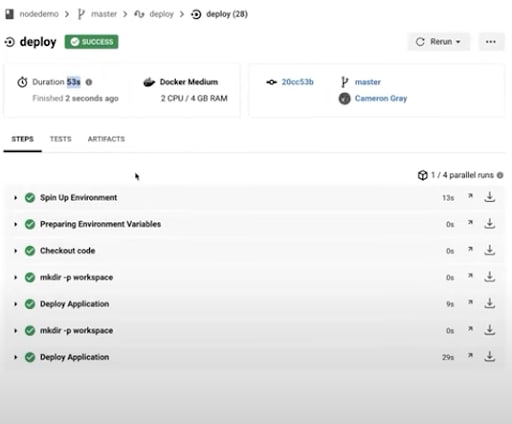
The detailed how-to video shows how you can easily manage multiple deployments with Convox:
Final Word
Kubernetes object deployment features are enabled on clusters for faster development, deployment, and scaling. However, single and multi-cloud environment users might find the complex deployment process discouraging and difficult in practical terms. Acting as a deployment controller, Convox is the perfect solution for these users and their development teams to speed up their production processes and create more robust containerized applications.


Oldest comments (0)