Wouldn't it be cool to have a way to watch flights move across the world; essentially see the flight's live location change in realtime? Of course, it would be, at least to a geek like me.

In the course of finding positive solutions, and easy implementation, but good enough to carry out this idea of mine - I came across Aviation Edge - a global flight database with an API. But this a REST API and does not fulfill my real-time requirement.
And with the advent of event-streaming technologies, many data providers prefer streaming data in real-time using push protocols over letting their consumers poll for data frequently using REST - which is inefficient for both parties.
During this search, I found Ably Hub. It is a marketplace for publicly hosted free, open and commercial data streams by various providers that are available to be consumed. Most of them are free to use. Luckily, I found just the thing that could scratch my itch with this project. A realtime data stream of flight data that uses data from Flight Radar called Heathrow Flights. Even though the flight information coming through in this data stream is limited to flights originating or arriving at London Heathrow airport, this was enough for my project.
If you’ve never heard of Ably, you can read about them from their site to learn more, and probably share what you learn with me too.
For this article, I’ll share how we can build a Realtime flight tracking app in React Native using the data from the Heathrow flight product on the Ably Hub.
Somethings that’ll be nice to have before we get started:
- Knowledge of JavaScript
- A free account with Ably
- Knowledge of React, React Hooks and React Native
Features of the application:
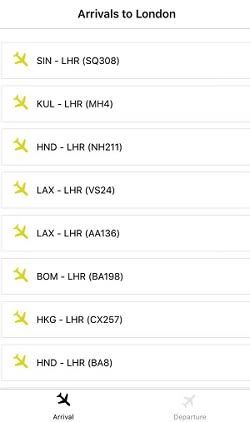
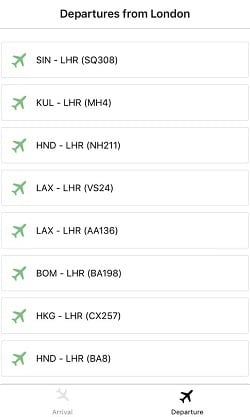
Arrival and Departure Screens: each screen will have a list of airports labeled with location and the destination of aircrafts
A search box: to quickly find a flight with its IATAID (International Air Transport Association ID)
The map area: we’ll have a map that tracks the current location of a moving flight; a Polyline from origin to destination
Step 1 - Creating a free Ably account
If you don't have a free account with Ably, you can create one here. If you already have an account, you can proceed to the Heathrow Flights product on Ably Hub. This is a self-subscribe product.

Locate the 'Subscribe to Heathrow Flight' button by the right corner of the product page as shown above. This will enable your Ably account to access the flight data stream from one or more of your apps. Let's go ahead and set one up next.
Step 2 - Setting up an Ably App
We'll assume we already have an Ably free account and we've subscribed to Ably's Hub Stream Product: Heathrow Flight. Now, we want to create an Ably app.
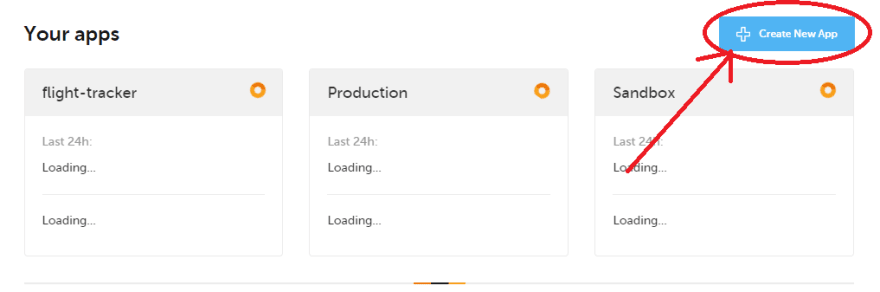
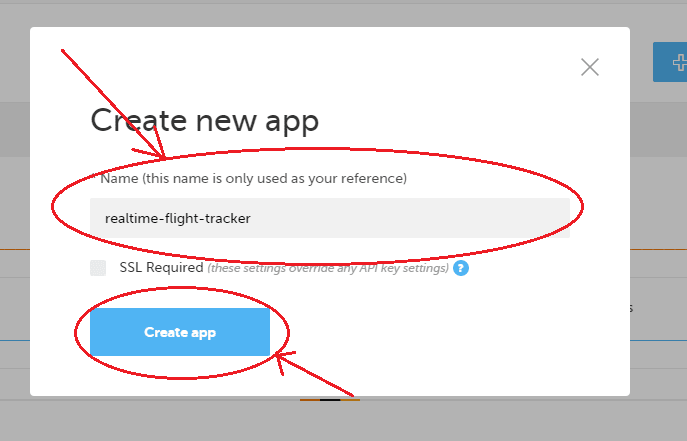
If you've successfully arrived on your dashboard, you should see a blue button labelled 'create app'. Create an Ably app using the button, then enter a project name for the project/app, as shown below.
Step 3 - Using Ably React Native Hub Stream Kit
I’ve created a starter kit to make building our project a lot faster and cleaner. The starter kit contains a quick setup of React Native with Expo Managed Workflow. Expo is highly recommended by the React Native team to build a small (or large project depending on complexity) with React.
Quickly clone the project from GitHub using the command below:
$ git clone https://github.com/ably/tutorials/tree/flight-tracking-app-starter-kit.git
Next, change directory into the project folder cd flight-tracking-app-starter-kit.
You'll want to confirm you have yarn, expo-cli, and nodejs installed on your machine.
Installations:
- Node.js (https://nodejs.org)
- Yarn (
npm install -g yarn) - Expo-CLI (
npm install -g expo-client)
We’d use Expo Client to test our application while building. Expo Client is currently available on both iOS and Android stores. Please, create an Expo account here.
Step 4 - Setting up locally
To get started with the project run yarn from the project directory your terminal.
$ cd flight-tracking-app-starter-kit
Next, run $ expo start and also launch the running application on a mobile device.
Step 5 - Obtaining Your Private API_KEY
Locate env.js in the root directory of your project and replace the code with the private API_KEY obtained from the Ably application you created in Step Two. Your API_KEY should look like this:

Step 6 - Update and Modify Codes
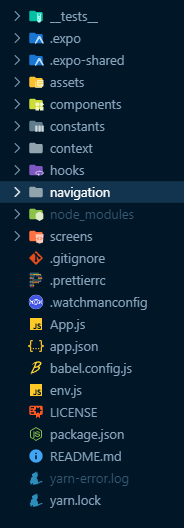
Your folder structure should like this:
Navigate to the hooks/ably.hooks.js and update the CHANNEL_SCOPE with this code:
const CHANNEL_NAME = '[product:ably-flightradar24/heathrow-flights]flights:airport:LHR'
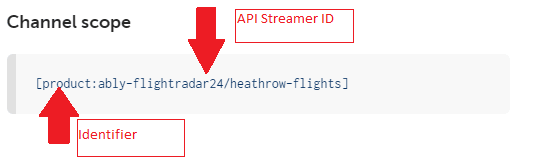
The above channel subscribes to a data stream of airport information like the flights departing and arriving at Heathrow Airport, London.
Step 7 - Connecting to Ably (Pub/Sub)
Ably uses a scalable and resilient messaging mechanism Pub/Sub. Ably Realtime service organizes the message traffic within applications into named channels.
Add the code in ./hooks/ably.hooks.js to connect and subscribe to a named channel.
export const useAblyChannel = (channel, dependencies) => {

  const [onMessage, setOnMessage] = useState('Please wait..')

  const [isLoading, setLoading] = useState(true)
  //fetch channel data
  const [channelData, setChannelData] = useState(null)

  useEffect(() => {
   //add ably connection here

    console.log('Ran Use Effects', channel)
     // know the current state of the application
    ably.connection.on(function(stateChange) {
      console.log('New connection state is ' + stateChange.current)
      setOnMessage(stateChange.current)
      setLoading(true)
    })
    // use the channel scope in the application
    const useChannel = ably.channels.get(`${CHANNEL_NAME}:${channel}`)
    useChannel.subscribe(message => {
      if (message.data.length > 0) {
        setOnMessage('Loading Data...')
        setLoading(false)
        setChannelData(message.data)
      }
    })

  }, dependencies)

  return [isLoading, onMessage, channelData]
}
Also quickly update ./context/ApplicationContext.js to have listeners
export default ApplicationContext = ({ children }) => {
.....

  //add subscription listeners here
const setChannel = iATA => {
    console.log(`This ${iATA} was clicked`)
    return ably.channels.get(`${HUB_STREAM}:${iATA}`)
  }

  const departureListener = message => {
    console.log('Still Listening Departure', message.data)
    message.data && subscribe(message.data)
  }

  const arrivalListener = message => {
    console.log('Still Listening', message.data)
    message.data && subscribe(message.data)
  }

  const subscribe = data => {
    setIsLoading(false)
    setArrivalsData(data)
  }
 // add unsubscribe listeners here
  const unsubscribe = (useChannel, type) => {
    console.log(`unmounting sub ${type}`)
    useChannel.off()
    useChannel.unsubscribe()
    type === 'arrival' ? setArrivalsData(null) : setDeparturesData(null)
    setIsLoading(true)
  }

  const setArrivals = (iATA, action) => {
    action === 'reset'
      ? unsubscribe(setChannel(iATA), 'arrival')
      : setChannel(iATA).subscribe(arrivalListener)
  }

  const setDepartures = (iATA, action) => {
    action === 'reset'
      ? unsubscribe(setChannel(iATA), 'departure')
      : setChannel(iATA).subscribe(departureListener)
  }

...

}
Next, update the ./screens/ArrivalScreen.js with the code as follows:
import { ListCards } from '../components/ListCards'
import { arrival as channelData } from '../constants/RawData'
import { Container, Text, Content } from 'native-base'
The above imports dummy data structured in the form of a data stream; this gives you a glance of what the expected data looks like.
import React, { useEffect } from 'react'
import { StyleSheet } from 'react-native'
import { Container, Text, Content } from 'native-base'
import { ListCards } from '../components/ListCards'
import { arrival as channelData } from '../constants/RawData'
Next, still in ArrivalScreen.js file, display a ListCard to show the origin and destination of the aircraft we want to watch in realtime. Add the codes below to display a ListCard:
export default ArrivalScreen = ({navigation}) => {
...
const Arrivals = channelData
    ? channelData.map((item, index) => {
        return (
          <ListCards
            key={index}
            text={`${item.origin} - ${item.destination} (${item.iataId})`}
            icon="ios-airplane"
            action={() =>
              navigation.navigate('PopModal', {
                iataId: item.iataId,
                action: 'arrival'
              })
            }
            rotate
          />
        )
      }) : []
...

  return (
    <Container style={styles.container}>
     <Content>{Arrivals}</Content>
    </Container>
  )
...
}
Repeat the steps for ./screens/ArrivalScreen.js in ./screen/DepartureScreen.js, and also rename 'Arrivals' constant to 'Departures'. Rename
...
import { departure as channelData } from '../constants/RawData'

export default DepartureScreen = ({ navigation }) => {

    const Departures = channelData
      ? channelData.map((item, index) => {
          return (
            <ListCards
              key={index}
              text={`${item.origin} - ${item.destination} (${item.iataId})`}
              icon="ios-airplane"
              action={() =>
                navigation.navigate('PopModal', {
                  iataId: item.iataId,
                  action: 'arrival',
                })
              }
            />
          )
        })
      : []

....
  return (
    <Container style={styles.container}>
      <Content>{Departures}</Content>
    </Container>
  )
}
Ensure you save and see changes as shown below in your mobile application before proceeding to Step Seven.
Step 7 - Adding State Management
First, update the React's Context API. Open ./context/ApplicationContext.js
Replace:
const HUB_STREAM = '<HUB_API_STREAM_CHANNEL>'
With:
const HUB_STREAM = '[product:ably-flightradar24/heathrow-flights]flights:plane'
The channel above subscribes to a data stream of aircraft information such as its current location, its route and the speed of the aircraft.
Next, return back to ./screens/ArrivalScreen.js and update code to use React Hooks for the state management of our application: useAblyChannel(channel, [])
export default ArrivalScreen = ({navigation}) => {
...
  const [
    isLoading,
    displayMessage,
    channelData
  ] = useAblyChannel('arrivals', [])
...
...
  return (
    <Container>
      {isLoading ? (
        <LoadingScreen message={displayMessage} />
      ) : (
        <>
          <Content>{Arrivals}</Content>
        </>
      )}
    </Container>
  )
...
}
./screen/DepartureScreen.js
export default DepartureScreen = ({navigation}) => {
...
  const [
    isLoading,
    displayMessage,
    channelData
  ] = useAblyChannel('departures', [])
...
...
  return (
    <Container>
      {isLoading ? (
        <LoadingScreen message={displayMessage} />
      ) : (
        <>
          <Content>{DeparturesScreen}</Content>
        </>
      )}
    </Container>
  )
...
}
Delete this import from both your DepartureScreen and ArrivalScreen since our data will be coming from live data stream using the hooks:
./screens/ArrivalScreens.js
import { arrival as channelData } from '../constants/RawData'
./screens/DepartureScreens.js
import { departures as channelData } from '../constants/RawData'
Next, open up ./components/ListCards.js and add a little bit of spice to make the cards clickable.
export const ListCards = ({ text, rotate, action }) => {
...
  return (
    <Card noShadow>
      <CardItem button onPress={() => handleActions(action)}>
       ...
      </CardItem>
    </Card>
  )
...
}
Adding the button property to the CardItem makes the button clickable.
Save and play around with the project a little bit. Click on a ListCard and to launch the Flight Tracking. Your Application should look like the Gif we have played above.
Step 8: Cleaning up and Finalising
Let's quickly add a search function to our application. Update both ./screen/ArrivalScreen.js and ./screen/DepartureScreen.js
...
import FabButton from '../components/FabButton'

export default DepartureScreen = ({navigation}) => {
...
...
...
return (
    <Container>
      {isLoading ? (
        <LoadingScreen message={displayMessage} />
      ) : (
        <>
          <Content>{Arrivals}</Content>
          <FabButton navigation={navigation} channelData={channelData}/>
        </>
      )}
    </Container>
  )
...
}
Save and right now your application should look and feel like this:

You can see the complete demo and source code for this app on GitHub.
Summary
You’ve successfully built a realtime flight tracking application that tracks the real-world flights' location and shows it on a map. How cool!.


Top comments (0)