Deployment is the final step in the smart contract development journey. It’s like the concept of Valhalla – only the rigorously tested contracts are deployed (we all know what happens otherwise). This is the third article in my series of Upgradeable Smart Contracts: End-to-End and in this article, we shall explore how you can easily deploy a contract and then upgrade it to a higher version. The time limit is 5 minutes and I would hate for the article to run too long so let’s get going…
Housekeeping
Before we deploy the contracts, please note that these contracts have been discussed in detail in the first article of this series. The second article showed how to test them out. So, this one assumes that you have prior knowledge of the topics discussed in the previous articles. We will be deploying to Polygon’s Mumbai Testnet in this article. If you are new to blockchain development, just know that deploying to other chains is as easy as changing an URL in the hardhat.config.js or the .env file.
The code files for this tutorial series are open-sourced at the GitHub Repo below:
 abhik-99
/
Upgradeable-Smart-Contracts-Blog
abhik-99
/
Upgradeable-Smart-Contracts-Blog
This is the repo containing code for my blog series on Upgradeable Smart Contracts.
Advanced Sample Hardhat Project
This project demonstrates an advanced Hardhat use case, integrating other tools commonly used alongside Hardhat in the ecosystem.
The project comes with a sample contract, a test for that contract, a sample script that deploys that contract, and an example of a task implementation, which simply lists the available accounts. It also comes with a variety of other tools, preconfigured to work with the project code.
Try running some of the following tasks:
npx hardhat accounts
npx hardhat compile
npx hardhat clean
npx hardhat test
npx hardhat node
npx hardhat help
REPORT_GAS=true npx hardhat test
npx hardhat coverage
npx hardhat run scripts/deploy.js
node scripts/deploy.js
npx eslint '**/*.js'
npx eslint '**/*.js' --fix
npx prettier '**/*.{json,sol,md}' --check
npx prettier '**/*.{json,sol,md}' --write
npx solhint 'contracts/**/*.sol'
npx solhint 'contracts/**/*.sol' --fix
Etherscan verification
To try out Etherscan verification, you…
Deploying v1
Deploying the first version of the contract is fairly easy. We just need to run npx hardhat run to run the deploy_v1.js script. This script contains the steps to deploy the contract as shown below:
const { ethers, upgrades } = require("hardhat");

async function main() {
  const Contract = await ethers.getContractFactory("OurUpgradeableNFT1");
  const contract = await upgrades.deployProxy(
    Contract,
    ["Hello Many Worlds!"],
    {initializer: 'initialize', kind: 'uups'}
    );

  await contract.deployed();
  console.log("OurUpgradeableNFT1 deployed to:", contract.address);
}

main().catch((error) => {
  console.error(error);
  process.exitCode = 1;
});
In the above code, inside the main function, we first get a reference to the contract OurUpgradeableNFT1 using the getContractFactory() method in the ethers exposed by Hardhat. The next line is a bit different because it is an upgradable smart contract. Normally we could just invoke .deploy() with the constructor arguments on the contract instance. But here upgrades.deployProxy() is needed to deploy the Proxy as well as the implementation contract behind the proxy. Note that the address that will be logged in the console will be the address of the proxy contract.
Proxy Verification
We can obtain the address of the implementation contract by looking up the transactions from our wallet address in the concerned blockchain explorer. In this case, it would be Polygonscan but on Mumbai Testnet.
The easier method is proxy contract verification. Once the contracts are deployed, we need to browse to the Proxy Contract as shown below.
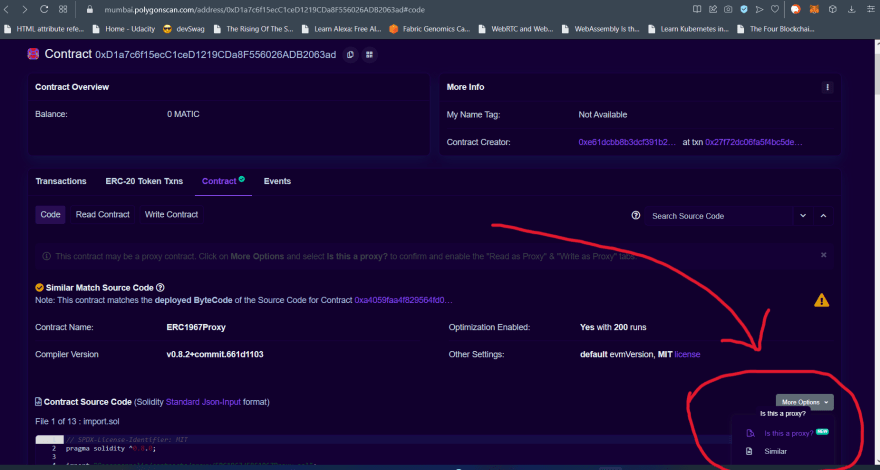
On the screen above, click on** More Options** and then select Is this a proxy?. This should open a screen similar to the one below.

In the screen above, you will notice the address of the proxy contract and an option to Verify. Click on the Verify Button. This will prompt the proxy verification process which on completion would show a dialog like the one below. This dialog will contain the address of the implementation contract.

Verifying Implementation
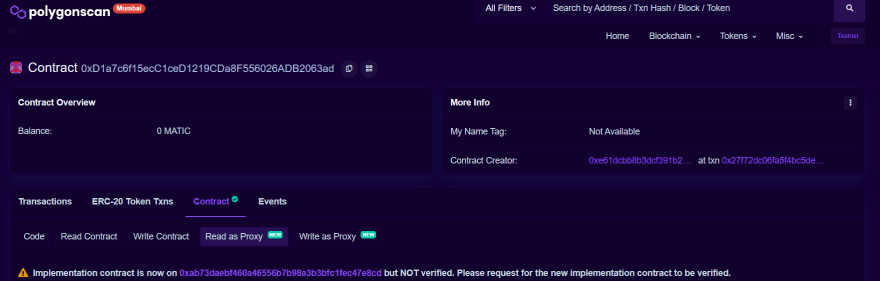
Once the Proxy verification is complete, the “Read as Proxy” and “Write as Proxy” options will appear when you browse over to the Proxy Contract on the explorer again. At this point, we need to complete verification of the implementation contract behind the proxy. Even the proxy contract will notify that the implementation is not verified.
Verification of the Implementation Smart Contract is also a bit different. Keep in mind that this version of our contract takes in a greeting (an arbitrary string value) when deploying as shown in the deployment code above. So, you might think that you need to pass in that string as that is normally done. The picture below will be similar to the output you receive if you do that.

In the image above, you see what happens when you try to pass in the initializer arguments as constructor arguments. This is another point that differentiates the two functions. Thus, verifying upgradeable smart contracts is that much easier. You just need to pass in the address as shown above that will verify the implementation.
Proxy vs Implementation
Once the verification above is completed, just browse over to the Proxy contract again. At this point, you will notice that the greeting is recorded and the owner is pointing to the deploying wallet address as shown below.

If you browse over to the implementation contract, you will notice that the owner is recorded as the 0x0 address and the greeting is noted as empty. This again shows that the implementation contract is pure logic. The context is handled by the proxy contract. The image below shows that.

Deploying v2
Next let’s upgrade our smart contract to version 2. The code below will be run to do that. We will be using npx hardhat run again, deploy the OurUpgradeableNFT2 contract and then make the proxy point to this contract version.
const { ethers, upgrades } = require("hardhat");

const PROXY_ADDRESS = "0xD1a7c6f15ecC1ceD1219CDa8F556026ADB2063ad"; //Address of version 1
const VERSION1 = "0x35C9fC0433A007E85E1df9339916F703D2c7512F"; //Address of the version 1 implementation

async function main() {
  const Contract = await ethers.getContractFactory("OurUpgradeableNFT2");
  await upgrades.upgradeProxy(
    PROXY_ADDRESS,
    Contract,
    {
      call: {fn: 'reInitialize'},
      kind: "uups"
    }
    );
  console.log("Version 2 deployed.");
}

main().catch((error) => {
  console.error(error);
  process.exitCode = 1;
});
In the code above, we get the reference to OurUpgradeableNFT2 contract and then pass in the Proxy contract address along with the OurUpgradeableNFT2 contract reference and the function to call as initializer during this upgrade. The kind argument says that we would like this to be a UUPS type proxy upgrade.
Once the deploy script finishes running, if you head over to the Proxy contract address on the explorer, you will notice that the implementation contract address would have changed. Something similar to the image below will be shown. Notice we do not need to verify the Proxy contract again.
Verifying Version 2 Implementation
Verifying the upgraded smart contract is as simple as the first one. Running npx hardhat verify and passing in the address of the implementation contract will do as shown below:

Once the verification completes, browse over to the second implementation contract as shown below.

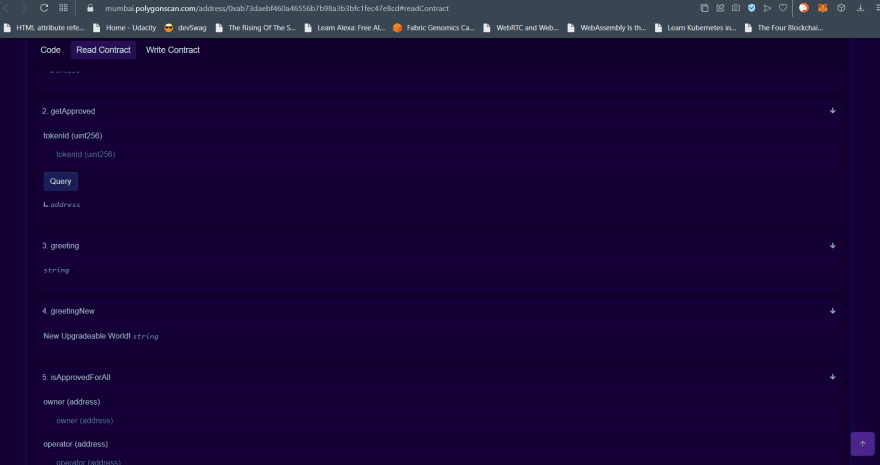
Next move over to the Read Contract tab and you will notice that this implementation contains our required contract methods. It also contains the methods from our previous contract.
The proxy contract now points to the new implementation contract i.e., OurUpgradeableNFT2. You can head over to the proxy contract to see for yourself. You should get something similar to the image below where all the new methods are listed and it should say that the new implementation is the address where OurUpgradeableNFT2 was deployed.

As you can see from the picture above, it also says the previously recorded implementation was the address where OurUpgradeableNFT1 was deployed. Compare the picture of the proxy contract above to the one in the version 1 section.
Using Upgradeable Smart Contracts
To invoke functions in the upgradeable smart contract, you need to pass in the Proxy Contract address with the ABI of the current implementation contract. This means that the ABI need to be updated on the frontend with every upgrade. The proxy contract is given the data and the methods to invoke which it then forwards to the implementation contract.
That’s all for this one, folks!
This brings us to the end of this article. In this article, we went through the steps to deploy an upgradeable smart contract, verify the proxy and the contract and then to upgrade the implementation contract to a newer version.
In the next article in this series, we shall discuss the nuances of upgradeable smart contracts. It would basically recap the essential steps and add a few pointers to help you better and more securely use upgradeable smart contracts.
If you think I might have missed something, feel free to add a comment below. If you liked the article leave some love on the article and feel free to share it. Reach out to me if you have any topic recommendations. Until the next one, continue to build awesome stuff on Web3 and WAGMI!


Top comments (0)