Let's say you're a coffee-shop owner, and you want to allow customers to place orders via the latest, state-of-the art Natural Language Chatbot service on Google Cloud Platform.
In my last post ,I went through setting up Intents in order to handle a customer requesting their coffee with their choice of milk. In this post, we want to take those two pieces of information and allow it to be stored in some data store, accessible by means of an API endpoint.
I go through setting up DialogFlow to send these pieces of information (or entities) by means of a call to your personalised Webhook. Note, I do not go through setting up your API endpoint, as this can be varied depending on your specific application, location and other requirements.
To be Fulfilled
Fullfilment is DialogFlow's way of connecting to some other, user-defined service
E.g. If you had a list of coffees on some database, Fulfillment could be set up to respond to an intent requesting 'types of coffee' by querying your database, using a service that you define.
In our case, we want to add data to a SQL database set up elsewhere based on customer orders (e.g. when a customer orders a drink, store the type of drink, time of order, name, etc...)

From the above, in order to handle such a request, we first need an intent to receive the coffee type (as we did in part one). Now we need to create an endpoint for our databse (the methods of doing this are far and varied, so I won't go into details here).
Webhooks
Basically we need a point (usually an IP address accessed via URL) called a webhook that makes our database reachable from anywhere on the internet. Again, the security details of such are quite varied as this isn't the focus of this post.
The main focus of this post is in setting up DialogFlow to communicate with your endpoint. According to Google Cloud documentation, your webhook service must:
- Be able to handle HTTPS request
-
Must handle POST requests with a JSON WebhookRequest body
A JSON WebhookRequest contains fields keeping track of session, the actual user query, current context, etc.
DialogFlow would then await a response from your webhook, which takes the form of a JSON object with the following:
- The actual response for the end-user (whether it be plain-text or one of the rich-intents such as cards, chips, etc)
- Updates to the current context of the conversation
- A follow-up event to trigger an intent match (so DialogFlow knows what to do next)
- A custom payload to your choice of service, in this case, we will enter information into a SQL database
Digression
Alternatively, can use Google Cloud Functions via the Inline Editor to build custom requests to your database using JavaScript functions. However, other that ultra-small projects, using Cloud Functions in this way is typically not recommended.
Setting Up Fulfillment
In your DialogFlow console, navigate to the Fulfillment tab from the left menu-bar, and enable Webhook.
Note: This requires as active billing account to be set up and attached to your project. If this has not been done, see Cloud Billing for more information

Once Webhook is enabled, set the URL to your endpoint's URL, with the necessary authentication (headers, etc) such that DialogFlow's POST request would be accepted by the endpoint

Setting Up Your Intents
In my last post, I went through setting up an intent to capture user data, specifically the type of coffee and type of milk desired. Now we enable fulfillment for the specific intent which you set up slot-filling for. To do this, navigate to the Intents page using the left menu-bar in DialogFlow console, and select your desired intent.
Note, Fulfillment is usually hidden by default, click the arrow next to the section to expand the options

Navigate to the bottom of the page, and enable both options under 'Fulfillment'
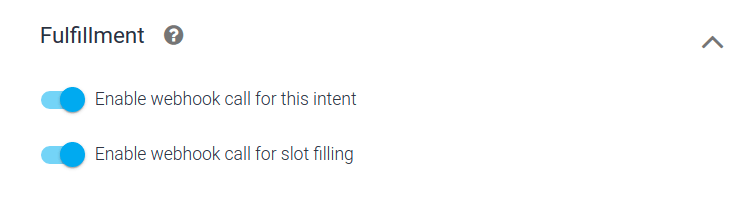
And that's it! Whenever your intents are matched and slot-filling is done, DialogFlow submits a POST request to your webhook with the paramter values matched by the intent. Now your endpoint will receive new orders as customers order, and you will be able to view it in whichever you prefer.
Navigate to the bottom of the page, and enable both options under 'Fulfillment'


Latest comments (0)