
Thanks to Mudassar Iqbal de Pixabay for the illustration image
In this article, I describe how you can build and host a full website on your own server. The website is composed of an Angular SPA for the front part and an ASP.NET web API for the backend. Everything is described from A to Z and you can find a full working example on my github repository.
If you already know how to setup a SPA with a backend API, feel free to skip the first sections and go directly to Deploy to production.
Prerequisites
- Angular CLI
- ASP.NET (5+ or core) SDK
- A machine with Linux installed (WSL should be OK but not tested)
- NGINX
- VSCode
You can use whatever version of Angular and .NET core you prefer. You could also scaffold a React web site with a GO backend if you wish. The website and API we'll build are just here for the sake of the demonstration.
Web API
First we need a backend. Let's create a new ASP.NET web api.
$ mkdir webapi
$ cd webapi
$ dotnet new webapi
Let's build and run it.
$ dotnet build
$ dotnet run
Open a web browser and navigate to https://localhost:5001/weatherforecast. You should see a JSON result similar to:
[{"date":"2021-09-26T10:15:16.6511246+02:00","temperatureC":-7,"temperatureF":20,"summary":"Mild"},{"date":"2021-09-27T10:15:16.6512592+02:00","temperatureC":41,"temperatureF":105,"summary":"Freezing"},{"date":"2021-09-28T10:15:16.6512606+02:00","temperatureC":29,"temperatureF":84,"summary":"Scorching"},{"date":"2021-09-29T10:15:16.6512609+02:00","temperatureC":-17,"temperatureF":2,"summary":"Hot"},{"date":"2021-09-30T10:15:16.6512612+02:00","temperatureC":-14,"temperatureF":7,"summary":"Bracing"}]
Dotnet automatically created a controller which returns fake data for us, perfect!
We need a little modification here: for the reverse proxy to be able to distinguish requests intended for the back from requests intended for the front, let's add an "api" segment in the route. Open the project with VSCode:
$ code .
Find WeatherForecastController.cs file and change the route like this:
[Route("api/[controller]")]
Now the route to weather forecast is https://localhost:5001/api/weatherforecast
We need one last modification: in the final version of the website, front and back will be served from the same URL thanks to the reverse proxy. But during the development phase, the backend will be served on port 5001 and the front on port 4200. This will endup with a CORS error.
Access to XMLHttpRequest at 'https://localhost:5001/api/weatherforecast' from origin 'http://localhost:4200' has been blocked by CORS policy: No 'Access-Control-Allow-Origin' header is present on the requested resource.
So, in order to be able to debug our website locally we need to add CORS headers on the backend side. Hopefully, .NET has a middleware which permits to do it easily. Open the Startup class and add the following at the beginning of ConfigureServices method:
#if DEBUG
    services.AddCors(options =>
    {
        options.AddPolicy("corsPolicy", builder =>
        {
            builder.AllowAnyHeader();
            builder.AllowAnyMethod();
            builder.AllowAnyOrigin();
        });
    });
#endif
The code above registers the CORS middleware and create a policy called "corsPolicy". Now it is registered we can add it to the pipeline. Open the Configure method and add:
app.UseCors("corsPolicy");
Allowing anything could be dangerous, so don't use this configuration in production. You should only allow trusted origins in production. Note the
#ifpragma which I use to add CORS middleware only in DEBUG configuration.
That's it for the API, now let's build the website.
Website
Let's quickly scaffold a new SPA thank to Angular CLI.
$ ng new website
Here we tell Angular to create a new application called "website".
Follow the instructions and wait for Angular to scaffold the website for you.
? Do you want to enforce stricter type checking and stricter bundle budgets in the workspace?
  This setting helps improve maintainability and catch bugs ahead of time.
  For more information, see https://angular.io/strict Yes
? Would you like to add Angular routing? No
? Which stylesheet format would you like to use? SCSS   [ https://sass-lang.com/documentation/syntax#scss
 ]
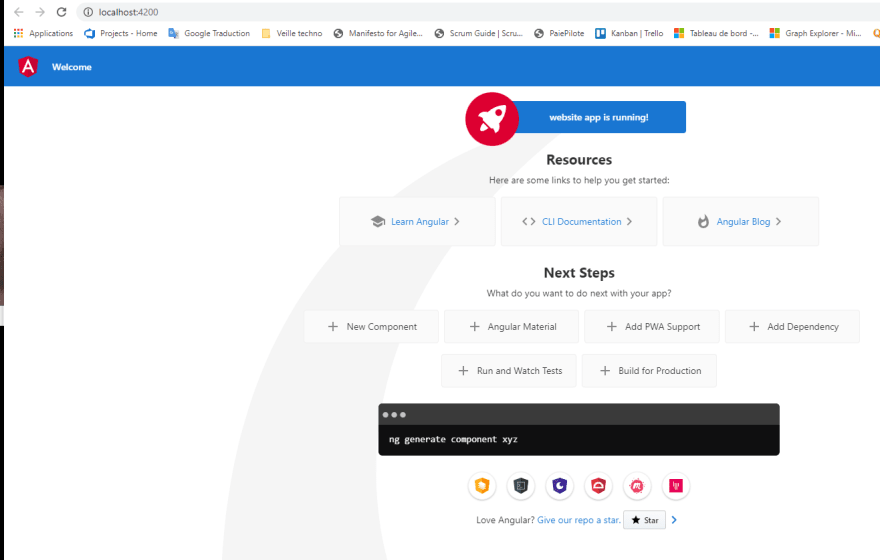
Once finished, build the website and launch it to ensure it works.
$ cd website
$ npm install
$ ng build
$ ng serve -o
You should see a page similar to this one:
Now we want our website to call the web API and show the weather forecast. First we need a new constant to store the backend URL. Open environment.ts and add the following:
export const environment = {
  production: false,
  baseUrl: 'https://localhost:5001'
};
Also add baseUrl to environment.prod.ts but keep it empty for now.
We will need the HttpClientModule to call the backend so let's add it. Open app.module.ts and add the import:
import { HttpClientModule } from '@angular/common/http'
Don't forget to register it in the imports section:
imports: [
    BrowserModule,
    HttpClientModule
  ],
Open app.component.ts and modify the content like this:
import { HttpClient } from '@angular/common/http';
import { Component, OnInit } from '@angular/core';
import { environment } from 'src/environments/environment';

@Component({
  selector: 'app-root',
  templateUrl: './app.component.html',
  styleUrls: ['./app.component.scss']
})
export class AppComponent implements OnInit {
  forecasts: any;

  constructor(private http: HttpClient) { }

  ngOnInit(): void {
    this.http.get(environment.baseUrl + '/api/weatherforecast')
      .subscribe(data => this.forecasts = data);
  }
}
Finally, open app.component.html, drop all its content and replace it with:
<div *ngFor="let forecast of forecasts">
 <h1>{{ forecast.date | date }}</h1>
 <h2>{{ forecast.summary }}</h2>
 <h3>{{ forecast.temperatureC }} celcius degrees</h3>
</div>
Yeah, that's ugly I know, but making a beautiful front is not the purpose of this article. It is just for the sake of the demonstration :)
Deploy to production
Now that we have a "beautiful" website, we're so proud of it that we want to put it on production. So people everywhere in the world could view it. And because we can publish and host it on our own, why wouldn't we do it? So let's start.
Firstly, we'll need a machine with Linux installed on it. If you don't have a machine with Linux on it and don't have time to install one, don't worry: you can install a linux distro directly on windows and leverage Windows Subsystem for Linux. I didn't tested it but that theoretically should work as well. Personally I'm going to host the website on my Raspberry Pi 3 (Debian Stretch).
Create a domain name
In order to make your website easily accessible, you'll need a domain name. It will be very more convenient than typing the public IP address of you server. Moreover, there will be a single static entry point for your website. If your IP address change you'll just have to update it on the DNS et voilà. But it is preferable to request a static IP if you can.
There are plenty of domain name providers, some paid, other free. Choose the one you prefer. Personally I'm going to use Duck DNS.
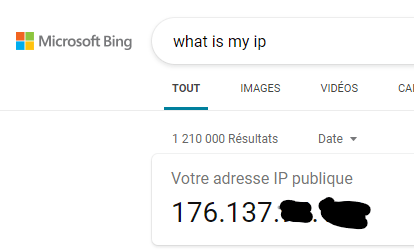
The setup is pretty easy. First you need to get your public IP. You can grab it very easily, just type "what is my ip" on Microsoft Bing.
Note your public IP and go to Duck DNS. You need to create a free account if you don't have one yet. Choose a domain name, type it and click "add domain".
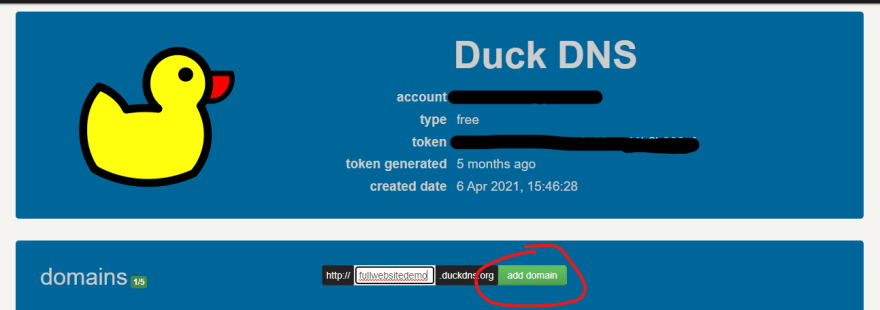
Then enter your IP address and click "update ip".

Bind you public IP to the local IP of your server
Now every request sent to <your_domain>.duckdns.org will be routed to your public IP address, but there is still a missing piece : you didn't tell your router where to redirect the TCP stream. So the packets are lost because your router do not know where to reroute them.
This part is maybe the trickier one because the setup depends on your internet provider and local network configuration tool supplied by him. So I can't tell you the detailed steps for your specific case. You have to find where to create port redirection rules, also known as "NAT & PAT".
Once you found it, create two rules:
1) One to redirect port 443 from public IP to port 443 on the local server IP (the one that'll host the website, raspberry PI in my case)
2) Another one to redirect port 80 from public IP to port 80 on the same local server. This second one will be useful to automatically setup SSL using Certbot.

Build and publish the web api
Return to webapi folder and type:
$ dotnet publish --configuration=Release
Go to /bin/Release/net5.0/publish/ and copy every files from there to the destination server. You can use ssh and scp for example:
$ ssh pi@192.168.1.25 mkdir /home/pi/fullwebsitedemo-api
$ scp -r ./bin/Release/net5.0/publish/* pi@192.168.1.25:/home/pi/fullwebsitedemo-api/
Microsoft.OpenApi.dll                                                                 100%  170KB   4.2MB/s   00:00
Swashbuckle.AspNetCore.Swagger.dll                                                    100%   16KB 937.5KB/s   00:00
Swashbuckle.AspNetCore.SwaggerGen.dll                                                 100%   79KB   1.6MB/s   00:00
Swashbuckle.AspNetCore.SwaggerUI.dll                                                  100% 3231KB   5.1MB/s   00:00
appsettings.Development.json                                                          100%  162    10.0KB/s   00:00
appsettings.json                                                                      100%  192    12.0KB/s   00:00
web.config                                                                            100%  492    23.7KB/s   00:00
webapi.deps.json                                                                      100%  109KB   2.0MB/s   00:00
webapi.dll                                                                            100%   11KB 609.2KB/s   00:00
webapi.exe                                                                            100%  123KB   2.2MB/s   00:00
webapi.pdb                                                                            100%   20KB   1.1MB/s   00:00
webapi.runtimeconfig.json                                                             100%  304    29.6KB/s   00:00
You can create an RSA key pair and use -i flag instead of typing your password, but it is beyond the scope of this article.
Now that binaries are on the server, we can serve them using Kestrel. The first step is to install .NET5 runtime because it is not installed by default on Debian Stretch. It is pretty straightforward, simply follow the instructions here. You don't need to install the SDK. Unless you plan to compile on the server, the runtime is sufficient.
Next we'll use systemd to create and manage the service, so it will be automatically run at startup and restarted in case of failure.
Create a file named fullwebsitedemo-api.service in your home folder and put this inside:
[Unit]
Description=Full website demo API
After=network-online.target

[Service]
WorkingDirectory=/home/pi/fullwebsitedemo-api
ExecStart=/home/pi/dotnet/dotnet /home/pi/fullwebsitedemo-api/webapi.dll
Restart=always
RestartSec=30
SyslogIdentifier=fullwebsitedemo-api
User=pi
Environment=ASPNETCORE_ENVIRONMENT=Production
Environment=ASPNETCORE_URLS=http://0.0.0.0:5002

[Install]
WantedBy=multi-user.target
I'm using port 5002 because I already have another application listening on port 5000 on my Raspberry. You can use any port as soon as it is free and not reserved.
Install and start the service with these commands:
$ sudo systemctl enable /home/pi/fullwebsitedemo-api.service
$ sudo systemctl start fullwebsitedemo-api
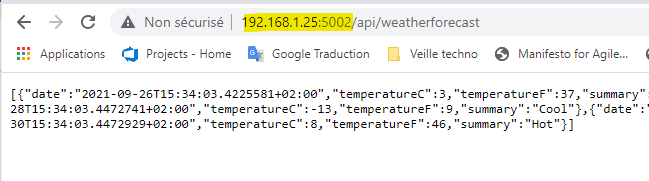
To make sure the web api is responding correctly you can test it from the web browser:
http://<local_server_ip>:5002/api/weatherforecast
Build and publish the frontend
Remember the baseUrl constant in our environment.prod.ts file? We left it empty because we didn't had a domain name yet. Now we have to set it before publication. Open the file and fill baseUrl:
export const environment = {
  production: true,
  baseUrl: 'https://<your_domain>.duckdns.org'
};
Then go to website directory and build the application:
$ ng build --prod
And copy files from dist folder to fullwebsitedemo folder on the server:
$ ssh pi@192.168.1.25 mkdir /home/pi/fullwebsitedemo
$ scp -r ./dist/* pi@192.168.1.25:/home/pi/fullwebsitedemo/
Setup NGINX
We are now ready to setup NGINX to serve our website. NGINX will have a few responsibilities:
1) It will serve static files of the frontend and redirect automatically to index.html when a page is not found, ensuring the SPA will work well and refresh correctly (F5).
2) It will act as a reverse proxy allowing us to have only one domain name and a single SSL certificate for both frontend and backend. And moreover: no more CORS issues.
3) It will load the SSL certificate allowing website to work properly over HTTPS.
4) It will enforce SSL by redirecting HTTP to HTTPS automatically.
First you need to install NGINX. Follow the instructions depending on your Linux distro.
Once installed, open nginx.conf file:
$ sudo nano /etc/nginx/nginx.conf
Inside the http section, add a first server section that'll handle SSL redirection:
# ssl redirection
server {
    listen 80 default_server;
    server_name fullwebsitedemo.duckdns.org;
    return 301 https://$host$request_uri;
}
Add a second server section that'll configure the reverse proxy:
server {
    server_name fullwebsitedemo.duckdns.org;

    # reroute "api" segment to asp.net webapi hosted by Kestrel
    location /api {
        proxy_pass http://localhost:5002;
        proxy_set_header Host $host;
    }

    # serve static files of the SPA
    location / {
        root /home/pi/fullwebsitedemo/website;
        try_files $uri $uri/ /index.html;
        index index.html;
    }
}
Save and close nginx.conf.
Remove the default nginx website otherwise it will conflict with the new default_server you've just defined.
$ rm -f /etc/nginx/sites-enabled/default
Don't be afraid of hardly removing it. There is a copy under
/etc/nginx/sites-available.
Setup SSL
The last step is to install an SSL certificate to allow secure (encrypted) communication over HTTPS. It is absolutely mandatory if you want your website to provide some advanced features such as push notifications. Hopefully we can obtain a free SSL certificate thanks to Let's encrypt and set it up automatically thanks to Certbot.
First install Certbot
Certbot will temporarily rewrite nginx.conf to serve a file containing random data (acme challenge) in order to prove you are in control of the domain name for which you want to obtain a certificate. This file will be served statically on http port 80, that's why we had to create a NAT rule above in this article.
When there is no more doubt on the fact you are the owner of the domain, an SSL certificate is issued for your domain name and installed on the server. nginx.conf is automatically modified to load the certificate associated with your website.
Finally restart NGINX:
$ sudo systemctl restart nginx
And after a few seconds your website is up with SSL.

Automatic certificate renewal
Let's encrypt certificate is free but it is valid for only 3 months. So you have to renew it quite regularly if you don't want to encounter issues with your website.
Manually renew each 3 months can be boring and there is a risk of human error with every manual operation.
So there is an ultimate step if you don't want to bother with renewal: automate it. The simpler way to do it is by creating a CRON task.
$ sudo crontab -e
Add the following line at the end of the file:
3 3 * * * certbot renew
With the line above, the command certbot renew will be executed every day at 03:03 AM. If the certificate is about to expire, then a new one will be issued and installed. If not, the command will just do nothing.
Conclusion
If you've made it this far, you should have a better understanding of NGINX, SSL and Certbot. If you have questions, see some mistakes or have any remarks or suggestions, please comment bellow. I hope you've found this article useful and I thank you for reading it.
You can find the full working example at https://github.com/bNobo/FullWebsiteDemo.


Top comments (0)